Follow My Blog Post Setup Docs
“Follow My Blog Post Setup Docs” Documentation by “WPWeb”- Introduction
- Installing the Plugin
- The Plugin Settings
- Adding a widget
- Post Meta Box Settings
- Viewing Followed Posts and Followers
- Viewing Followed Terms and Followers
- Viewing Followed Authors and Followers
- Send Emails
- Add Followers
- Adding a Shortcode
- Frontend Behavior
- Functions Reference
- Template Structure
- Minimum Requirements
- Follow My Blog Post Demo
- Documentation
- Follow My Blog Post
- Setup Docs
Introduction
Follow My Blog Post plugin allows your visitors to follow changes on your site for particular post, page, category, tags, authors etc.
Features:
- Visitors can opt to follow the post, page, category, tags, authors etc with or without creating a user account.
- Visitors can unfollow any post, page, category, tags, authors etc at any time using a link from email or from website via unfollow button.
- Followed posts displayed with number of unique visitors following the post.
- Administrative panel to view page/post wise followers, Terms wise followers and Authors wise followers with option to disable the follow for any follower.
- Ability to send confirmation email for the actions like subscription and unsubscription.
- Ability to send email notifications for any new post added in defined category or tags, edit any post/page or comment added on any post.
- Each post, page, or custom post type on your blog have individual settings in Metabox to disable follow button or disable Email notification for particular post and have options to set different email template for new post, edit post and comment notification.
- Includes shortcodes to add "follow post button", "follow terms button" or "follow authors button" on any page or post at any position.
- Logged In users would have a page where they can see all the posts/pages they follow, all the terms they follow and all the authors they follow with the option to unfollow button.
- Works for any post, page or custom post type and for any category, tags or any custom taxonomies created on your site.
- Ability to send Custom emails to Followers of posts/pages, Terms or Authors.
- Works for any E-commerce plugins like WooCommerce, WP eCommerce, Easy Digital Downloads or Jigoshop.
- Added support to work with FES extension of Easy Digital Downloads.
- 100% multilanguage - Follow My Blog Post is completely translatable both in front and back-end.
Installing the Plugin
- The installation of the plugin is just like any other plugin installation for WordPress. Login to your WordPress site and go to Plugins > Add New.
- At the Install Plugins Page click on Upload from the top navigation and then click on browse.
- Go to the location on your computer where you saved the downloaded plugin zip file and upload this zipped file. You need to unzip the file first to get the plugin zip file.
- Now click on Install Now.
- Wait until WordPress has uploaded the file. If it's done click on Activate Plugin.
- Now you should see a message 'Plugin activated' at the top of the window.
After you successfully installed the plugin you will see a new Admin Menu on the left hand side. It's called Follow My Blog Post. Click on the submenu page "settings" to get to the Settings Page which should look like in the image below.
The Plugin Settings
General Settings

Delete Options
If you don't want to use the Follow My Blog Post Plugin on your site anymore, you can check that box. This makes sure, that all the settings and tables are being deleted from the database when you deactivate the plugin.
Disable Guest Followers
Guests (non-logged-in users) have the permission to follow any post by default. If you check this option, then Follow button would not be displayed for Guest users.
Enable Email Logs
Check this box if you want to log all emails into database. Enabling this will add a new column on followers listing page to view the log entries.
Note: It is not recommended to enable this option, as this will slow down the plugin.
Disable Follow My Blog Post Settings Meta Box
If you check this box, Follow My Blog Post Settings Meta Box will not be displyed on selected post types.
Auto Enable Notify Followers
Check this box to automatically enable "Notify followers for this update" for all Pots / Pages / Custom post types.
Posts Follow Settings
Follow Button Text
Enter Follow, Following and Unfollow button text respectively. Default button text are Follow, Following and Unfollow respectively.
Follow : When user is not following post.
Following : When user is following the post.
Unfollow : When user is following the post and mouse over the button.
Followers Counter Message
Here you can give the custom message to show followers count for Post / Page. Leave it blank to hide the followers counter.
You can customize this content for your needs. The template tag will then be replaced with the related information. The available tag is:
{followers_count} - Displays the followers count.
Follow Button Location
Select the location where you want the follow button being displayed. You can also use the following shortcode to insert the follow / unfollow button in to your posts/pages: [wpw_follow_me].
Follow Button Position
Select the position where you want the follow button being displayed.
Enable Follow Button On
Check each of the post types on which you want the follow button being displayed.
You will see a list of all available content types from your site. If you click on the checkbox beside a content type, this means that all content of this type will have the follow button added automatically. Click on "choose individual entries" and a pop up window will appear from which you can select individual posts on which you want to have the follow button being added.
Terms Follow Settings
Follow Button Text
Enter Follow, Following and Unfollow button text respectively. Default button text are Follow, Following and Unfollow respectively.
Follow : When user is not following post.
Following : When user is following the post.
Unfollow : When user is following the post and mouse over the button.
You can customize this content for your needs. The template tag will then be replaced with the related information. The available tag is:
{term_name} - Displays the title of the term.
Followers Counter Message
Here you can give the custom message to show followers count for Terms. Leave it blank to hide the followers counter.
You can customize this content for your needs. The template tag will then be replaced with the related information. The available tag is:
{followers_count} - Displays the followers count.
Authors Follow Settings
Follow Button Text
Enter Follow, Following and Unfollow button text respectively. Default button text are Follow, Following and Unfollow respectively.
Follow : When user is not following post.
Following : When user is following the post.
Unfollow : When user is following the post and mouse over the button.
You can customize this content for your needs. The template tag will then be replaced with the related information. The available tag is:
{author_name} - Displays the name of the author.
Followers Counter Message
Here you can give the custom message to show followers count for Authors. Leave it blank to hide the followers counter.
You can customize this content for your needs. The template tag will then be replaced with the related information. The available tag is:
{followers_count} - Displays the followers count.
Pages Settings
Subscription Manage Page
This is subscription manage page which shows followed posts list, followed terms list and followed authors list to user.
Unsubscription Manage Page
This is unsubscription manage page which contains the form to unsubscribe the email address for the users.
Misc Settings
Add support to work with thirdparty plugins
Check this box if you wanted to allow to send notifications to all followers when any page/post created from frontside from any thirdparty plugins.
Custom CSS
Here you can enter your custom css for the follow my blog post. The css will automatically added to the header, when you save it.
Notification Settings
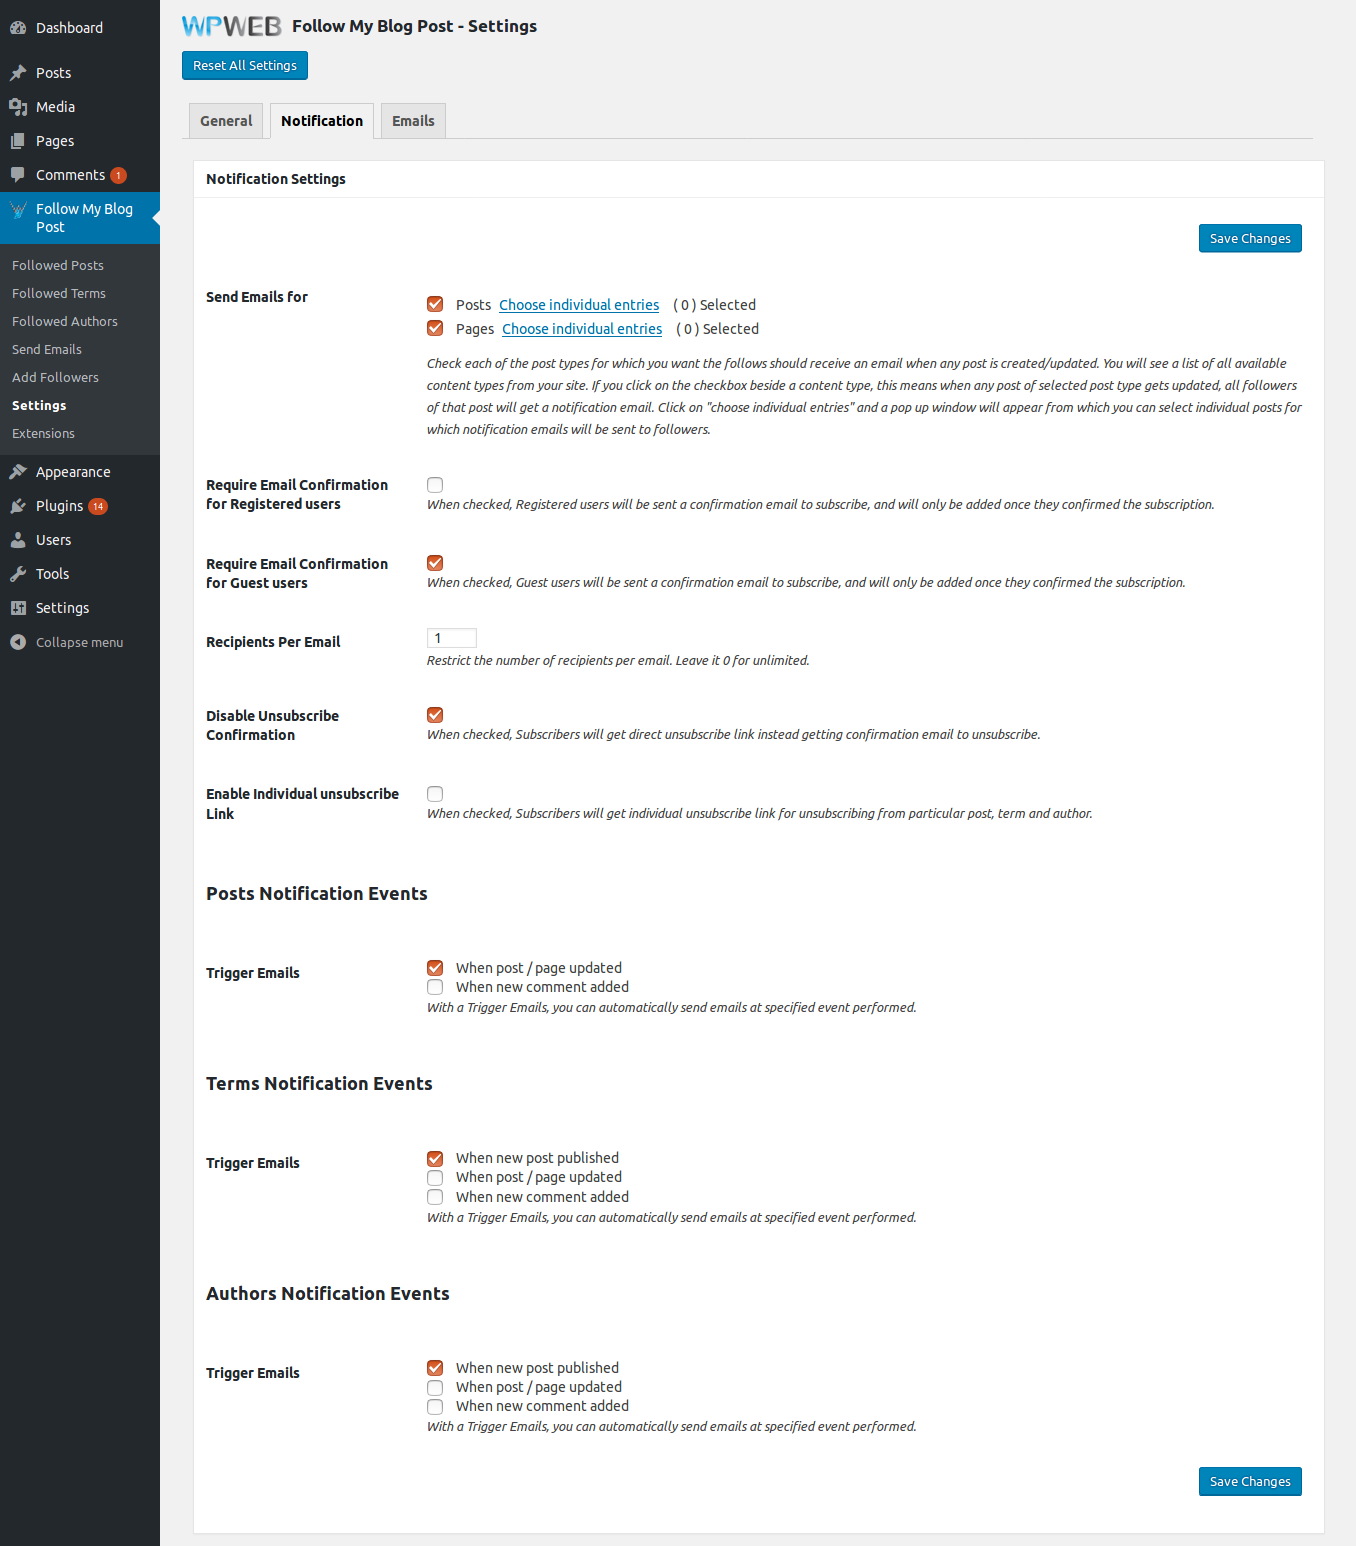
Send Emails for
Check each of the post types for which you want the follows should receive an emails when any post is created/updated. You will see a list of all available content types from your site. If you click on the checkbox beside a content type, this means when any post of selected post type gets updated, all followers of that post will get an notification email. Click on "choose individual entries" and a pop up window will appear from which you can select individual posts for which notification emails will be send to followers.
Require Email Confirmation for Registered users
When checked, Registered users will be sent a confirmation email to subscribe, and will only be added once they confirmed the subscription.
Require Email Confirmation for Guest users
When checked, Guest users will be sent a confirmation email to subscribe, and will only be added once they confirmed the subscription.
Recipients Per Email
Restrict the number of recipients per email. Leave it 0 for unlimited.
Note : Now all emails will get sent to followers as "bcc:" instead of "to:" to make the process faster of sending emails. Although if you want to send emails to each user uniquely as "to:" then set Recipients Per Email equals to 1.
Disable Unsubscribe Confirmation
When checked, Subscribers will get direct unsubscribe link instead getting confirmation email to unsubscribe.
Note : This option will only be displayed when Recipients Per Email set as 1.
Enable Individual unsubscribe Link
When checked, Subscribers will get individual unsubscribe link for unsubscribing from particular post, term and author.
Note : This option will only be displayed when Recipients Per Email set as 1 and Disable Unsubscribe Confirmation is checked.
Posts Notification Events
Trigger Emails
With an Trigger Emails, you can automatically send emails at specified event performed.
These are the events for Trigger Emails.
- When post / page updated : When any post or page updated, all the followers of that post will get an email notification for that.
- When new comment added : When any new comment added (approved) on any post, all the followers of that post will get an email notification for that.
Note: comment added means when comment get approved. If comments directly added in "Approved" status then email will get fired immediately else email will be fired when comment get approved by the admin.
Terms Notification Events
Trigger Emails
With an Trigger Emails, you can automatically send emails at specified event performed.
These are the events for Trigger Emails.
- When new post published : When any new post published, all the followers of that terms which is selected in that post will get an email notification for that.
- When post / page updated : When any post or page updated, all the followers of that terms which is selected in that post will get an email notification for that.
- When new comment added : When any new comment added (approved) on any post, all the followers of that terms which is selected in that post will get an email notification for that.
Note: comment added means when comment get approved. If comments directly added in "Approved" status then email will get fired immediately else email will be fired when comment get approved by the admin.
Authors Notification Events
Trigger Emails
With an Trigger Emails, you can automatically send emails at specified event performed.
These are the events for Trigger Emails.
- When new post published : When any new post published, all the followers of the author of that post will get an email notification for that.
- When post / page updated : When any post or page updated, all the followers of the author of that post will get an email notification for that.
- When new comment added : When any new comment added (approved) on any post, all the followers of the author of that post will get an email notification for that.
Note: comment added means when comment get approved. If comments directly added in "Approved" status then email will get fired immediately else email will be fired when comment get approved by the admin.
Email Settings

Email Template
Choose a template and Choose "Preview Test Email" to see the email template.
From Email Address
Example: Your Name <sales@yourdomain.com>. These are the name and email address used as a from to followers emails. The email address is also being used as the "Reply To" email address when users send an email back.
Add Unsubscribe link to email Message
When checked, Unsubscribe link with below custom message will be added to each subscription email Message.
Unsubscribe Message
Enter the custom Unsubscribe Message. Available template tags for unsubscribe message fields are :
{unsubscribe_url} - displays the unsubscribe url for unsubscribe email.
Edit Post Subscription Email Template
Email Subject
This is the subject of the email that will be sent to the followers of that post when post is updated. Available template tags for subject fields are :
{post_name}- displays the title of the post{site_name}- displays the name of your site
Email Body
This is the body, main content of the email that will be sent to the followers of that post when post is updated. You can customize this content for your needs. There are also several template tags you can use within email content. The template tags will then be replaced with the related information.
The available tags are:
{post_name}- displays the title of the post{post_link}- displays the post title with link{site_name}- displays the name of your site{site_link}- displays the site name with link
New Post Term Subscription Email Template
Email Subject
This is the subject of the email that will be sent to the followers of the selected terms when new post published. Available template tags for subject fields are :
{post_name}- displays the title of the post{site_name}- displays the name of your site
Email Body
This is the body, main content of the email that will be sent to the followers of the selected terms when new post published. You can customize this content for your needs. There are also several template tags you can use within email content. The template tags will then be replaced with the related information.
The available tags are:
{post_name}- displays the title of the post{post_link}- displays the post title with link{post_description}- displays the description of the post{term_name}- displays the title of the term{taxonomy_name}- displays the title of the taxonomy{site_name}- displays the name of your site{site_link}- displays the site name with link
New Post Author Subscription Email Template
Email Subject
This is the subject of the email that will be sent to the all followers of the author of that new post when new post published. Available template tags for subject fields are :
{post_name}- displays the title of the post{site_name}- displays the name of your site
Email Body
This is the body, main content of the email that will be sent to the all followers of the author of that new post when new post published. You can customize this content for your needs. There are also several template tags you can use within email content. The template tags will then be replaced with the related information.
The available tags are:
{post_name}- displays the title of the post{post_link}- displays the post title with link{post_description}- displays the description of the post{author_name}- displays the name of the author{site_name}- displays the name of your site{site_link}- displays the site name with link
Comment Subscription Email Template
Email Subject
This is the subject of the email that will be sent to the followers when comment is added and get approved. Available template tags for subject fields are :
{post_name}- displays the title of the post{user_name}- displays the user name
Email Body
This is the body, main content of the email that will be sent to the followers when comment is added and get approved. You can customize this content for your needs. There are also several template tags you can use within email content. The template tags will then be replaced with the related information.
The available tags are:
{post_name}- displays the title of the post{site_name}- displays the name of your site{user_name}- displays the user name{comment_text}- displays the comment text of the post
Posts Confirmation Email Template
Email Subject
This is the subject of the email that will be sent to the user for confirming his email address for subscription for post / page. Available template tags for subject fields are :
{post_name}- displays the title of the post{site_name}- displays the name of your site
Email Body
This is the body, main content of the email that will be sent to the user for confirming his email address for subscription for post / page. You can customize this content for your needs. There are also several template tags you can use within email content. The template tags will then be replaced with the related information.
The available tags are:
{post_name}- displays the title of the post{post_link}- displays the post title with link{site_name}- displays the name of your site{site_link}- displays the site name with link{subscribe_url}- displays the subscribe url for confirm email subscription
Terms Confirmation Email Template
Email Subject
This is the subject of the email that will be sent to the user for confirming his email address for subscription of any terms. Available template tags for subject fields are :
{term_name}- displays the title of the term{site_name}- displays the name of your site
Email Body
This is the body, main content of the email that will be sent to the user for confirming his email address for subscription of any terms. You can customize this content for your needs. There are also several template tags you can use within email content. The template tags will then be replaced with the related information.
The available tags are:
{term_name}- displays the title of the term{taxonomy_name}- displays the title of the taxonomy{site_name}- displays the name of your site{site_link}- displays the site name with link{subscribe_url}- displays the subscribe url for confirm email subscription
Authors Confirmation Email Template
Email Subject
This is the subject of the email that will be sent to the user for confirming his email address for subscription of any authors. Available template tags for subject fields are :
{author_name}- displays the name of the author{site_name}- displays the name of your site
Email Body
This is the body, main content of the email that will be sent to the user for confirming his email address for subscription of any authors. You can customize this content for your needs. There are also several template tags you can use within email content. The template tags will then be replaced with the related information.
The available tags are:
{author_name}- displays the name of the author{site_name}- displays the name of your site{site_link}- displays the site name with link{subscribe_url}- displays the subscribe url for confirm email subscription
Unsubscribe Confirmation Email Template
Email Subject
This is the subject of the email that will be sent to the user for confirming his email address for unsubscription. Available template tags for subject fields are :
{email}- displays the followers email{site_name}- displays the name of your site
Email Body
This is the body, main content of the email that will be sent to the user for confirming his email address for unsubscription. The available tags are:
{email}- displays the followers email{site_name}- displays the name of your site{site_link}- displays the site name with link{confirm_url}- displays the confirm url for confirm email unsubscription.
Adding a widget
Follow Post Button
If you want to attach a widget that shows follow button to follow post, enter the administrator panel, then go to Appearance and click Widgets.
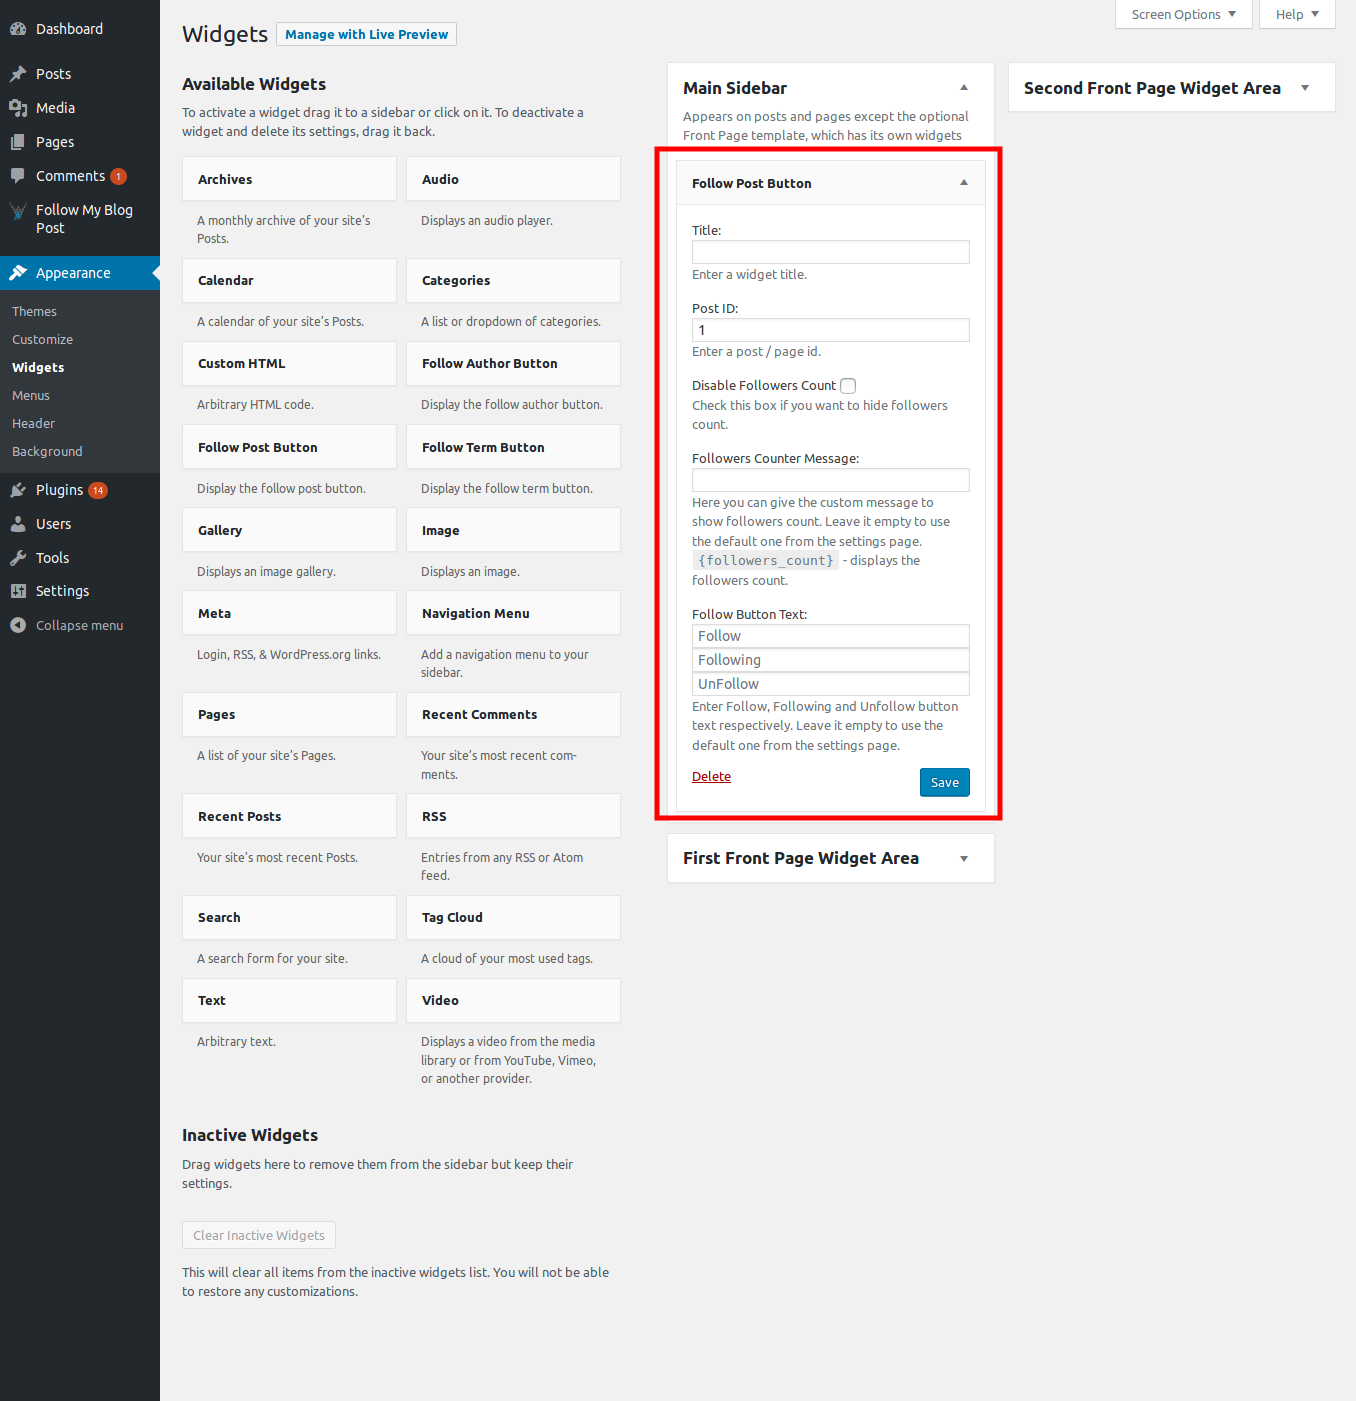
Find the "Follow Post Button" widget and drag it to your desired place.
Follow Post Button
Title
Enter a widget title (this will appear above the follow button).
Post ID
Enter a post / page id (If you want to follow specific post / page then enter id of that post / page).
Disable Followers Count
Check this box if you want to hide followers count.
Followers Counter Message
Here you can give the custom message to show followers count. Leave it empty to use the default one from the settings page.
{followers_count} - displays the followers count.
Follow Button Text
Enter Follow, Following and Unfollow button text respectively. Leave it empty to use the default one from the settings page.
Follow Button Frontend
After you setup the widget, Widget will look something like one shown in the image below on frontend.

Follow Term Button
If you want to attach a widget that shows follow button to follow term, enter the administrator panel, then go to Appearance and click Widgets.
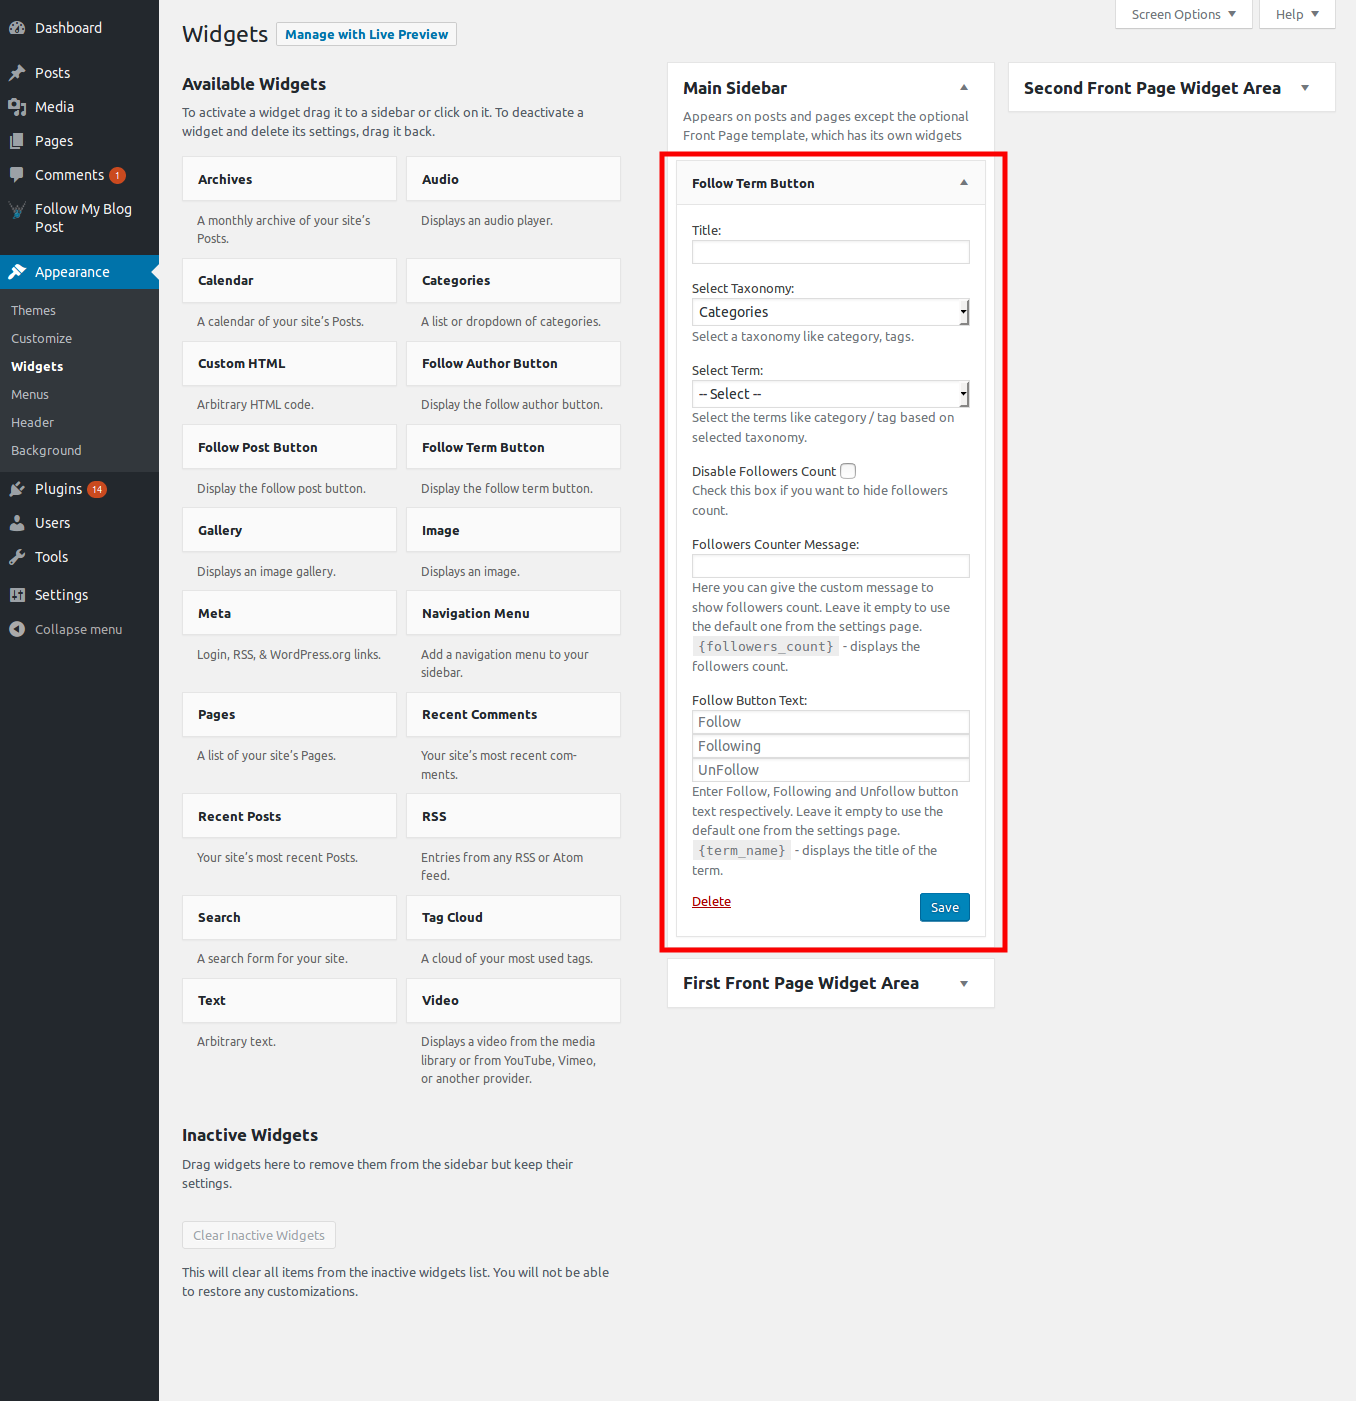
Find the "Follow Term Button" widget and drag it to your desired place.
Follow Term Button
Title
Enter a widget title (this will appear above the follow button).
Select Taxonomy
Select a taxonomy like category, tags.
Select Term
Select the terms like category / tag based on selected taxonomy.
Disable Followers Count
Check this box if you want to hide followers count.
Followers Counter Message
Here you can give the custom message to show followers count. Leave it empty to use the default one from the settings page.
{followers_count} - displays the followers count.
Follow Button Text
Enter Follow, Following and Unfollow button text respectively. Leave it empty to use the default one from the settings page.
{term_name} - displays the title of the term.
Follow Button Frontend
After you setup the widget, Widget will look something like one shown in the image below on frontend.

Follow Author Button
If you want to attach a widget that shows follow button to follow author, enter the administrator panel, then go to Appearance and click Widgets.
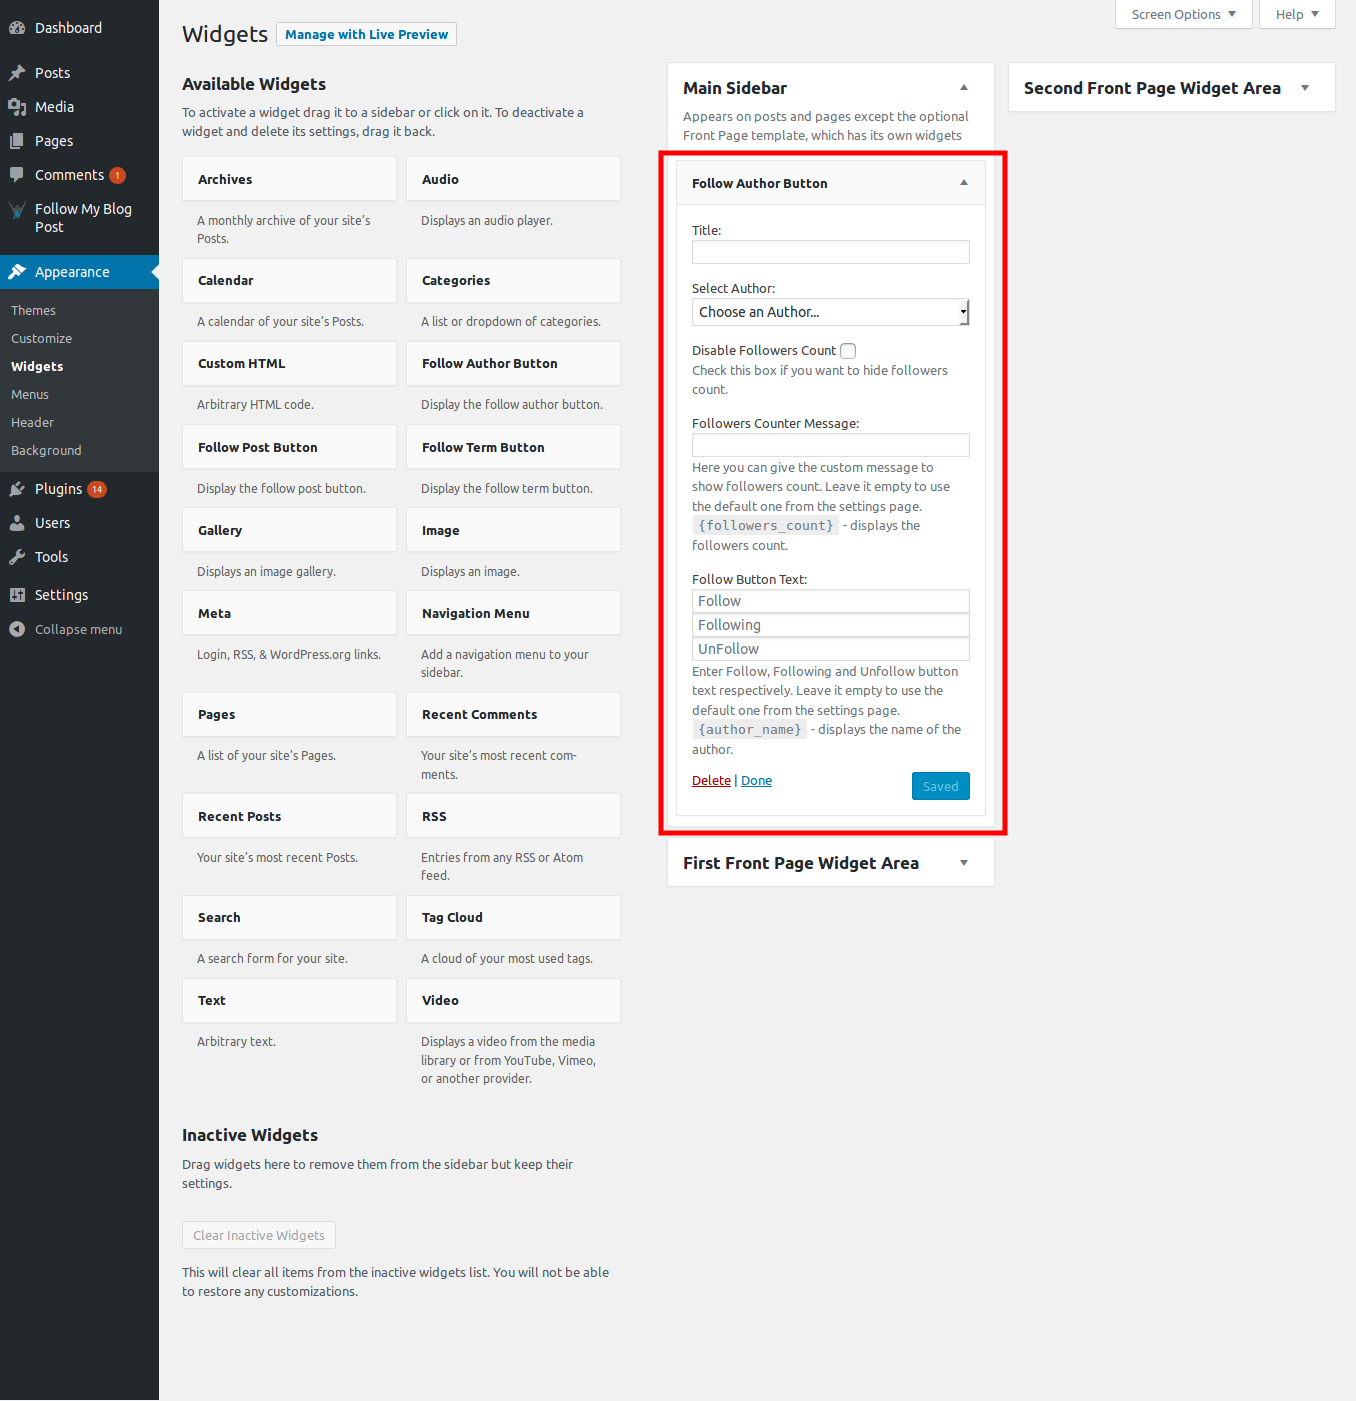
Find the "Follow Author Button" widget and drag it to your desired place.
Follow Author Button
Title
Enter a widget title (this will appear above the follow button).
Select Author
Select a author (If you want to follow specific author then select that author).
Disable Followers Count
Check this box if you want to hide followers count.
Followers Counter Message
Here you can give the custom message to show followers count. Leave it empty to use the default one from the settings page.
{followers_count} - displays the followers count.
Follow Button Text
Enter Follow, Following and Unfollow button text respectively. Leave it empty to use the default one from the settings page.
{author_name} - displays the name of the author.
Follow Button Frontend
After you setup the widget, Widget will look something like one shown in the image below on frontend.

Post Meta Box Settings
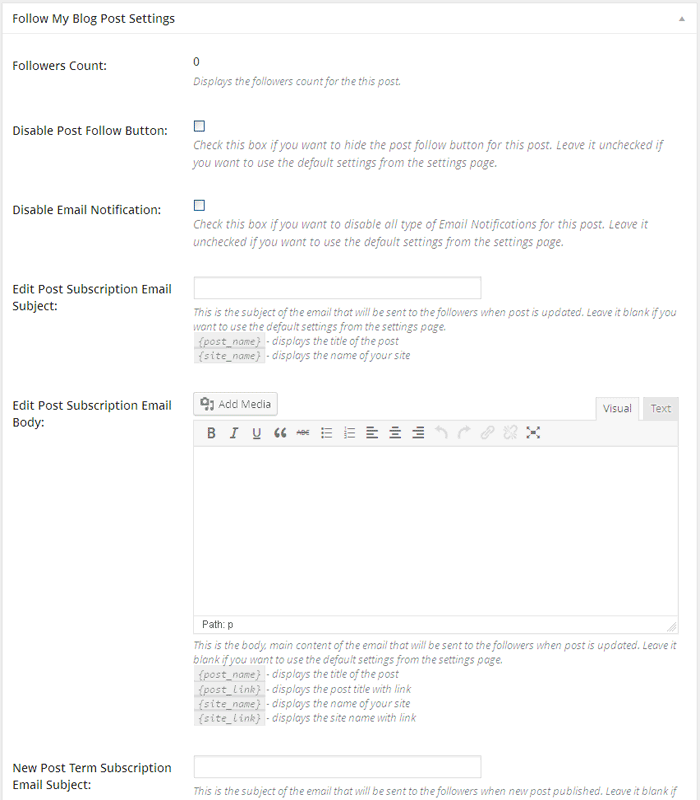
Followers Count
Displays the followers count for the this post.
Disable Post Follow Button
Check this box if you want to hide the post follow button for this post. Leave it unchecked if you want to use the default settings from the settings page.
Disable Email Notification
Check this box if you want to disable all type of Email Notifications for this post. Leave it unchecked if you want to use the default settings from the settings page.
Edit Post Subscription Email Subject
This is the subject of the email that will be sent to the followers when post is updated.It will override the global Email Subject setting. Available template tags for subject fields are :
{post_name}- displays the title of the post{site_name}- displays the name of your site
Edit Post Subscription Email Body
This is the body, main content of the email that will be sent to the followers when post is updated. It will override the global Email Body setting. You can customize this content for your needs. There are also several template tags you can use within email content. The template tags will then be replaced with the related information.
The available tags are:
{post_name}- displays the title of the post{post_link}- displays the post title with link{site_name}- displays the name of your site{site_link}- displays the site name with link
New Post Term Subscription Email Subject
This is the subject of the email that will be sent to the followers when new post published. It will override the global Email Subject setting. Available template tags for subject fields are :
{post_name}- displays the title of the post{site_name}- displays the name of your site
New Post Term Subscription Email Body
This is the body, main content of the email that will be sent to the followers when new post published. It will override the global Email Body setting. You can customize this content for your needs. There are also several template tags you can use within email content. The template tags will then be replaced with the related information.
The available tags are:
{post_name}- displays the title of the post{post_link}- displays the post title with link{post_description}- displays the description of the post{term_name}- displays the title of the term{taxonomy_name}- displays the title of the taxonomy{site_name}- displays the name of your site{site_link}- displays the site name with link
New Post Author Subscription Email Subject
This is the subject of the email that will be sent to the all followers of the author of that new post when new post published. It will override the global Email Subject setting. Available template tags for subject fields are :
{post_name}- displays the title of the post{site_name}- displays the name of your site
New Post Author Subscription Email Body
This is the body, main content of the email that will be sent to the all followers of the author of that new post when new post published. It will override the global Email Body setting. You can customize this content for your needs. There are also several template tags you can use within email content. The template tags will then be replaced with the related information.
The available tags are:
{post_name}- displays the title of the post{post_link}- displays the post title with link{post_description}- displays the description of the post{author_name}- displays the name of the author{site_name}- displays the name of your site{site_link}- displays the site name with link
Comment Subscription Email Subject
This is the subject of the email that will be sent to the followers when comment is added and get approved. It will override the global Email Subject setting. Available template tags for subject fields are :
{post_name}- displays the title of the post{user_name}- displays the user name
Comment Subscription Email Body
This is the body, main content of the email that will be sent to the followers when comment is added and get approved. It will override the global Email Body setting. You can customize this content for your needs. There are also several template tags you can use within email content. The template tags will then be replaced with the related information.
The available tags are:
{post_name}- displays the title of the post{site_name}- displays the name of your site{user_name}- displays the user name{comment_text}- displays the comment text of the post
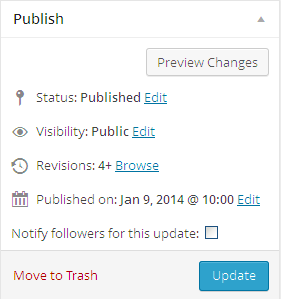
Notify followers for this update
Check this box when you want to send the Email notification to your followers for Edit post.
Note: This option will only be displayed if you have checked global setting of Trigger Emails for "When post / page updated."
Viewing Followed Posts and Followers
A list of all followed post is kept and available for viewing from Follow My Blog Post > Followed Posts.
You can export post followers by clicking on "Export All Followers" button.
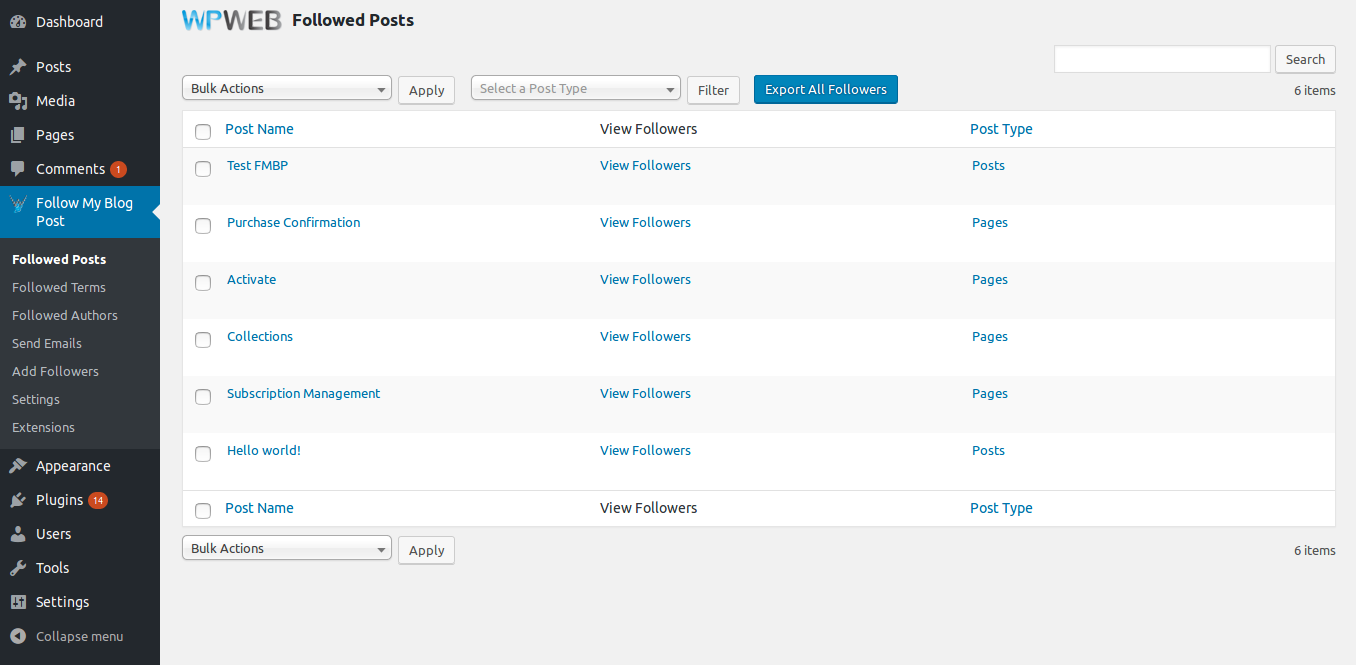
As shown above, for followed post list : the post title, view followers column and post type are displayed.
Click on the view followers link to see the list of all followers
for that post.
You can export selected post followers by clicking on "Export Followers" button.
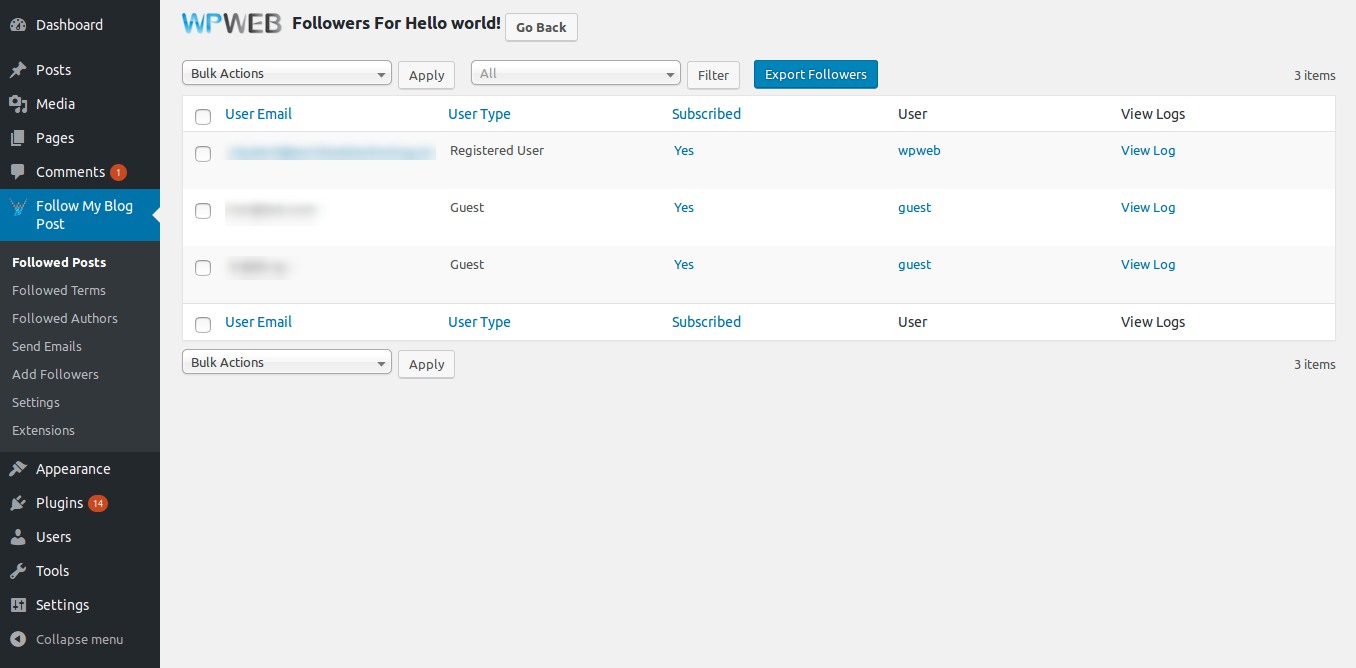
As shown above, for followers list : the user's email, user type (Registered or Guest) and subscription status (Yes or No).
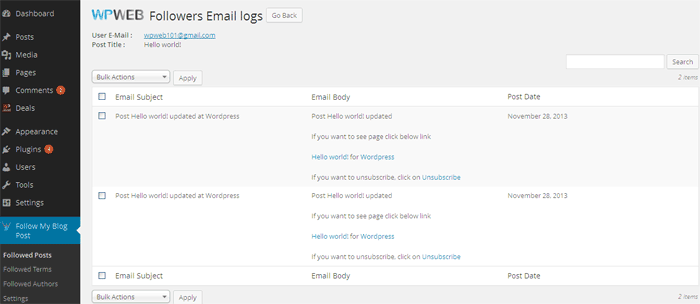
Note: View logs column only displayed if you have global Enable Log setting is checked.On click of view logs link, You will see the list of all email logs entry shown as in the image below :
Viewing Followed Terms and Followers
A list of all followed terms is kept and available for viewing from Follow My Blog Post > Followed Terms.
You can export term followers by clicking on "Export All Followers" button.
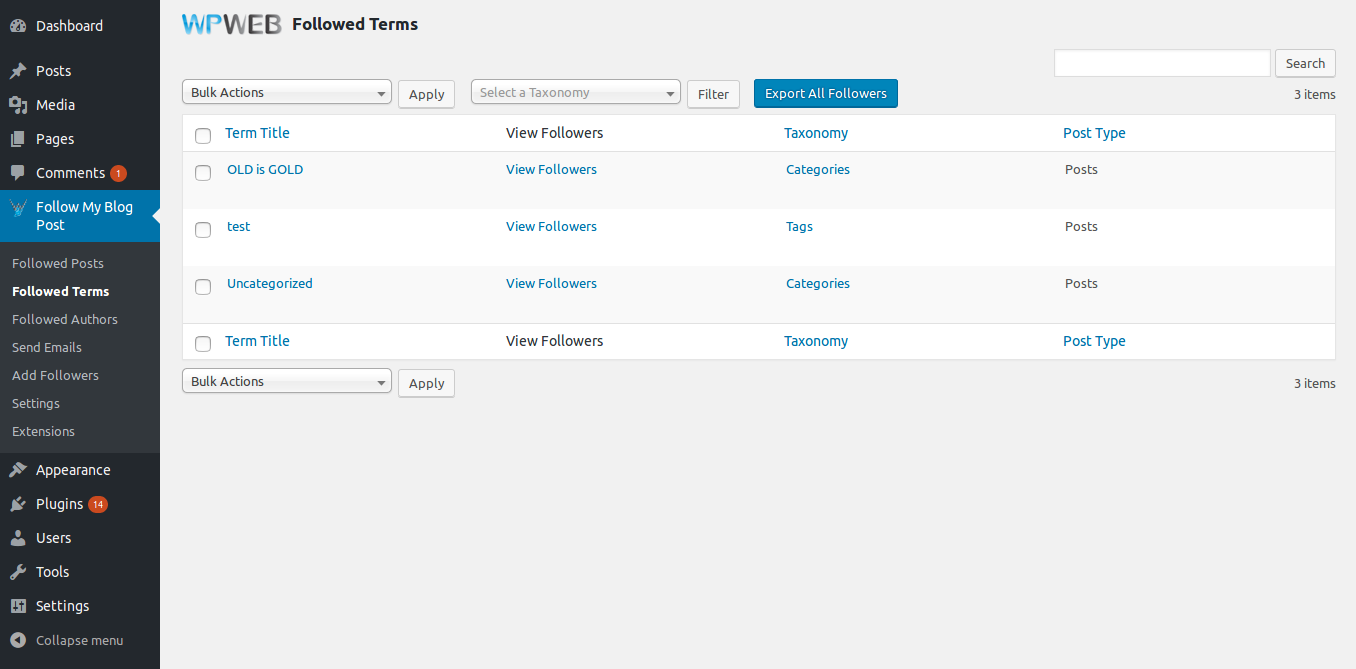
As shown above, for followed terms list : the term title, view followers column, taxonomy and post type are displayed.
Click on the view followers link to see the list of all followers
for that term.
You can export selected term followers by clicking on "Export Followers" button.
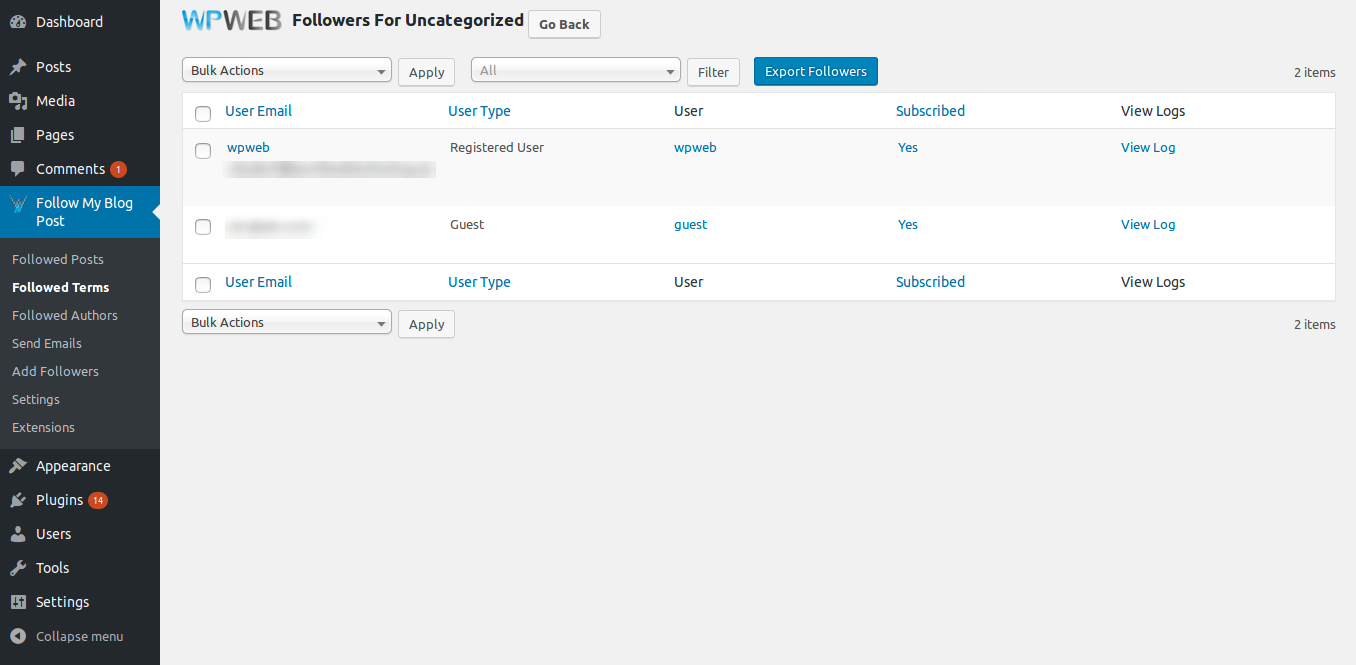
As shown above, for followers list : the user's email, user type (Registered or Guest) and subscription status (Yes or No).
Viewing Followed Authors and Followers
A list of all followed authors is kept and available for viewing from Follow My Blog Post > Followed Authors.
You can export author followers by clicking on "Export All Followers" button.
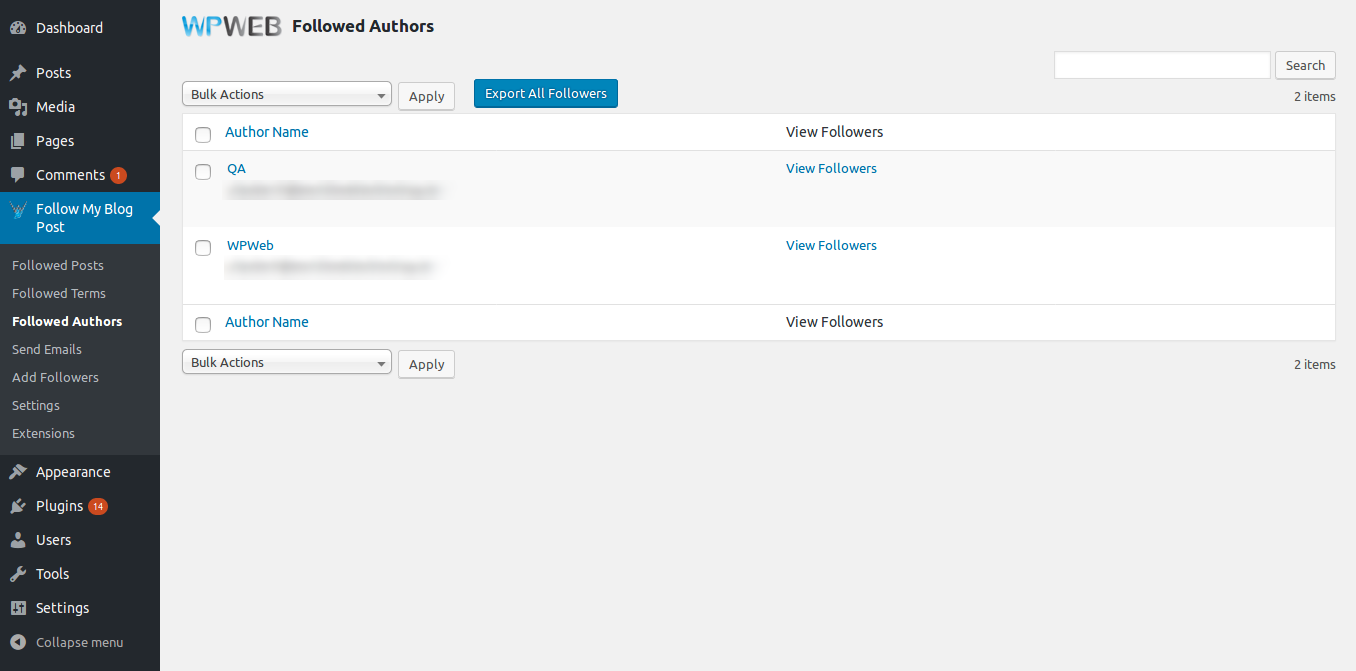
As shown above, for followed authors list : the author name and view followers column are displayed.
Click on the view followers link to see the list of all followers for that author.
You can export selected author followers by clicking on "Export Followers" button.
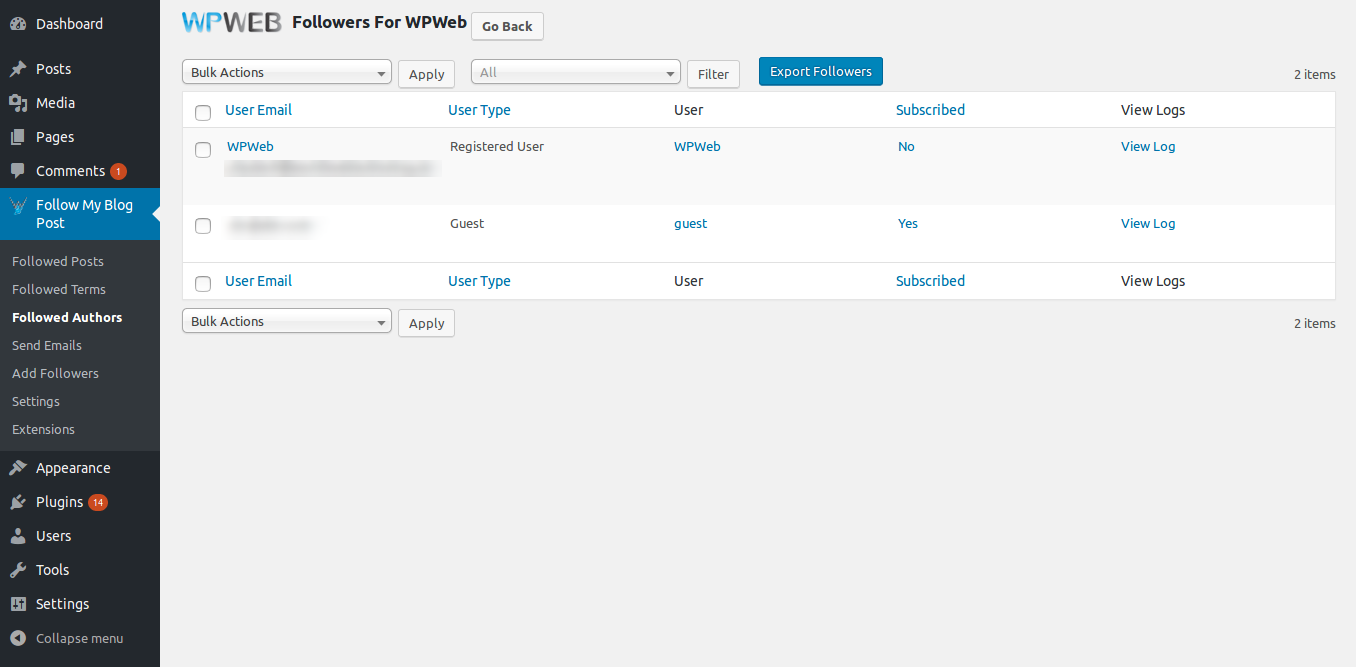
As shown above, for followers list : the user's email, user type (Registered or Guest) and subscription status (Yes or No).
Send Emails
You can send Custom emails to Followers of posts/pages, Terms or Authors via Send Emails page as mentioned in the image below:
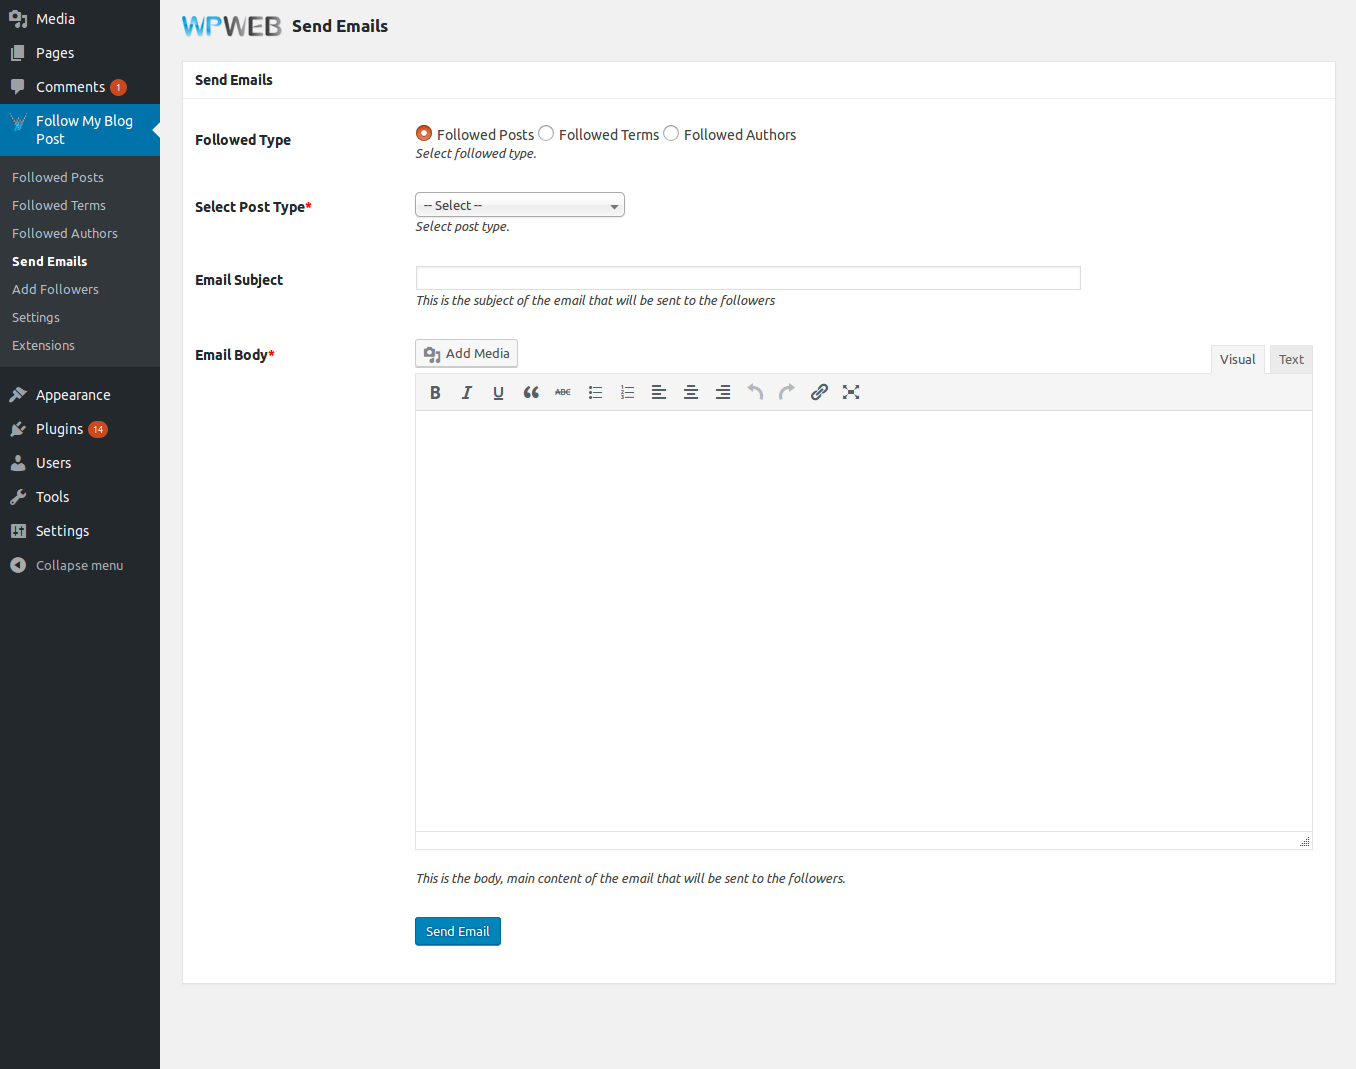
Add Followers
Admin can add followers of any post, term or author manually from "Add Followers" page as mentioned in the image below:
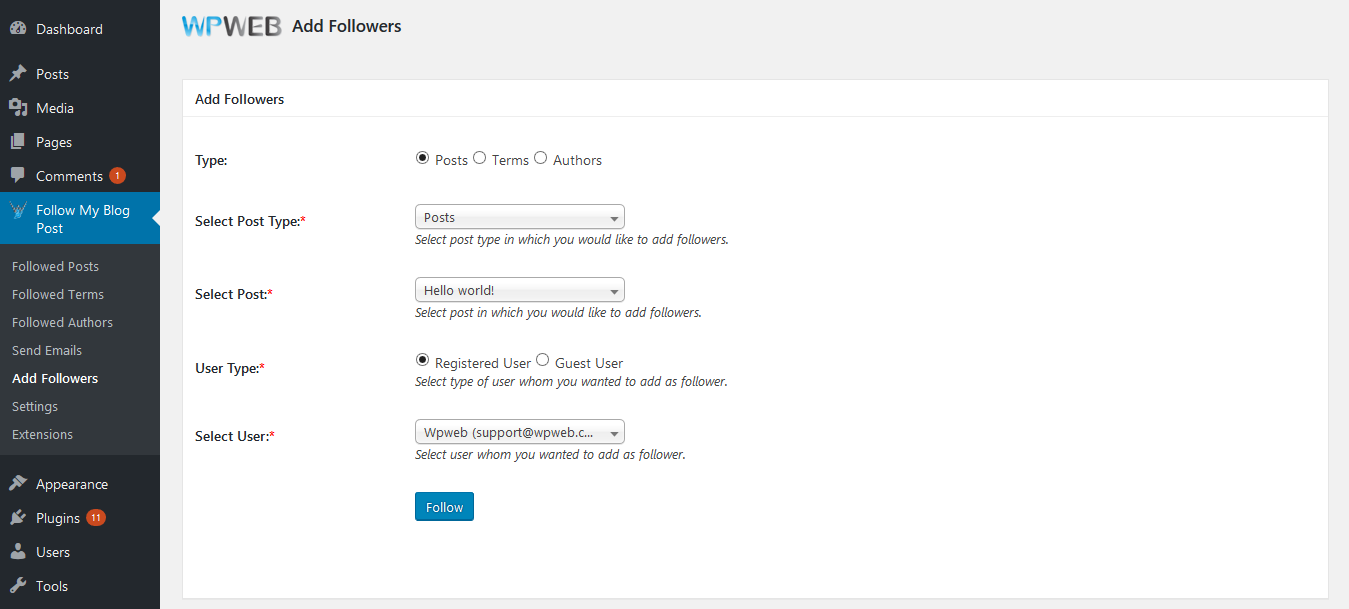
Adding a Shortcode
To integrate the Follow buttons into any page or post at any position you can use the shortcodes. You will see a Follow icon within the WordPress classic editor, just as shown in the image below:
With Gutenberg editor, it will look like as shown in the screenshot below.
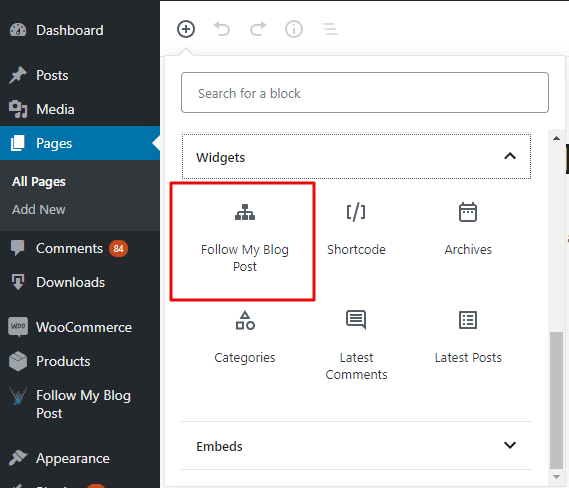
Click on the icon and a new window with the custom settings will pop up. Within these settings you have the ability to completely customize the look and all the messages for each Follow buttons you create.
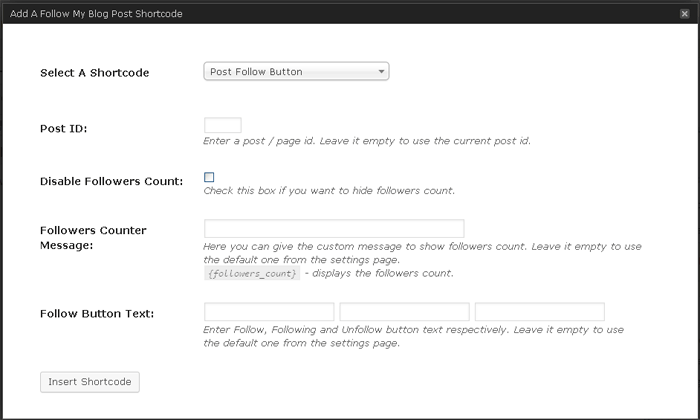
Posts Follow Button Shortcode
With Clasic editor, it will look like as shown in the screenshot below.
With Gutenberg editor, it will look like as shown in the screenshot below.
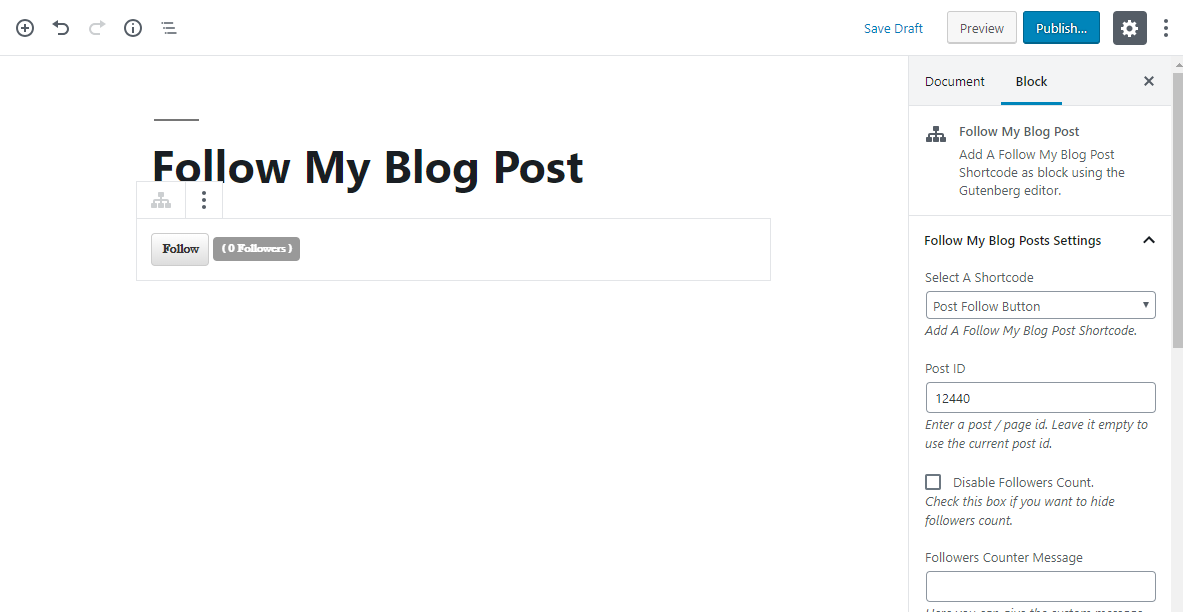
Post ID
Enter a post / page id. Leave it empty to use the current post id.
Disable Followers Count
Check this box if you want to hide followers count.
Followers Counter Message
Here you can give the custom message to show followers count. It will override the global Followers Counter Message setting.
{followers_count} - displays the followers count.
Follow Button Text
Enter Follow, Following and Unfollow button text respectively. It will override the global Follow Button Text setting.
Insert Shortcode
After you entered all the information you want, click on the "Insert Shortcode" button and the shortcode will be entered in to the normal WordPress editor with all you custom settings. Now you only need to save/update your post and the Follow Button is done and ready.
Follow Button Frontend
After inserted shortcode it will look something like one shown in the image below on frontend.

Note: When you use shortcode to insert Post / Page follow button it will override the global Follow Button Location setting and Follow Button Position setting.
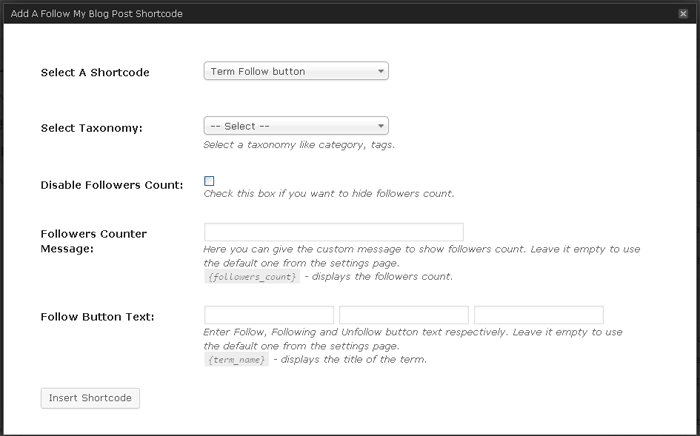
Terms Follow button Shortcode
With Clasic editor, it will look like as shown in the screenshot below.
With Gutenberg editor, it will look like as shown in the screenshot below.
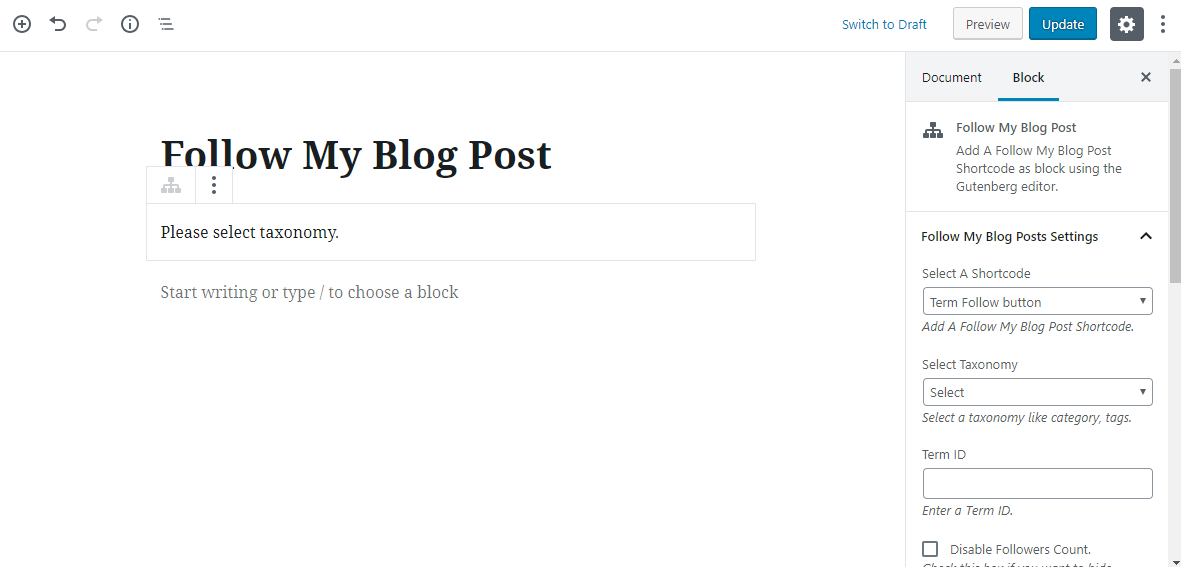
Select Taxonomy
Select a taxonomy like category, tags.
Select Term
Select the terms like category / tag based on selected taxonomy.
Disable Followers Count
Check this box if you want to hide followers count.
Followers Counter Message
Here you can give the custom message to show followers count. It will override the global Followers Counter Message setting.
{followers_count} - displays the followers count.
Follow Button Text
Enter Follow, Following and Unfollow button text respectively. It will override the global Follow Button Text setting.
Insert Shortcode
After you entered all the information you want, click on the "Insert Shortcode" button and the shortcode will be entered in to the normal WordPress editor with all you custom settings. Now you only need to save/update your post and the Follow Button is done and ready.
Follow Button Frontend
After inserted shortcode it will look something like one shown in the image below on frontend.

Authors Follow button Shortcode
With Clasic editor, it will look like as shown in the screenshot below.
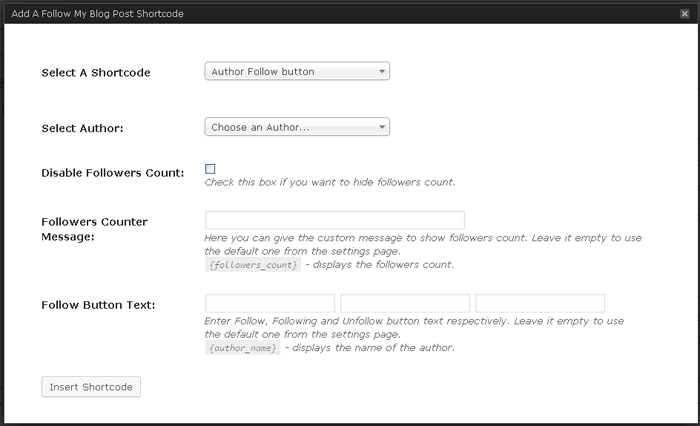
With Gutenberg editor, it will look like as shown in the screenshot below.
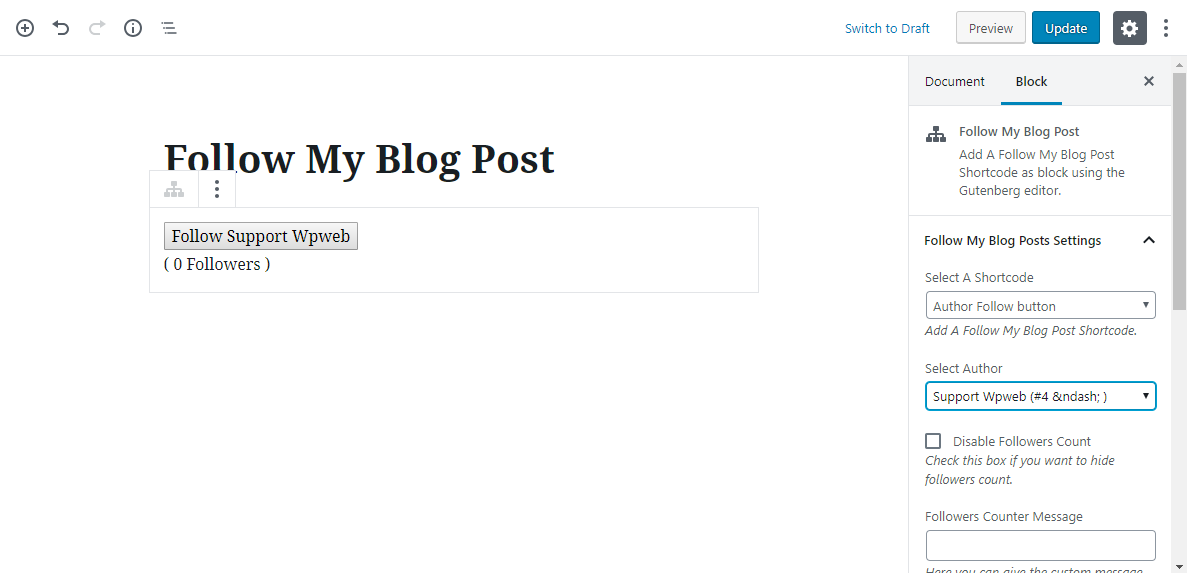
Select Author
Select an author.
Disable Followers Count
Check this box if you want to hide followers count.
Followers Counter Message
Here you can give the custom message to show followers count. It will override the global Followers Counter Message setting.
{followers_count} - displays the followers count.
Follow Button Text
Enter Follow, Following and Unfollow button text respectively. It will override the global Follow Button Text setting.
Insert Shortcode
After you entered all the information you want, click on the "Insert Shortcode" button and the shortcode will be entered in to the normal WordPress editor with all you custom settings. Now you only need to save/update your post and the Follow Button is done and ready.
Follow Button Frontend
After inserted shortcode it will look something like one shown in the image below on frontend.

Posts I Follow Shortcode
With Clasic editor, it will look like as shown in the screenshot below.
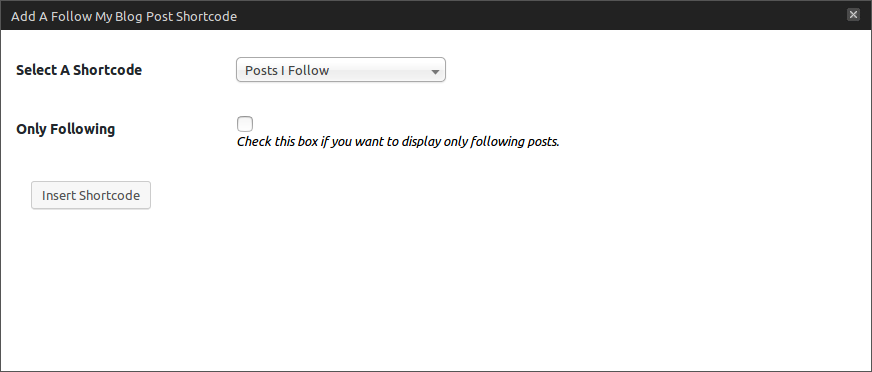
With Gutenberg editor, it will look like as shown in the screenshot below.
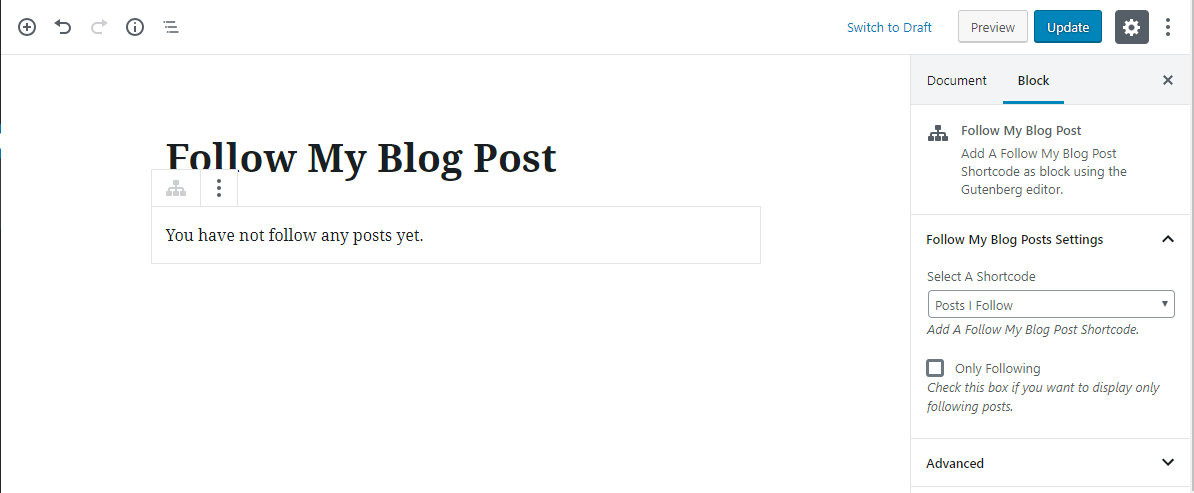
Only Following
Check this box if you want to display only following posts.
Posts I Follow Frontend
After inserted shortcode with only following checked, it will display only following posts. it will look something like one shown in the image on frontend.
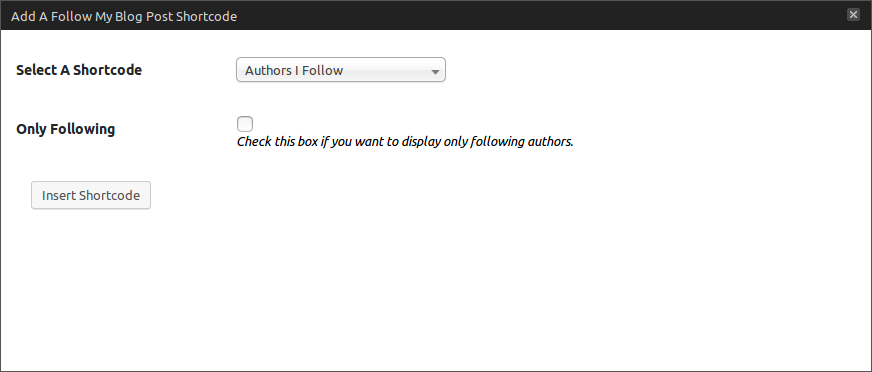
Authors I Follow Shortcode
With Clasic editor, it will look like as shown in the screenshot below.
With Gutenberg editor, it will look like as shown in the screenshot below.
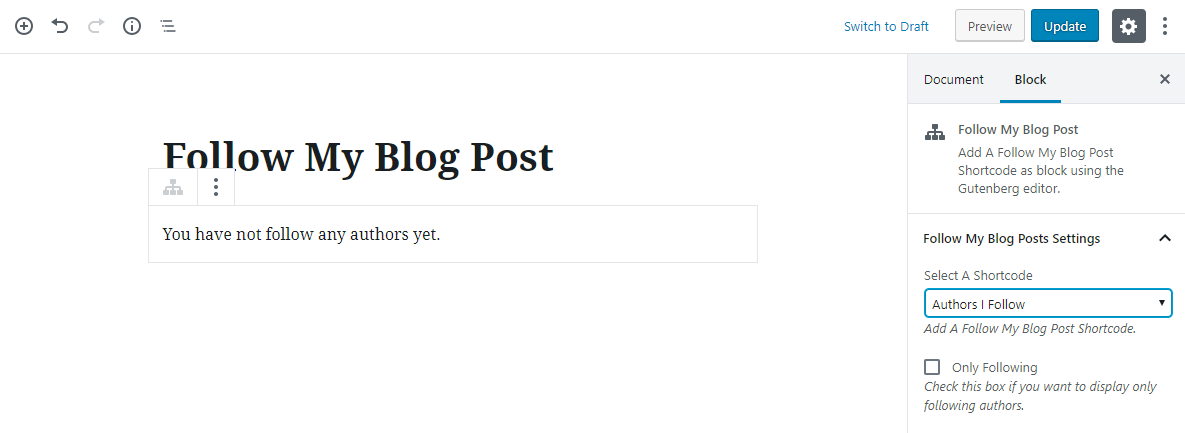
Only Following
Check this box if you want to display only following authors.
Authors I Follow Frontend
After inserted shortcode with only following checked, it will display only following authors. it will look something like one shown in the image on frontend.
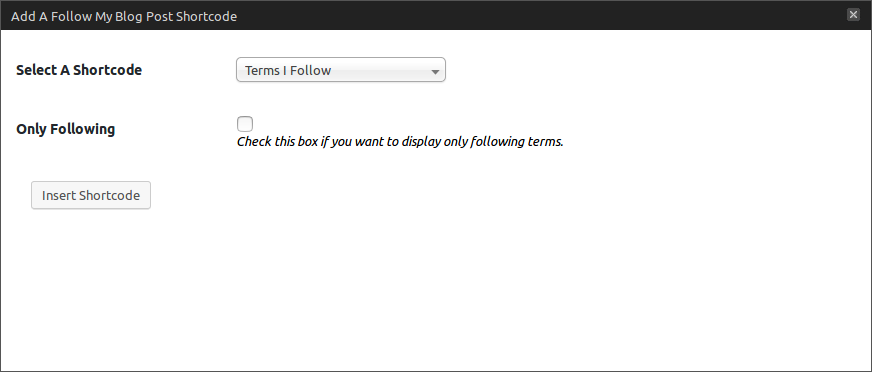
Terms I Follow Shortcode
With Clasic editor, it will look like as shown in the screenshot below.
With Gutenberg editor, it will look like as shown in the screenshot below.
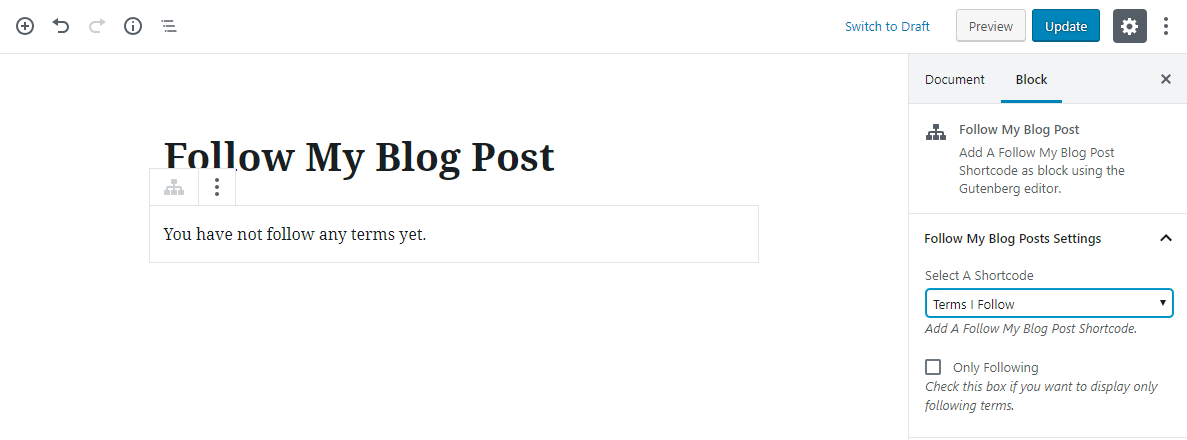
Only Following
Check this box if you want to display only following terms.
Terms I Follow Frontend
After inserted shortcode with only following checked, it will display only following terms. it will look something like one shown in the image on frontend.
Show Users Their followed posts, terms and authors
A Subscription Management page will be created where all logged in users can view below 3 sections :
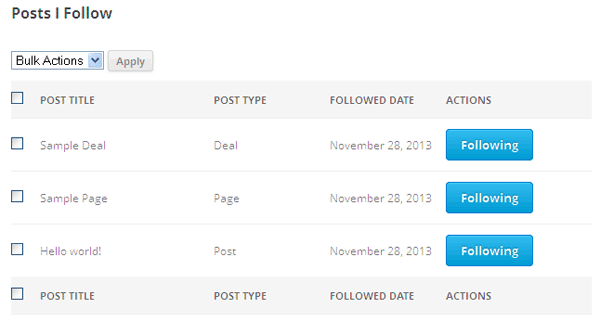
1) "Posts I follow" which contains a list of all posts which user is following with the option to unfollow any post as shown in the image below:
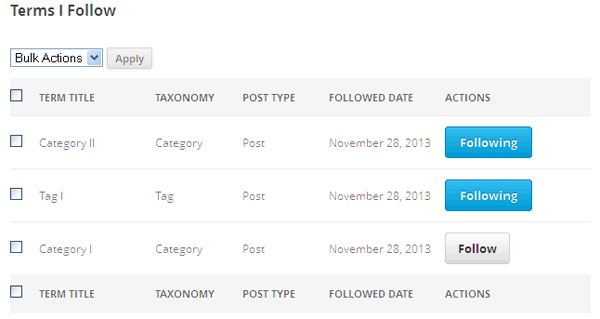
2) "Terms I follow" which contains a list of all terms which user is following with the option to unfollow any term as shown in the image below:
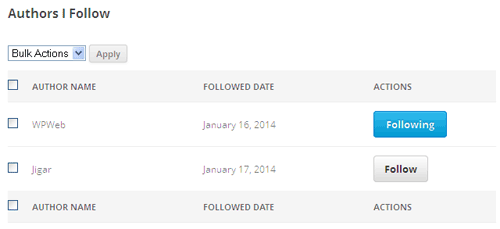
3) "Authors I follow" which contains a list of all authors which user is following with the option to unfollow any author as shown in the image below:
Frontend Behavior
Registered user experience
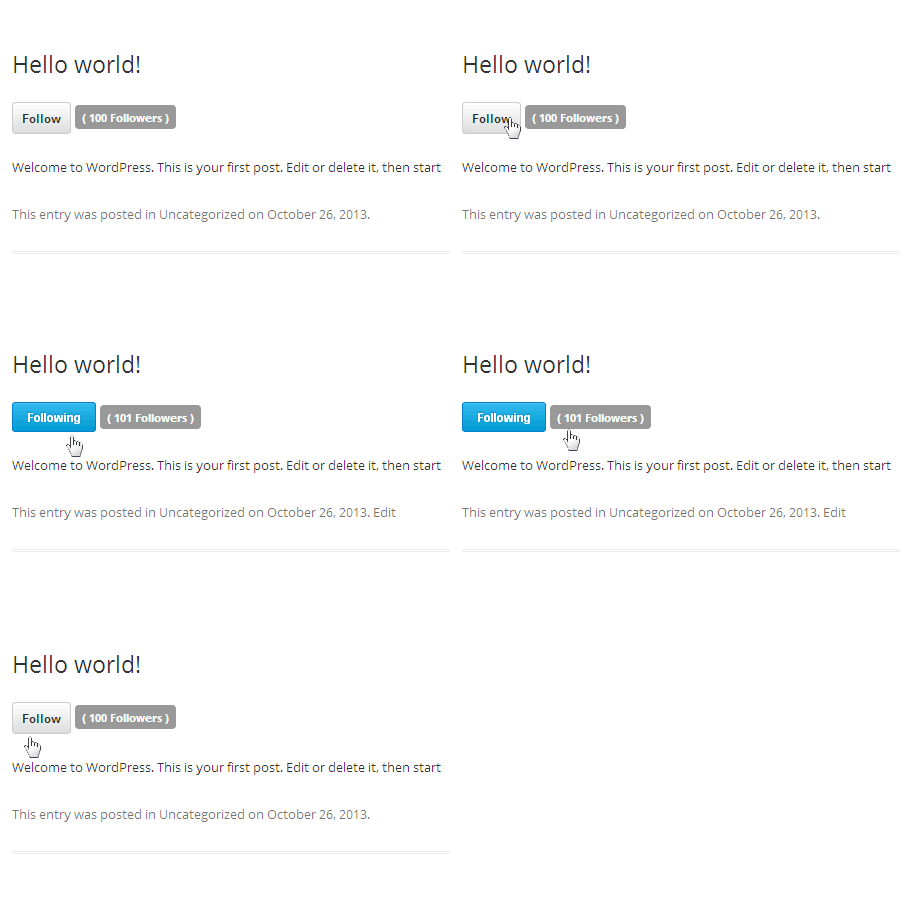
Here's a .gif of the frontend Registered user experience:
Guest user experience
Here's a .gif of the frontend Guest user experience:
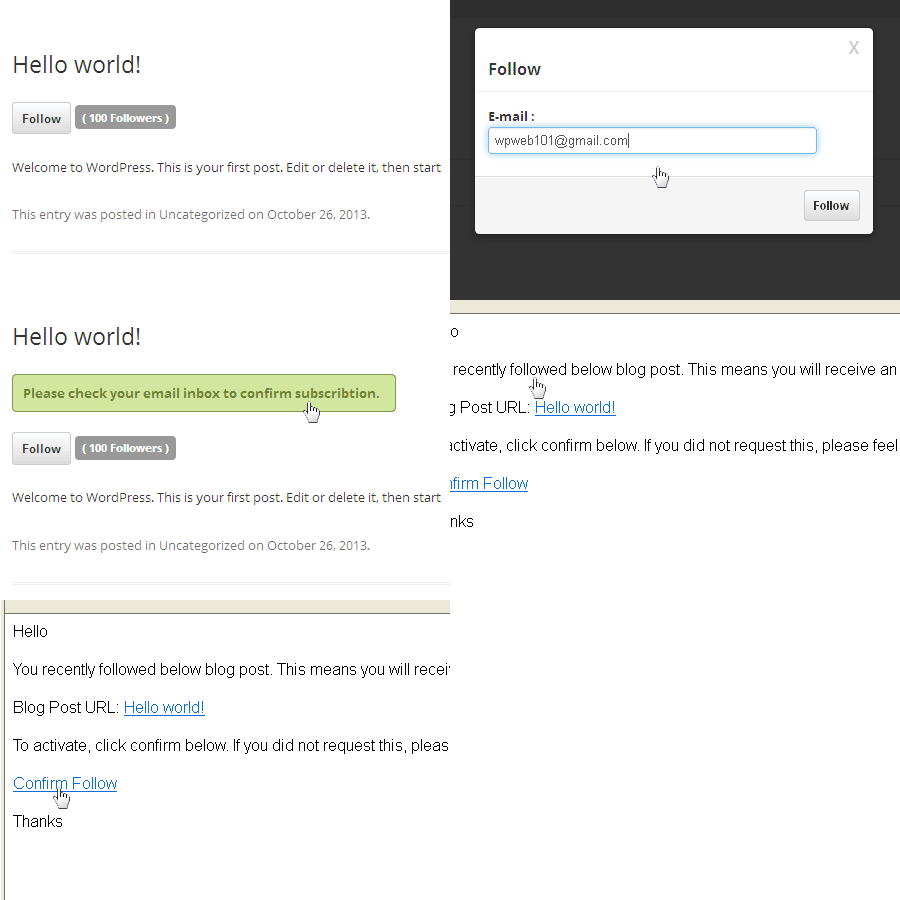
Functions Reference
The following useful functions are found in wpw-fb-misc-functions.php and can be used by themes and plugins.
wpw_fp_get_post_followers_count()
This function can be used to get followers count of post / page / custom post type by post id.
wpw_fp_get_term_followers_count()
This function can be used to get followers count of term by term id.
wpw_fp_get_author_followers_count()
This function can be used to get followers count of author by author id.
Template Structure + Overriding templates via a theme
The template files of Follow My Blog Post contain the markup and template structure for the front-end of your site. If you open these files you'll notice they all contain many hooks which will allow you to add / move content without having to edit the template files themselves. This method protects even further against any upgrade issues as the template files can be left completely untouched.
Alternatively, you can edit these files in an upgrade safe way through overrides. Simply copy it into a directory within your theme named /follow-my-blog-post, keeping the same file structure.
The copied file will now override the Follow My Blog Post default template file. Do not edit these files within the core plugin itself as they are overwritten during the upgrade process and any customizations will be lost.
The following template files can be found within the /follow-my-blog-post/includes/templates/ directory:
- subscribe-manage.php
-
subscribe-manage/
- follow-posts.php
- follow-terms.php
- follow-authors.php
-
follow-posts-listing/
- follow-posts-listing.php
-
follow-terms-listing/
- follow-terms-listing.php
-
follow-authors-listing/
- follow-authors-listing.php
- unsubscribe.php
-
unsubscribe/
- content.php
-
follow-post
- follow-post.php
- follow-count-box.php
- guest.php
- user.php
-
follow-term
- follow-term.php
- follow-count-box.php
- guest.php
- user.php
-
follow-author
- follow-author.php
- follow-count-box.php
- guest.php
- user.php
-
emailtemplate
- htmlemail.php
-
author-followers
- author-followers-listing.php
These files contain the markup and template structure for the front-end (and HTML emails) of your store. If you want to edit one of these templates simply copy it into a directory within theme named /follow-my-blog-post, keeping the same file structure, e.g. move "/templates/follow-post/guest.php" to "yourtheme/follow-my-blog-post/follow-post/guest.php". The copied file will now override the Follow My Blog Post default template file. Do not edit these files within the core plugin itself as they are overwritten during the upgrade process and any customisations will be lost.
Minimum Requirements
- WordPress 3.8 or greater
- PHP version 5.3.0 or greater
- MySQL version 5.0 or greater
- The mod_rewrite Apache module (for permalinks)
You should also check WordPress minimum requirements.
Follow My Blog Post Demo
You can view a demo of the Follow My Blog Post plugin here: Follow My Blog Post Demo
By: WPWeb
Email: support@wpweb.co.in