Social Auto poster Setup Docs
“Social Auto Poster” Documentation by “WPWeb”- Documentation
- Social Auto poster
- Setup Docs
Introduction
Social Auto Poster - A perfect choice for auto posting your content to famous social media platforms like Facebook, Twitter, LinkedIn, Tumblr, BufferApp, and Pinterest. You can configure your social accounts and post new content as well as repost your old content to keep it alive and reach a maximum audience. SAP provides an amazing feature for scheduling your content to post whenever you desired. The plugin also works well with personal profiles, business pages, groups etc.
Features
-
Auto Post New Content
Allows auto posting new/old post to configured social networks. Almost every popular social networks are supported. -
Supports Custom Post Types
Exceptionally handy for custom websites using other content types apart from the default ones. SAP allows to autopost, blogpost, pages, WooCommerce products and any other "custom post type". -
Configure Unlimited Of Each Social Media
Allows you to share your content to multiple accounts on each of the supported social networks. No limitations. Plugin works with profiles, business pages, community pages, groups, etc. -
Scheduled Posting
You can schedule the exact time when the auto post should go out. Scheduling option: Minutes, Hourly, Twice daily, Daily or Weekly. You can also set posting order by post title, date, post type or randomly for the scheduled posts. -
Hashtags From Tags Or Categories
Make it easy for yourself. SAP can post tags, categories and any other custom WordPress taxonomies as hashtags. -
Total Control Over Social Media Shares
It’s upon you; whether you want to share just the titles of your posts, include a hashtag, mention a @username or some completely custom additional text, our plugin allows you to do that.
SAP can also fetch pictures from blog posts automatically and then attach them to your social media shares. -
URL Shorteners
Ability to shorten long url into a TinyURL with TinyURL.com, bit.ly, shorte.st or built in WordPress URL shortener. -
Logs Tracking
Logs available to track all social posting activities. -
Posting Statistics
Graphical representation of each social media postings with different filter options. -
Category Wise Posting
Set what posts go to each network based on categories. -
Exclude Category
Exclude the content that you don't want to post which belongs to a particular category. -
Share Your Post More Than Once
SAP allows you to manually share each post multiple times. -
Customize Message Format
Ability to add custom message for each account individually. Post your posts uniquely as per your requirement on each social network. -
Publish A Single WordPress Post
Ability to publish a single post to all configured accounts concurrently with just one click. -
Unique URL
Unique URL generated each time for each wall post to avoid duplicate content error. -
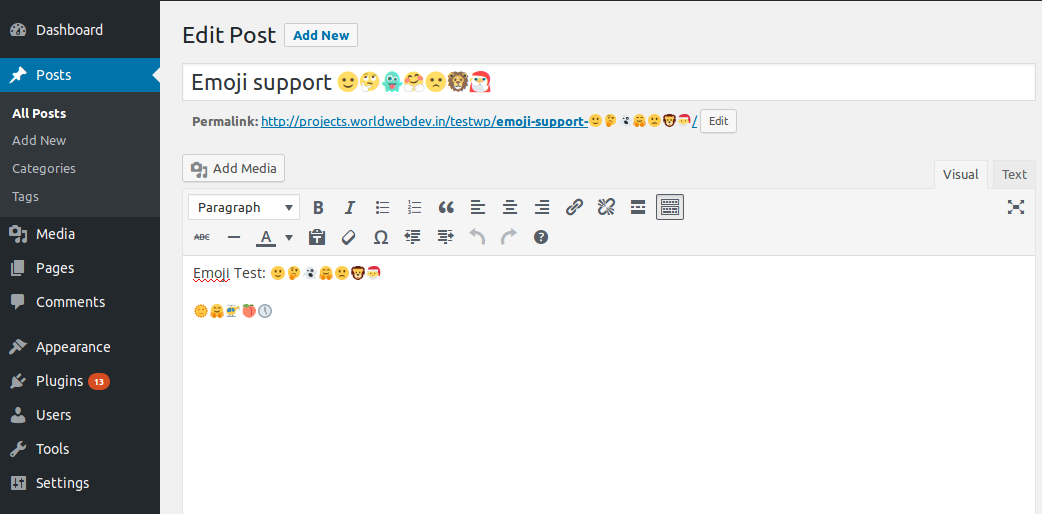
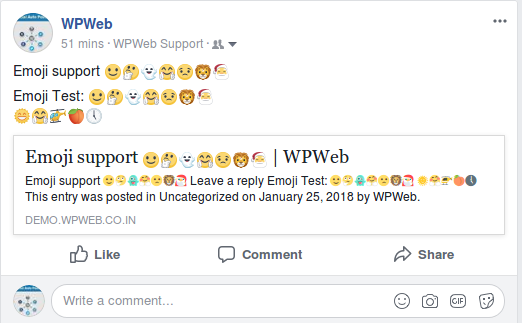
Emoji Supports
Support emoji codes for posting on social media. -
Google Analytics Campaign Tracking
Supports Google Analytics Campaign Tracking. This will allow you to see how popular your posts are and monitor the exact traffic you are getting with Google Analytics. -
Auto re-post already existing posts.
Don't stop after just a single social media share SAP allows you to share every post multiple times over and over again. SAP can select specific posts for re-posting using filters. -
E-commerce Supports
Social Auto Poster supports e-commerce plugins like WooCommerce, WP eCommerce, Easy Digital Downloads or Jigoshop. -
100% Multilingual
Social Auto Poster is completely translatable both in front and back-end.
Minimum Requirements
Below are the minimum requirements to use the plugin.
- cURL is required for the plugin to function; don't worry, most hosting providers already have this enabled.
However, if your host doesn't the plugin will show you a notice, and you must ask your host to upgrade your server. - PHP version 5.5.0 or greater
- MySQL version 5.0 or greater
- The mod_rewrite Apache module (for permalinks)
- WordPress 4.4 or greater
You should also check WordPress minimum requirements.
Installing the Plugin
- The installation of the plugin is just like any other plugin installation for WordPress. Login to your WordPress site and go to Plugins > Add New.
- At the Install Plugins Page click on Upload from the top navigation and then click on browse.
- Go to the location on your computer where you saved the downloaded plugin zip file and upload this zipped file. You need to unzip the file first to get the plugin zip file.
- Now click on Install Now.
- Wait until WordPress has uploaded the file. If it's done click on Activate Plugin.
- Now you should see a message 'Plugin activated' at the top of the window.
After you successfully installed the plugin you will see a new Admin Menu on the left-hand side. It's called Social Auto Poster. Click on that to get to the Settings Page which should look like in the image below.
The Plugin Settings
General Settings

Enable Social Posting Logs
Check this box to store your social posting activities into the database which can be viewed from "Social Posting Logs" section.
Google Analytics Campaign Tracking
Enable campaign tracking if you want to see how much traffic is generated by this plugin.
Use Google Analytics
If you are using any thirdparty plugin which is adding Google analytics tracking code then select thirdparty options.
Google Analytics Tracking Code
Paste your Google Analytics Tracking Code here. This will be added into the header template of your theme.
Enable Auto Posting for new post only
Check this box to enable auto posting for new post only.
Schedule Settings
Note: We are using WordPress Cron for schedule feature if you wanted to replace it with Real (Manual) cron please refer thedocumentation.
Schedule Wall Posts
Select the Schedule wall post option if you want to auto post your content at a desired time i.e. Minutes, Hourly, Twice Daily, Daily or Weekly.
If you select Daily, You will get two options as under:
Posting Type
Select the Posting Type option. i.e. Specific time or Randomly.
Schedule Time
Select "Schedule Time" to specify at what time wall posting should be done.
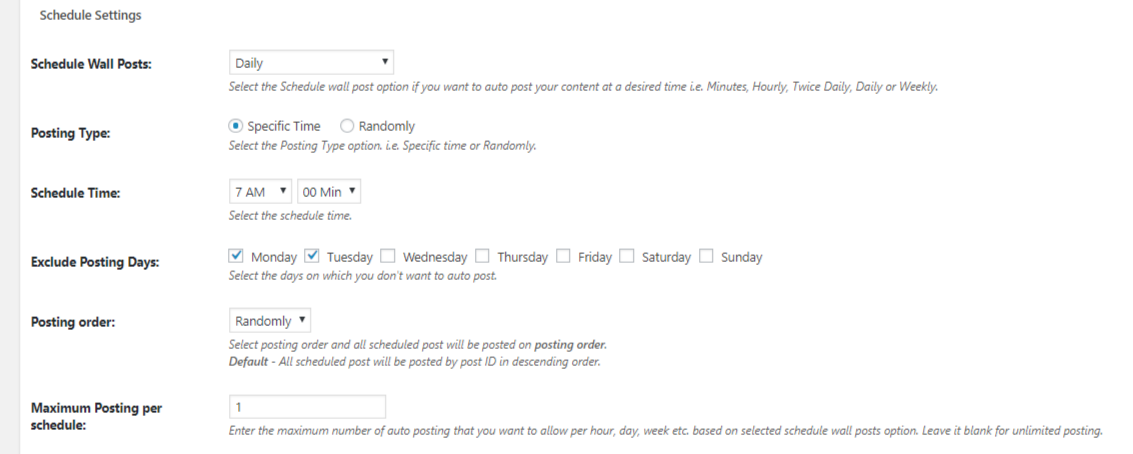
If you select Minutes, you will have another input box to set the custom minutes for schedule wall posting.

If you select Hourly, you will get a field for set date and one more drop-down option for Schedule Time to set time on each post/page, so you can set at what date and time wall posting should be done.
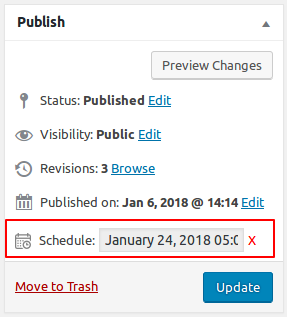
If you are using WordPress greater than or equal to version 5.0 with Gutenberg editor, it will look like below screenshot.
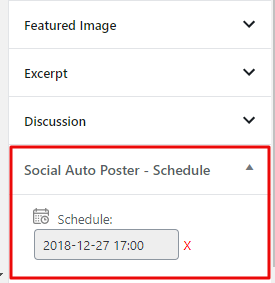
If you select Twice Daily, You will get below two options :
Posting Type
Select the Posting Type option.
Schedule Time
Select "Schedule Time" for specify two different time to set what time wall posting should be done.

Exclude Posting Days
Select the days on which you don't want to auto post.
Posting Order
Select scheduled posting order. All scheduled post will be posted on selected "posting order".
Default - All scheduled post will be posted by post ID in descending order.
Post Title - All scheduled post will be posted by post title in descending order.
Post Date - All scheduled post will be posted by post date in descending order.
Post Type Name - All scheduled post will be posted by post type name in descending order. i.e. if you have post type like downloads, products then all downloads post will be posted first.
Randomly - All scheduled post will be posted by random order.
Maximum Posting per schedule
Enter the maximum number of auto posting that you want to allow per hour, day, week etc. based on selected schedule wall posts option. Leave it blank for unlimited posting.
Misc Settings
Allow autopost from thirdparty plugins
Check this box if you want to allow autoposting from any thirdparty plugins which allows to submit data from frontend.
Delete Options
If you don't want to use the Social Auto Poster Plugin on your site anymore, you can check this box. This will make sure that all the settings and tables are being deleted from the database when you deactivate the plugin.
Debug Log
You can check posting system log at the file location.
/home/wpweb/public_html/wordpress/sap-logs/logs-f8dd8fa90ce08118edfde029525e4a77.txt.
Facebook Settings
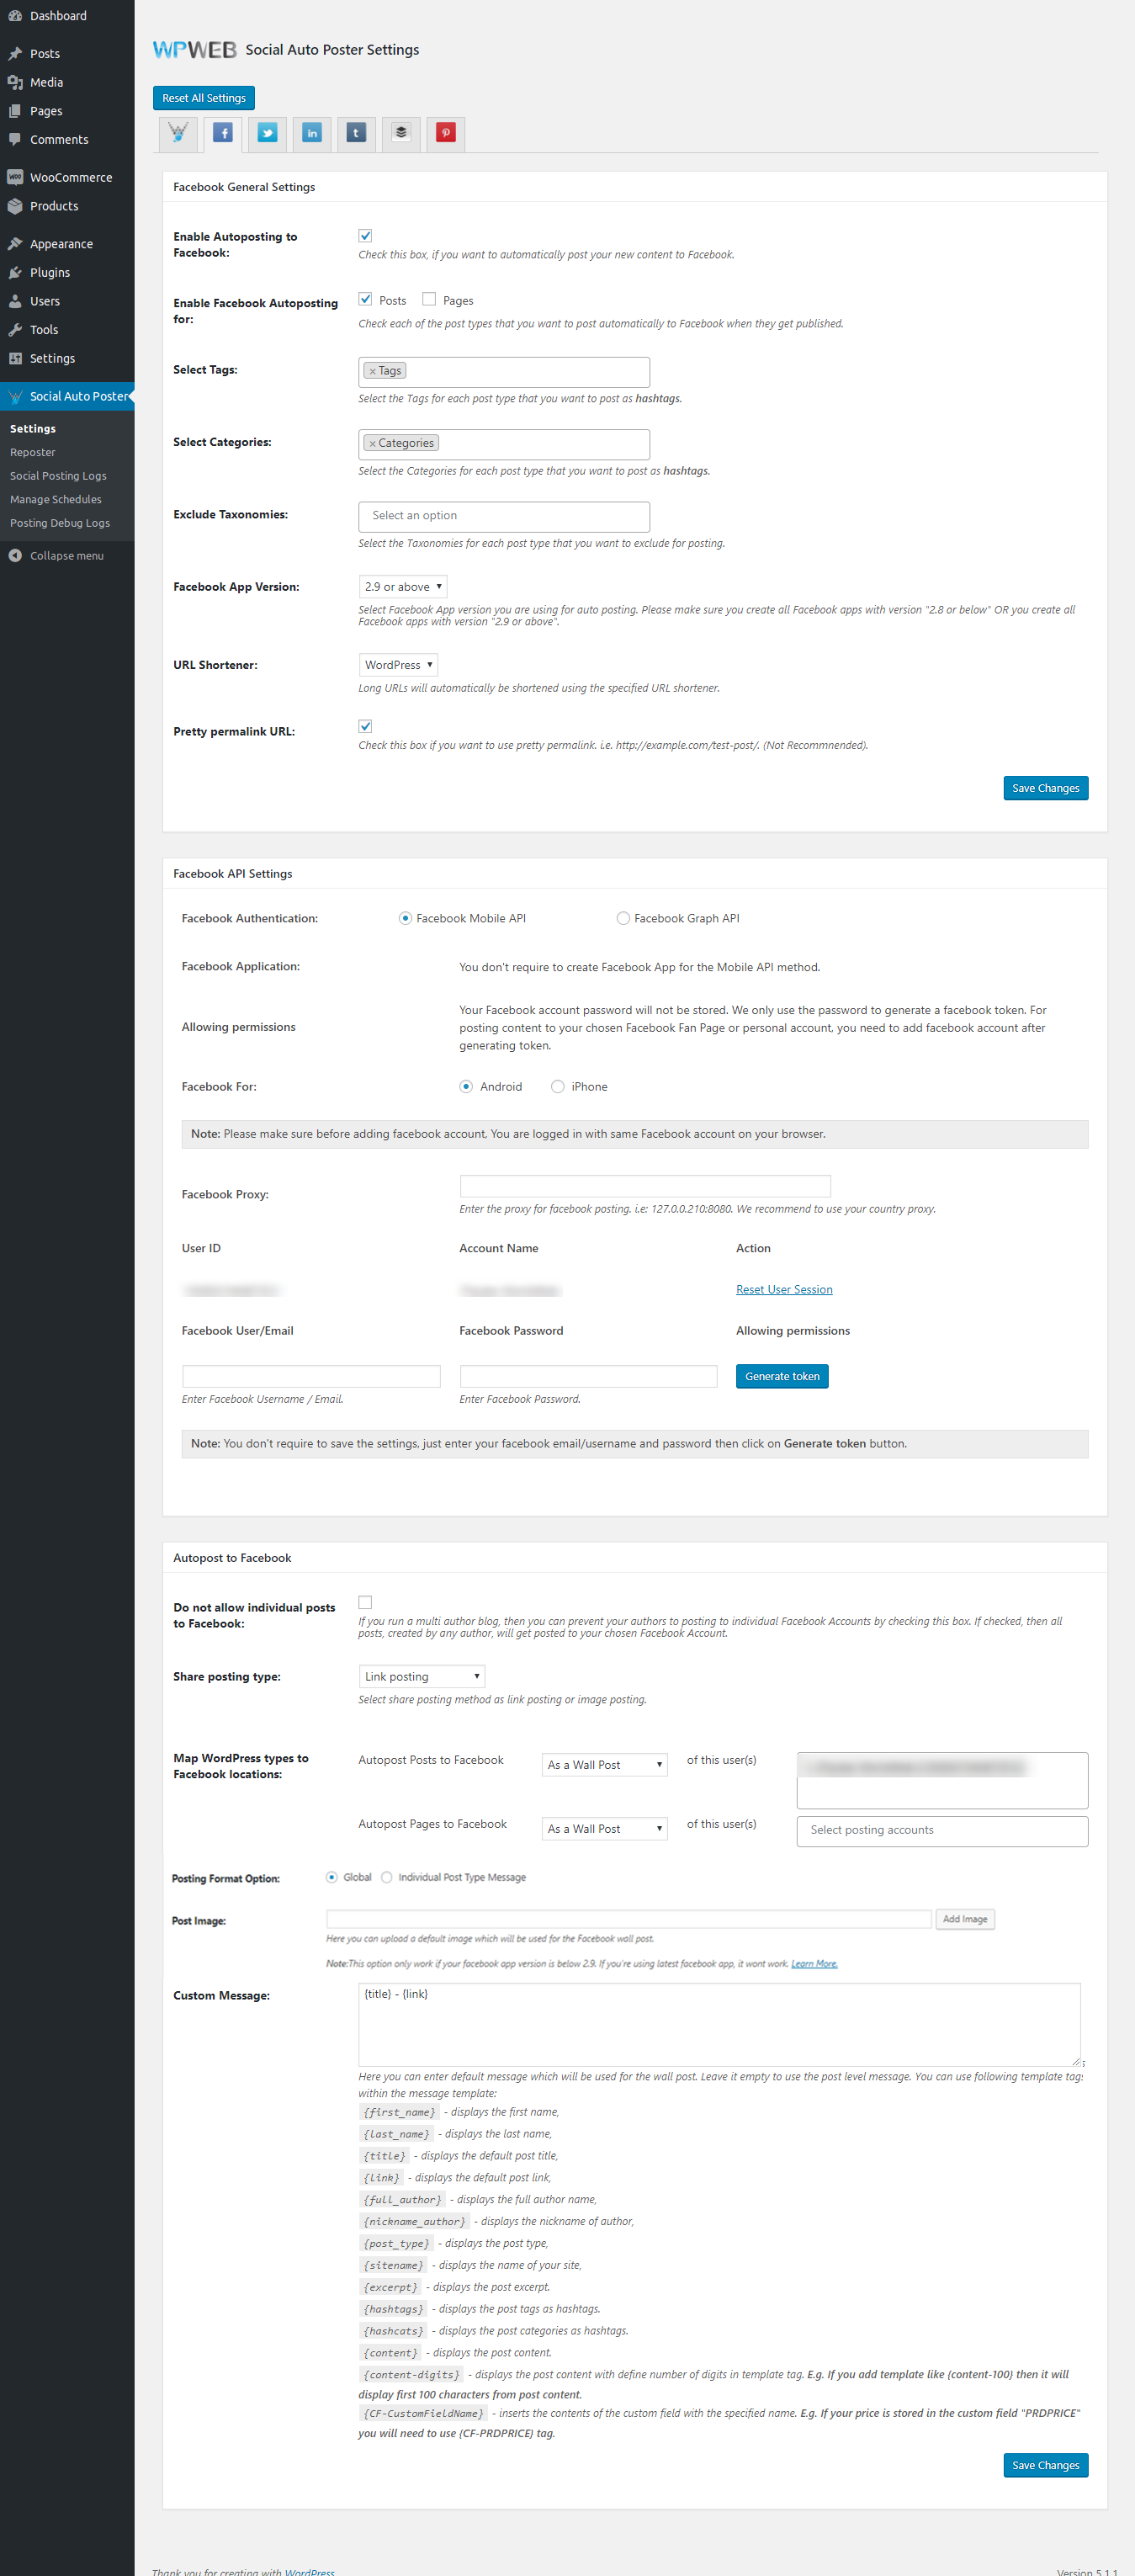
Facebook General Settings
Enable Autoposting to Facebook
Check this box, if you want to automatically post your new content to Facebook.
Enable Facebook Autoposting for
Check each of the post types that you want to post automatically to Facebook when they get published.
Select Tag
Select the Tags for each post type that you want to post as hashtags.
Select Categories
Select the Categories for each post type that you want to post as hashtags.
Exclude Taxonomies
Select the Taxonomies for each post type that you want to exclude for posting.
Facebook App Version
Select Facebook app version that you are using for auto posting. If you are using multiple Facebook apps, make sure you have created all Facebook apps either with version "2.8 or below" OR with version "2.9 or above".
Notes: If your Facebook app version is 2.9 or above then custom image, title and description will not work for posting. Facebook will scrap default image,title and description for the link. More info
URL Shortener
Long URLs will automatically be shortened using the specified URL shortener like WordPress, tinyurl.com, bit.ly or shorte.st.
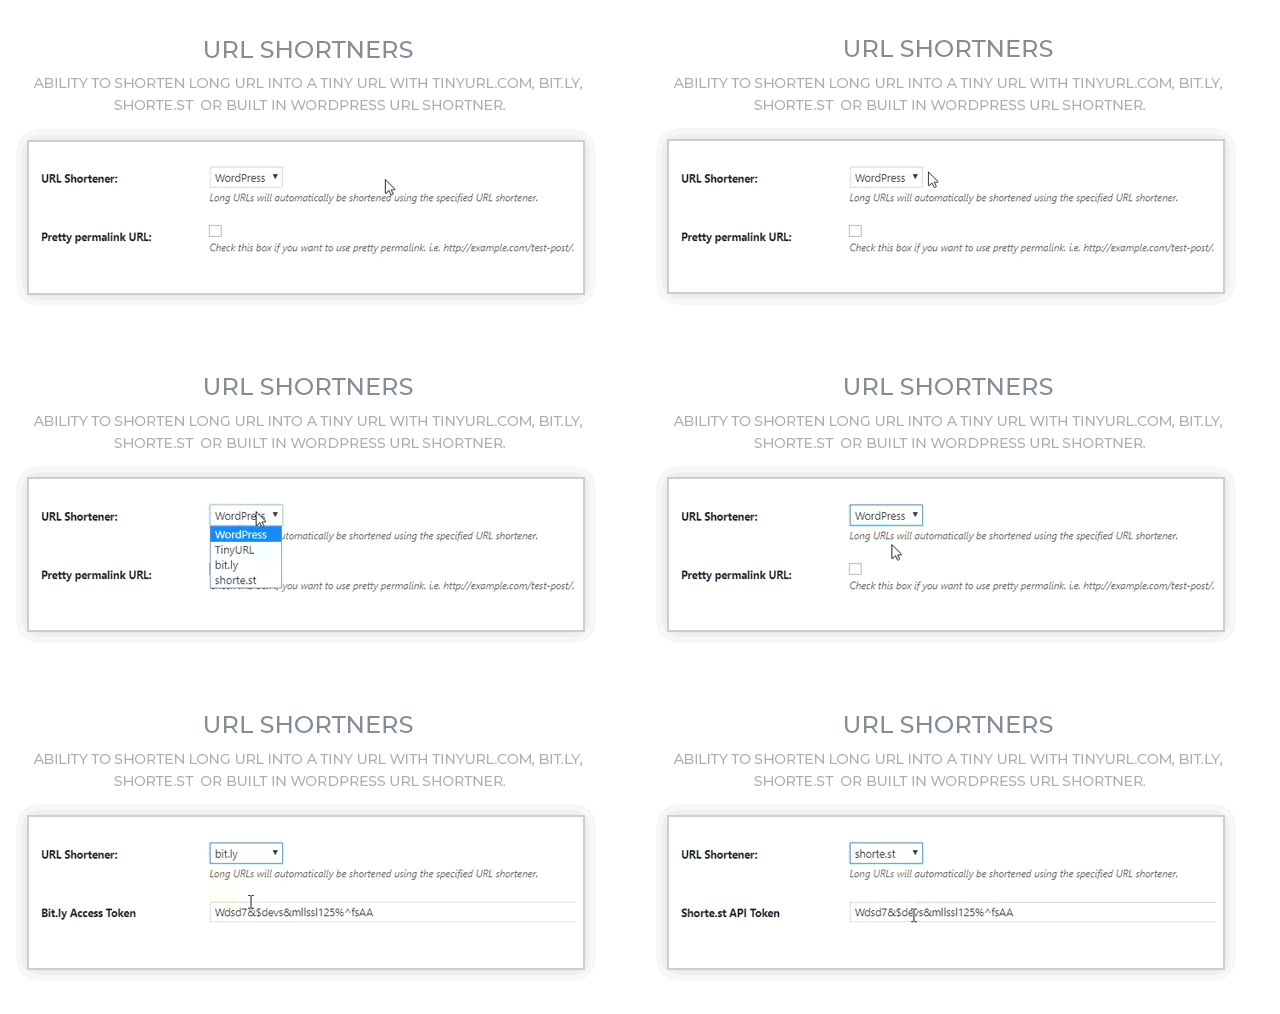
Pretty permalink URL
This setting will only appear once the URL Shortener "WordPress" is enabled. Check this option if you want to use pretty URL instead of WordPress plain url in Social Media.
Facebook API Settings
There are two method for connecting with Facebook. Either to use Facebook Graph API or Facebook Mobile API.
Facebook Graph API
Here, You have to enter the Facebook App ID and App Secret.
Note: Now, you can set multiple Facebook accounts to which you want to autopost the content.
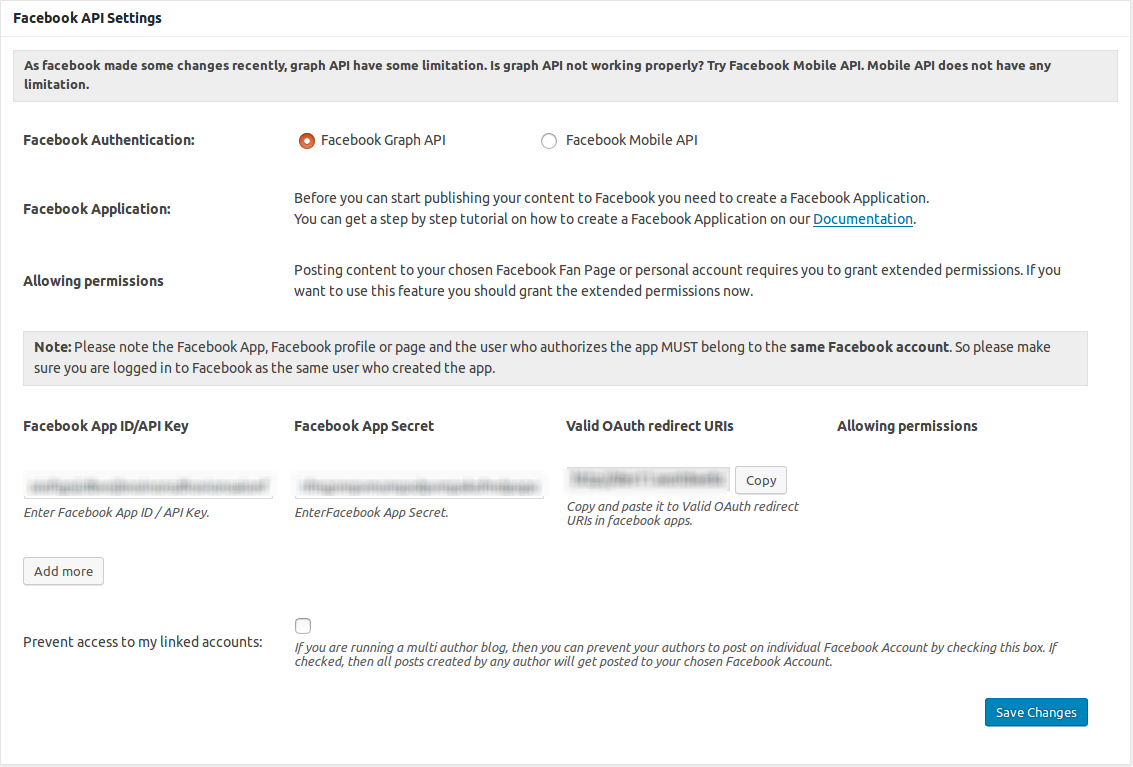
Facebook App ID/API Key
Here you can enter Facebook App ID / API Key.
Facebook App Secret
Here you can enter Facebook App Secret.
Valid OAuth redirect URIs
Copy the valid OAuth redirect URIs value and paste the url to the Facebook App Valid OAuth redirect URIs field.
Allowing permissions
After adding Facebook App ID and App Secret click on Save button. After saved your API details click on Grant extended permission link.
Prevent access to my linked accounts
Check this option to make all of your linked Facebook Accounts unaccessible to the plugin. This means that you will only be able to post to your personal Facebook Account/Profile.
Facebook Mobile API
As the facebook made some changes recently, graph API have some limitation. Is graph API not working properly? Try Facebook Mobile API. Mobile API does not have any limitation. Mobile API have two options. You can use either Android or iPhone.
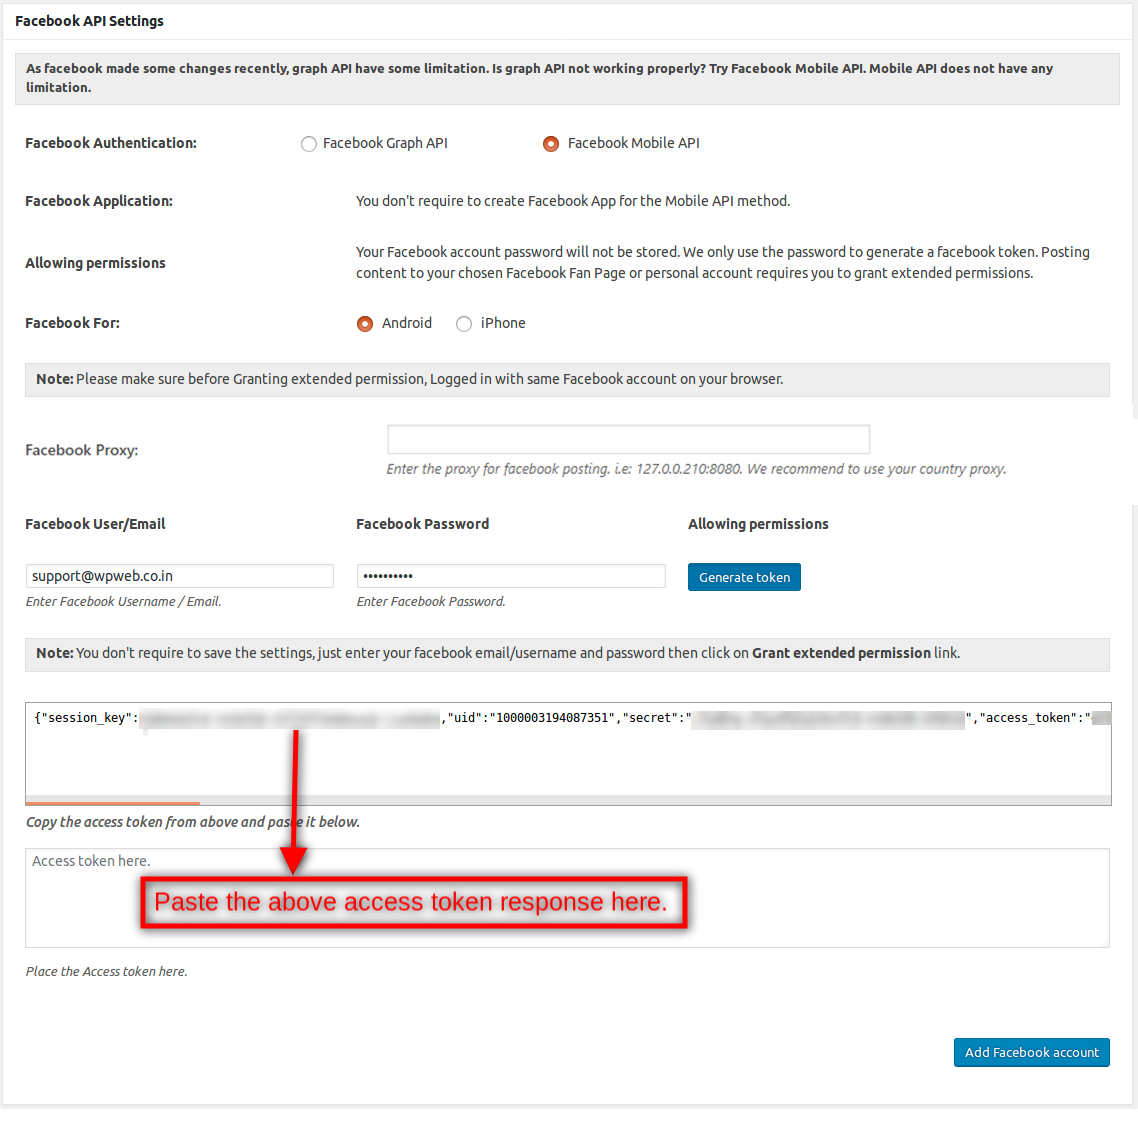
Facebook Proxy
Enter the proxy for facebook posting. i.e: 127.0.0.210:8080. We recommend to use your country proxy.
Facebook User/Email
Here you can enter Facebook Username / Email.
Facebook Password
Here you can enter Facebook Password.
Allowing permissions
After adding your Facebook Email/Username and password, click on Generate token button directly.
Note: There is no need to click on save button as a Facebook password will not be stored anywhere. We only use the password generate a Facebook token. Make sure you paste whole response that is generated.
Access Token
Copy the complete response from above and paste it below.
Grant Extended Permissions
Allowing permissions
To be able to autopost to your Facebook Accounts, you need to grant extended permissions. Click on the 'Grant extended permissions' link. This will connect the plugin with your previously created Facebook App. When you go through the steps while connecting the plugin to your Facebook App you need to give all the asked permissions. Remember: You give the permissions to your own App, so you won't get spammed from someone else then your self :-)
Autopost to Facebook
Do not allow individual posts to Facebook
By checking this box you can prevent your authors to post to individual Facebook Accounts If you run a multi author blog. If checked, then all posts created by any author will get posted to your chosen Facebook Account.
Share posting type
Here you can Select share posting method as link posting or image posting.
Note: If you are using image posting then the supported image formats are JPEG, BMP, PNG, GIF. Recommend uploading photo under 1MB..
Map WordPress types to Facebook locations
Once you perform a “Grant the extended permission” step you'll be able to choose which post type you want to autopost to a specific Facebook Account. You'll see a list of all registered post types and two drop downs. From the first drop down you can choose how you want to post the new content to Facebook (As a Wall Post or as a Status Update). Then on the second drop-down you can choose on which Facebook Account you want to post each of these content types.
Note: Now you can set as many facebook pages/groups as you want to autopost the content.
Posting Format Option
Here you will have two options as below.Global: Select global to apply custom message template to all post types.
Individual Post Type Message:
Select this option if you want to to apply custom message template individual post types as shown in the screenshot i.e. page, product, post etc. Check the screenshot below. Here you can upload post image for individual post types.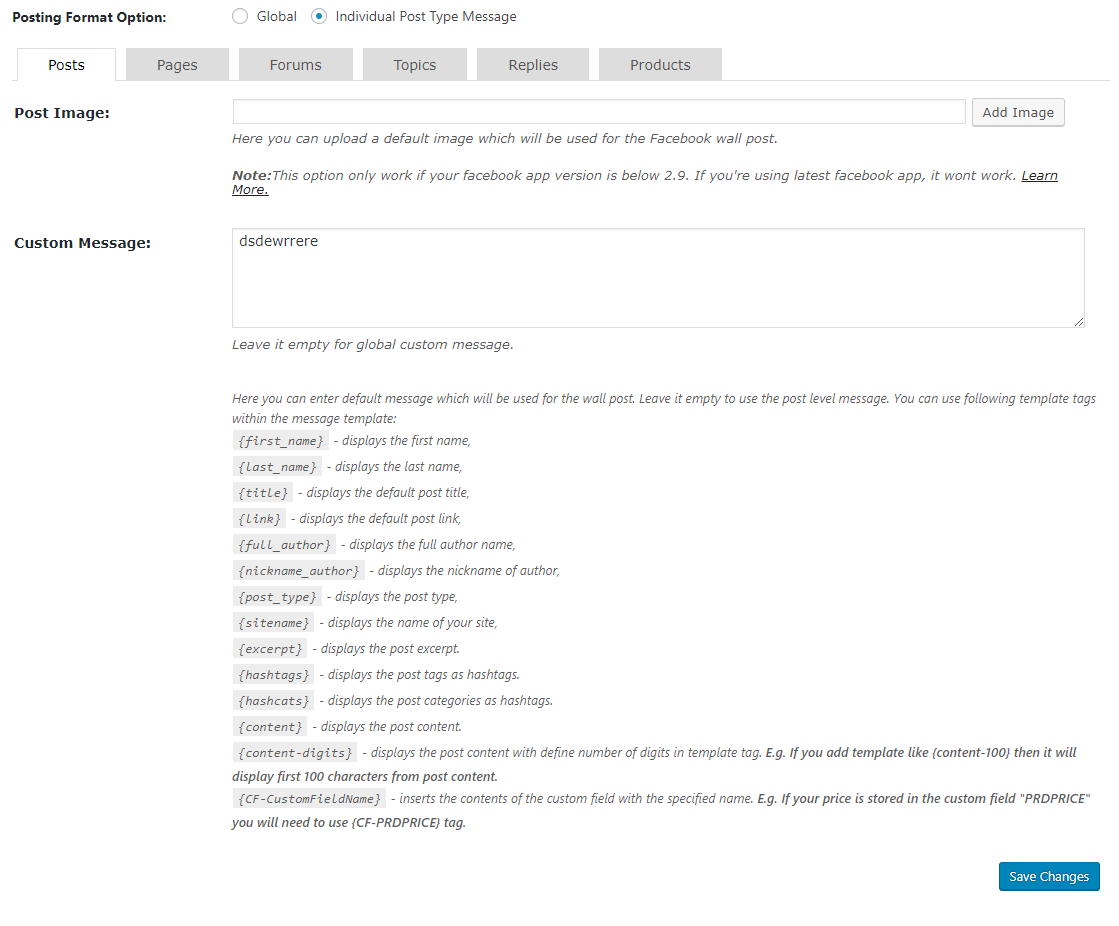
Facebook Post Image
Here you can upload a default image which will be used for the Facebook wall post.
Note: This option only work if your facebook app version is below 2.9. If you're using latest facebook app, it wont work. Learn More.
Facebook Message Template
Here you can enter default message which will be used for the wall post. Leave it empty to use the post level message. You can use following template tags within the message template:{first_name}- displays the first name{last_name}- displays the last name{title}- displays the post title{link}- displays the post title with link{full_author}- displays the full author name{nickname_author}- displays the nickname of author{post_type}- displays the post type{sitename}- displays the name of your site{excerpt}- displays the post excerpt{hashtags}- displays the post tags as hashtags{hashcats}- displays the post categories as hashtags{content}- displays the post content{content-digits}- displays the post content with define number of digits in template tag. E.g. If you add template like {content-100} then it will display first 100 characters from post content{CF-CustomFieldName}- inserts the contents of the custom field with the specified name. E.g. If your price is stored in the custom field "PRDPRICE" you will need to use {CF-PRDPRICE} tag.
Twitter Settings
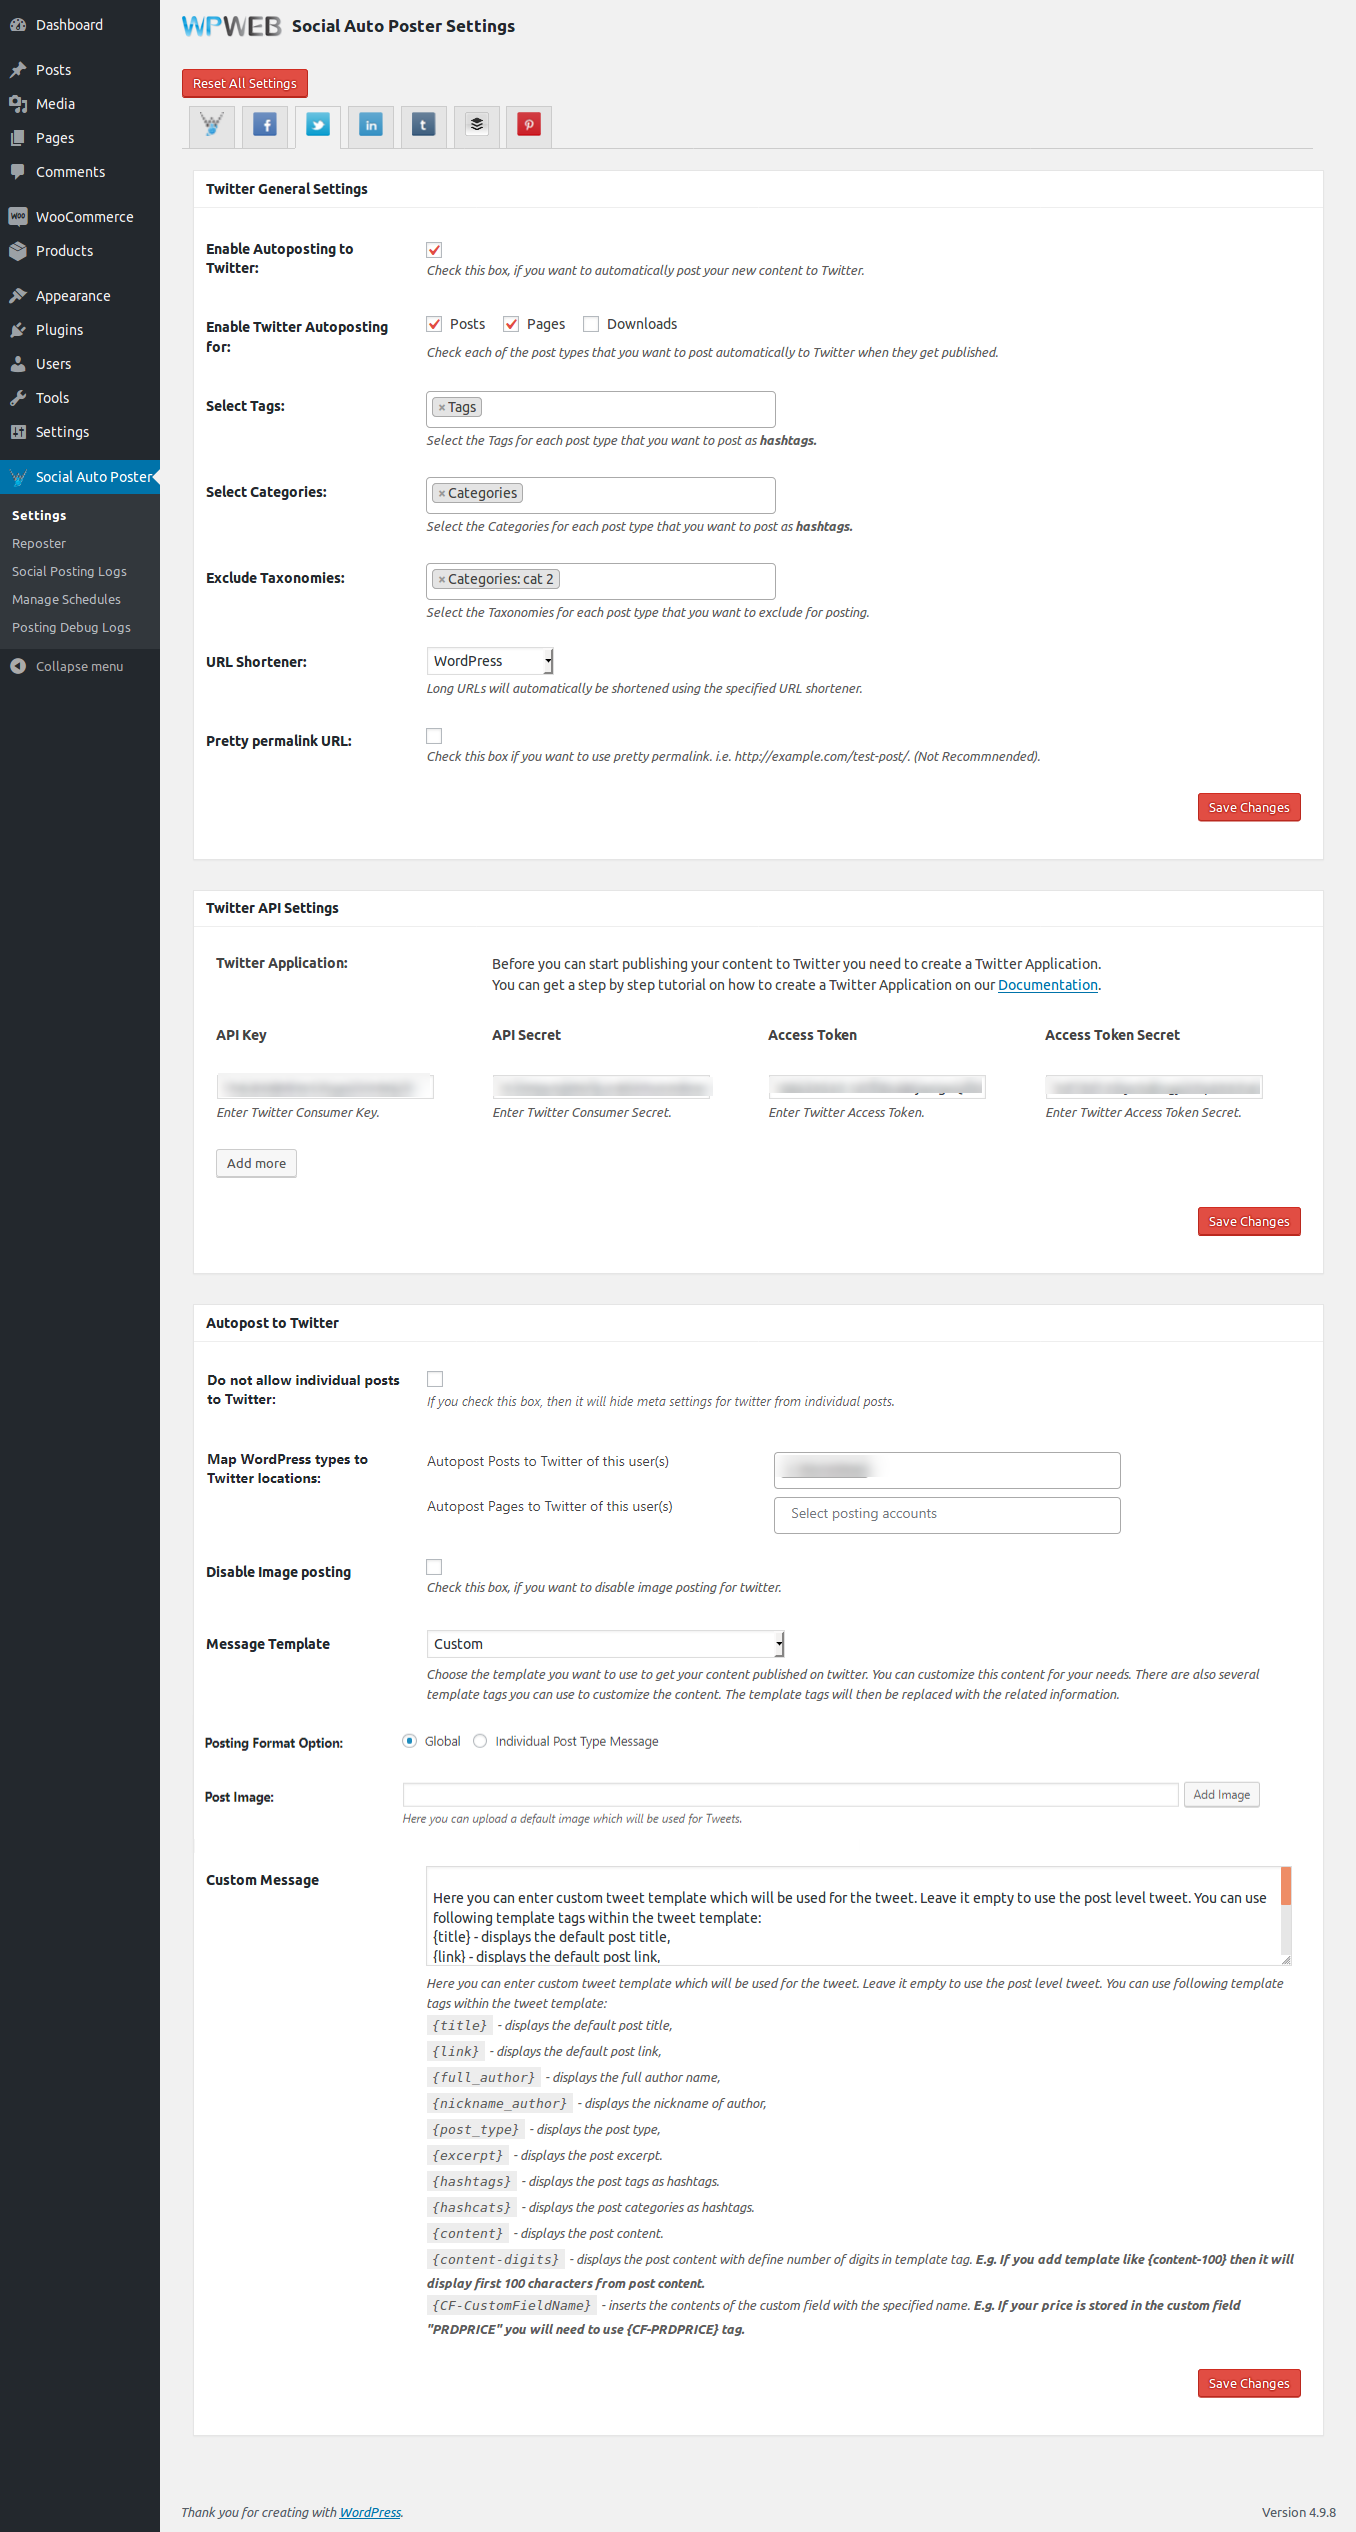
Twitter General Settings
Enable Autoposting to Twitter
Check this box, if you want to automatically post your new content to Twitter.
Enable Twitter Autoposting for
Check each of the post types that you want to post automatically to Twitter when they get published.
Select Tag
Select the Tags for each post type that you want to post as hashtags.
Select Categories
Select the Categories for each post type that you want to post as hashtags.
Exclude Taxonomies
Select the Taxonomies for each post type that you want to exclude for posting.
URL Shortener
Long URLs will automatically be shortened using the specified URL shortener like WordPress, tinyurl.com, bit.ly or shorte.st.
Pretty permalink URL
This setting will only appear once the URL Shortener "WordPress" is enabled. Check this option if you want to use pretty URL instead of WordPress plain URL in Social Media.
Twitter API Settings
Here, You have to enter Twitter Consumer Key, Consumer Secret, Access Token, Access Token Secret.
Note: Now you can set as many Twitter accounts as you want to autopost the content.
Autopost to Twitter
Do not allow individual posts to Twitter
If you check this box, then it will hide meta settings for Twitter from individual posts.
Map WordPress types to Twitter locations
After you save the Consumer Key, Secret, Access Token and Access Token Secret, you'll be able to choose which post type you want to autopost to a specific Twitter Account. You'll see a list of all registered post types and a drop-down from where you can choose on which Twitter Account you want to post each of these content types.
Disable Image posting
Check this box, if you want to disable image posting for Twitter.
Posting Format Option
Here you will have two options as below.Global: Select global to apply custom message template to all post types.
Individual Post Type Message: Select this option if you want to to apply custom message template individual post types as shown in the screenshot i.e. page, product, post etc.
Post Image
Here you can upload a default image which will be used for Tweets.
Message Template
Within this option, you can customize the template which will get posted to your Twitter Account. There are also several template tags you can use to customize the content. The template tags will then be replaced with the related information. The available tags are:
{title}- displays the post title{link}- displays the post link{full_author}- displays the full author name{nickname_author}- displays the nickname of author{post_type}- displays the post type{excerpt}- displays the post excerpt{hashtags}- displays the post tags as hashtags{hashcats}- displays the post categories as hashtags{content}- displays the post content{content-digits}- displays the post content with define number of digits in template tag. E.g. If you add template like {content-100} then it will display first 100 characters from post content{CF-CustomFieldName}- inserts the contents of the custom field with the specified name. E.g. If your price is stored in the custom field "PRDPRICE" you will need to use {CF-PRDPRICE} tag.
LinkedIn Settings
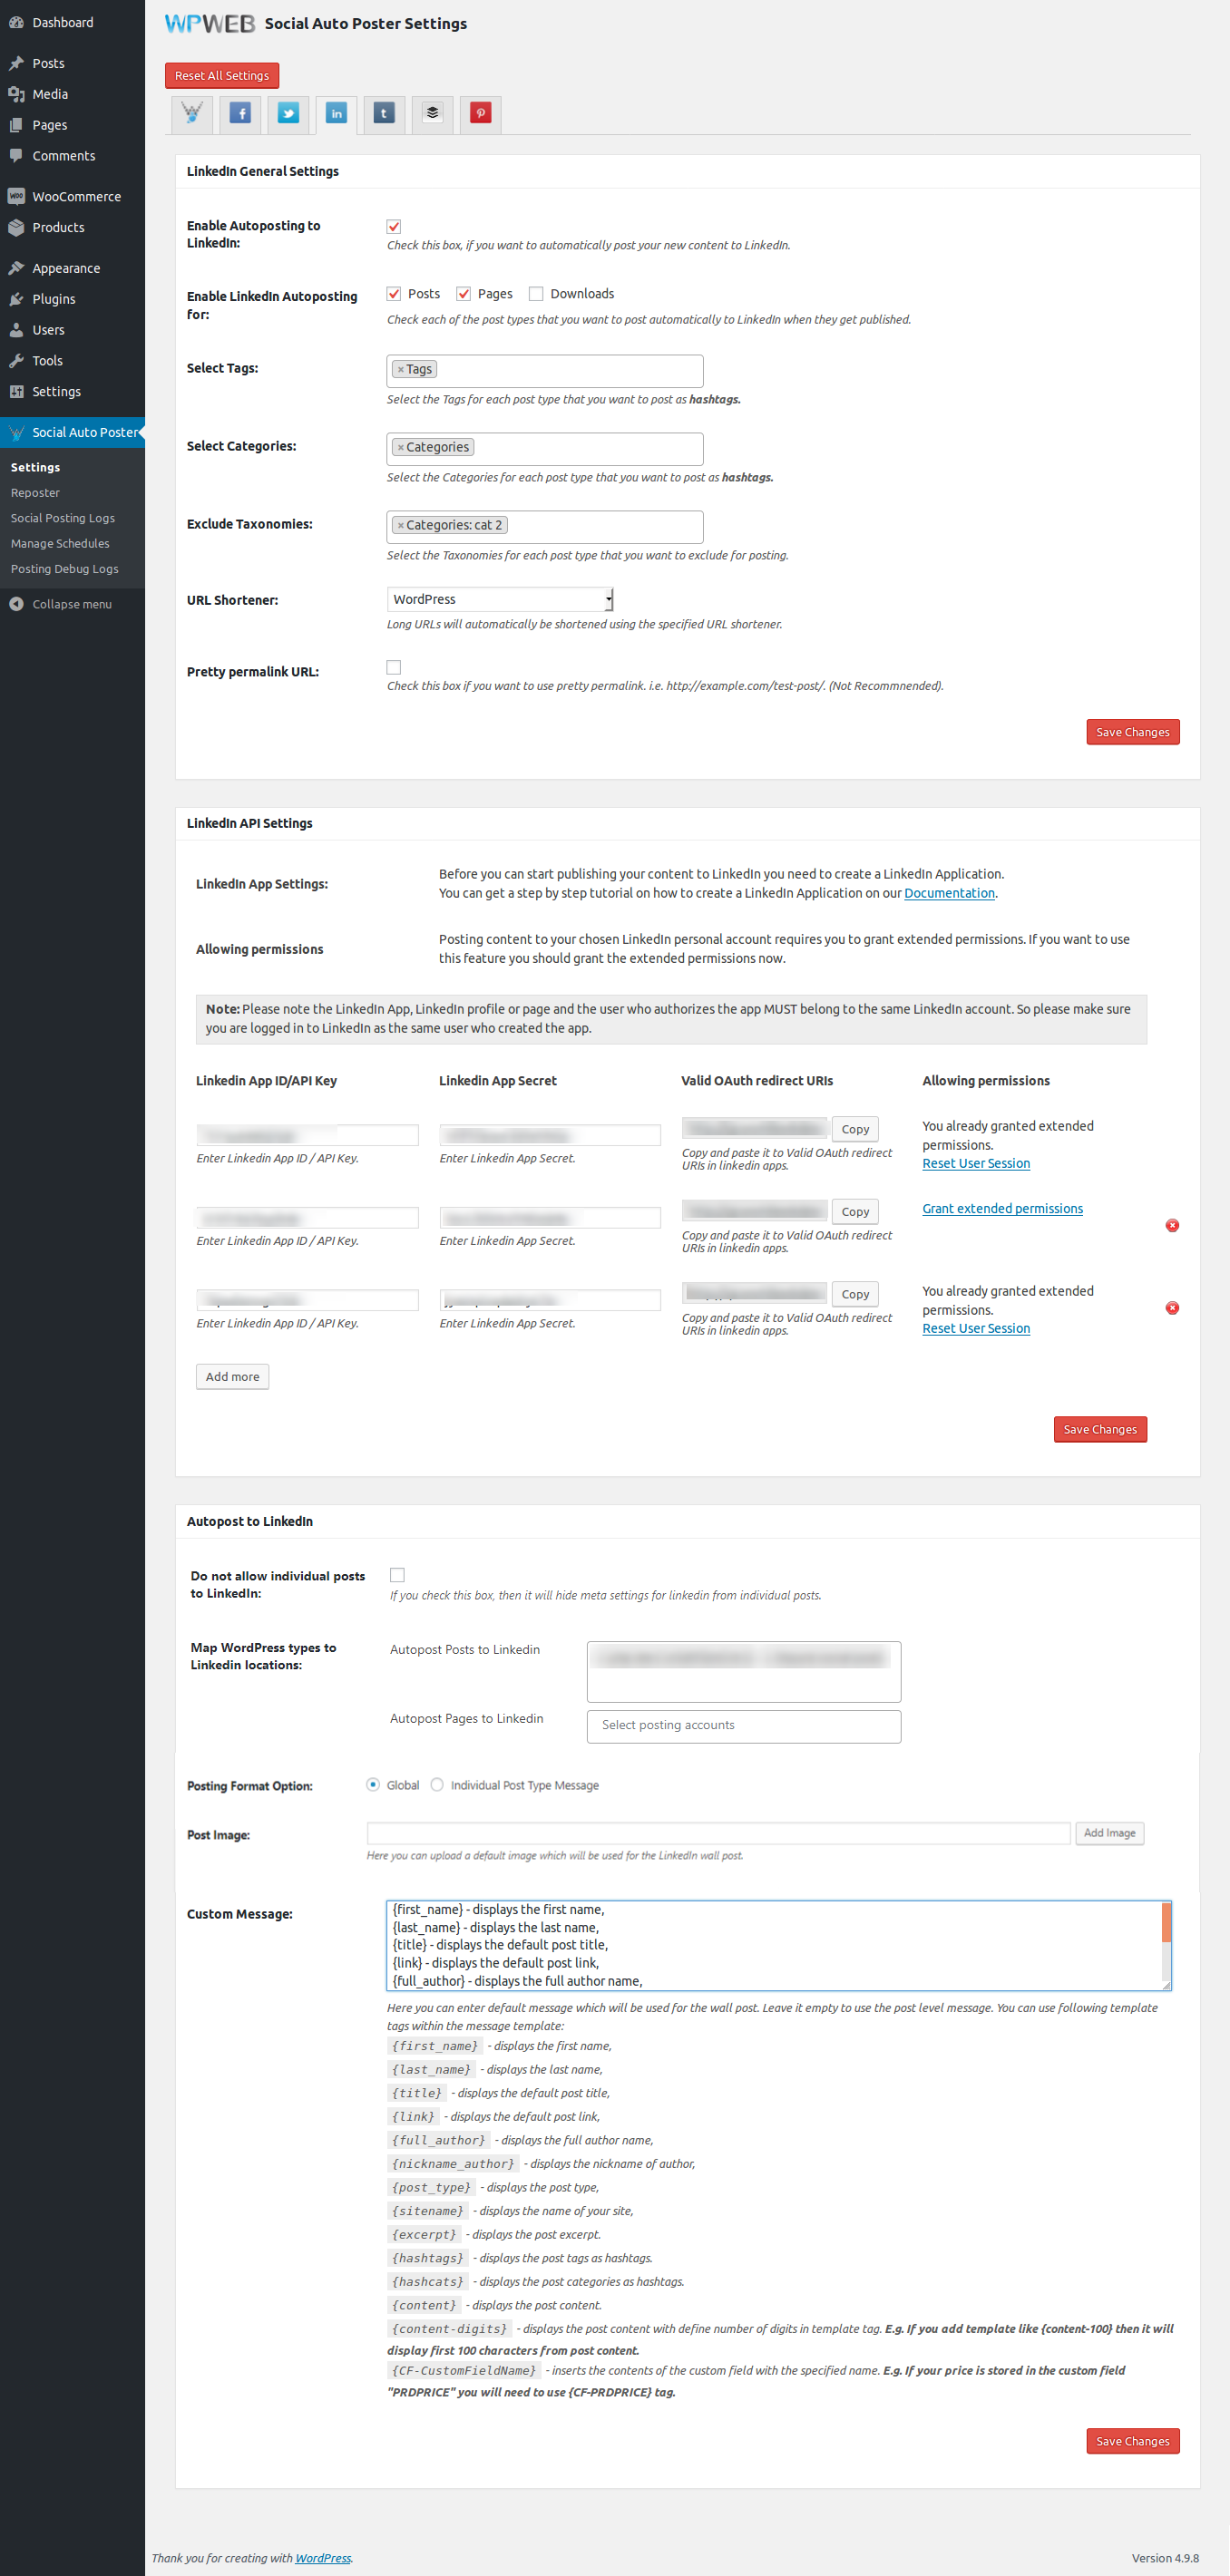
LinkedIn General Settings
Enable Autoposting to LinkedIn
Check this box, if you want to automatically post your new content to LinkedIn.
Enable LinkedIn Autoposting for
Check each of the post types that you want to post automatically to LinkedIn when they get published.
Select Tag
Select the Tags for each post type that you want to post as hashtags.
Select Categories
Select the Categories for each post type that you want to post as hashtags.
Exclude Taxonomies
Select the Taxonomies for each post type that you want to exclude for posting.
URL Shortener
Long URLs will automatically be shortened using the specified URL shortener like WordPress, tinyurl.com, bit.ly or shorte.st.
Pretty permalink URL
This setting will only appear once the URL Shortener "WordPress" is enabled. Check this option if you want to use pretty URL instead of WordPress plain URL in Social Media.
LinkedIn API Settings
Here, You have to enter LinkedIn App ID/API Key, LinkedIn App Secret.
Note: Now you can set as many LinkedIn accounts as you want to autopost the content.
Valid OAuth redirect URIs
Copy the valid OAuth redirect URIs value and paste the URL to the LinkedIn App OAuth 2.0 Redirect URIs field.
Grant Extended Permissions
Allowing permissions
To be able to autopost to your LinkedIn Accounts, you need to grant extended permissions. Click on the 'Grant extended permissions' link. This will connect the plugin with your previously created LinkedIn App. When you go through the steps while connecting the plugin to your LinkedIn App you need to give all the asked permissions. Remember: You give the permissions to your own App, so you won't get spammed from someone else then your self :-)
Autopost to LinkedIn
Do not allow individual posts to LinkedIn
If you check this box, then it will hide meta settings for LinkedIn from individual posts.
Map WordPress types to LinkedIn locations
Once you perform the “Grant the extended permission” step you'll be able to choose which post type you want to autopost to a specific LinkedIn Account. You'll see a list of all registered post types and one drop down from which you can choose on which LinkedIn Account you want to post each of these content types.
Note : Now, you can set multiple LinkedIn company pages / groups as you want to autopost the content.
Posting Format Option
Here you will have two options as below.Global: Select global to apply custom message template to all post types.
Individual Post Type Message: Select this option if you want to to apply custom message template individual post types as shown in the screenshot i.e. page, product, post etc.
Post Image
Here you can upload a default image which will be used for the LinkedIn wall post.
Custom Message
Here you can enter default message which will be used for the wall post. Leave it empty to use the post level message. You can use following template tags within the message template
{first_name}- displays the first name{last_name}- displays the last name{title}- displays the post title{link}- displays the default post link{full_author}- displays the full author name{nickname_author}- displays the nickname of author{post_type}- displays the post type{sitename}- displays the name of your site{excerpt}- displays the post excerpt{hashtags}- displays the post tags as hashtags{hashcats}- displays the post categories as hashtags{content}- displays the post content{content-digits}- displays the post content with define number of digits in template tag. E.g. If you add template like {content-100} then it will display first 100 characters from post content{CF-CustomFieldName}- inserts the contents of the custom field with the specified name. E.g. If your price is stored in the custom field "PRDPRICE" you will need to use {CF-PRDPRICE} tag.
Tumblr Settings
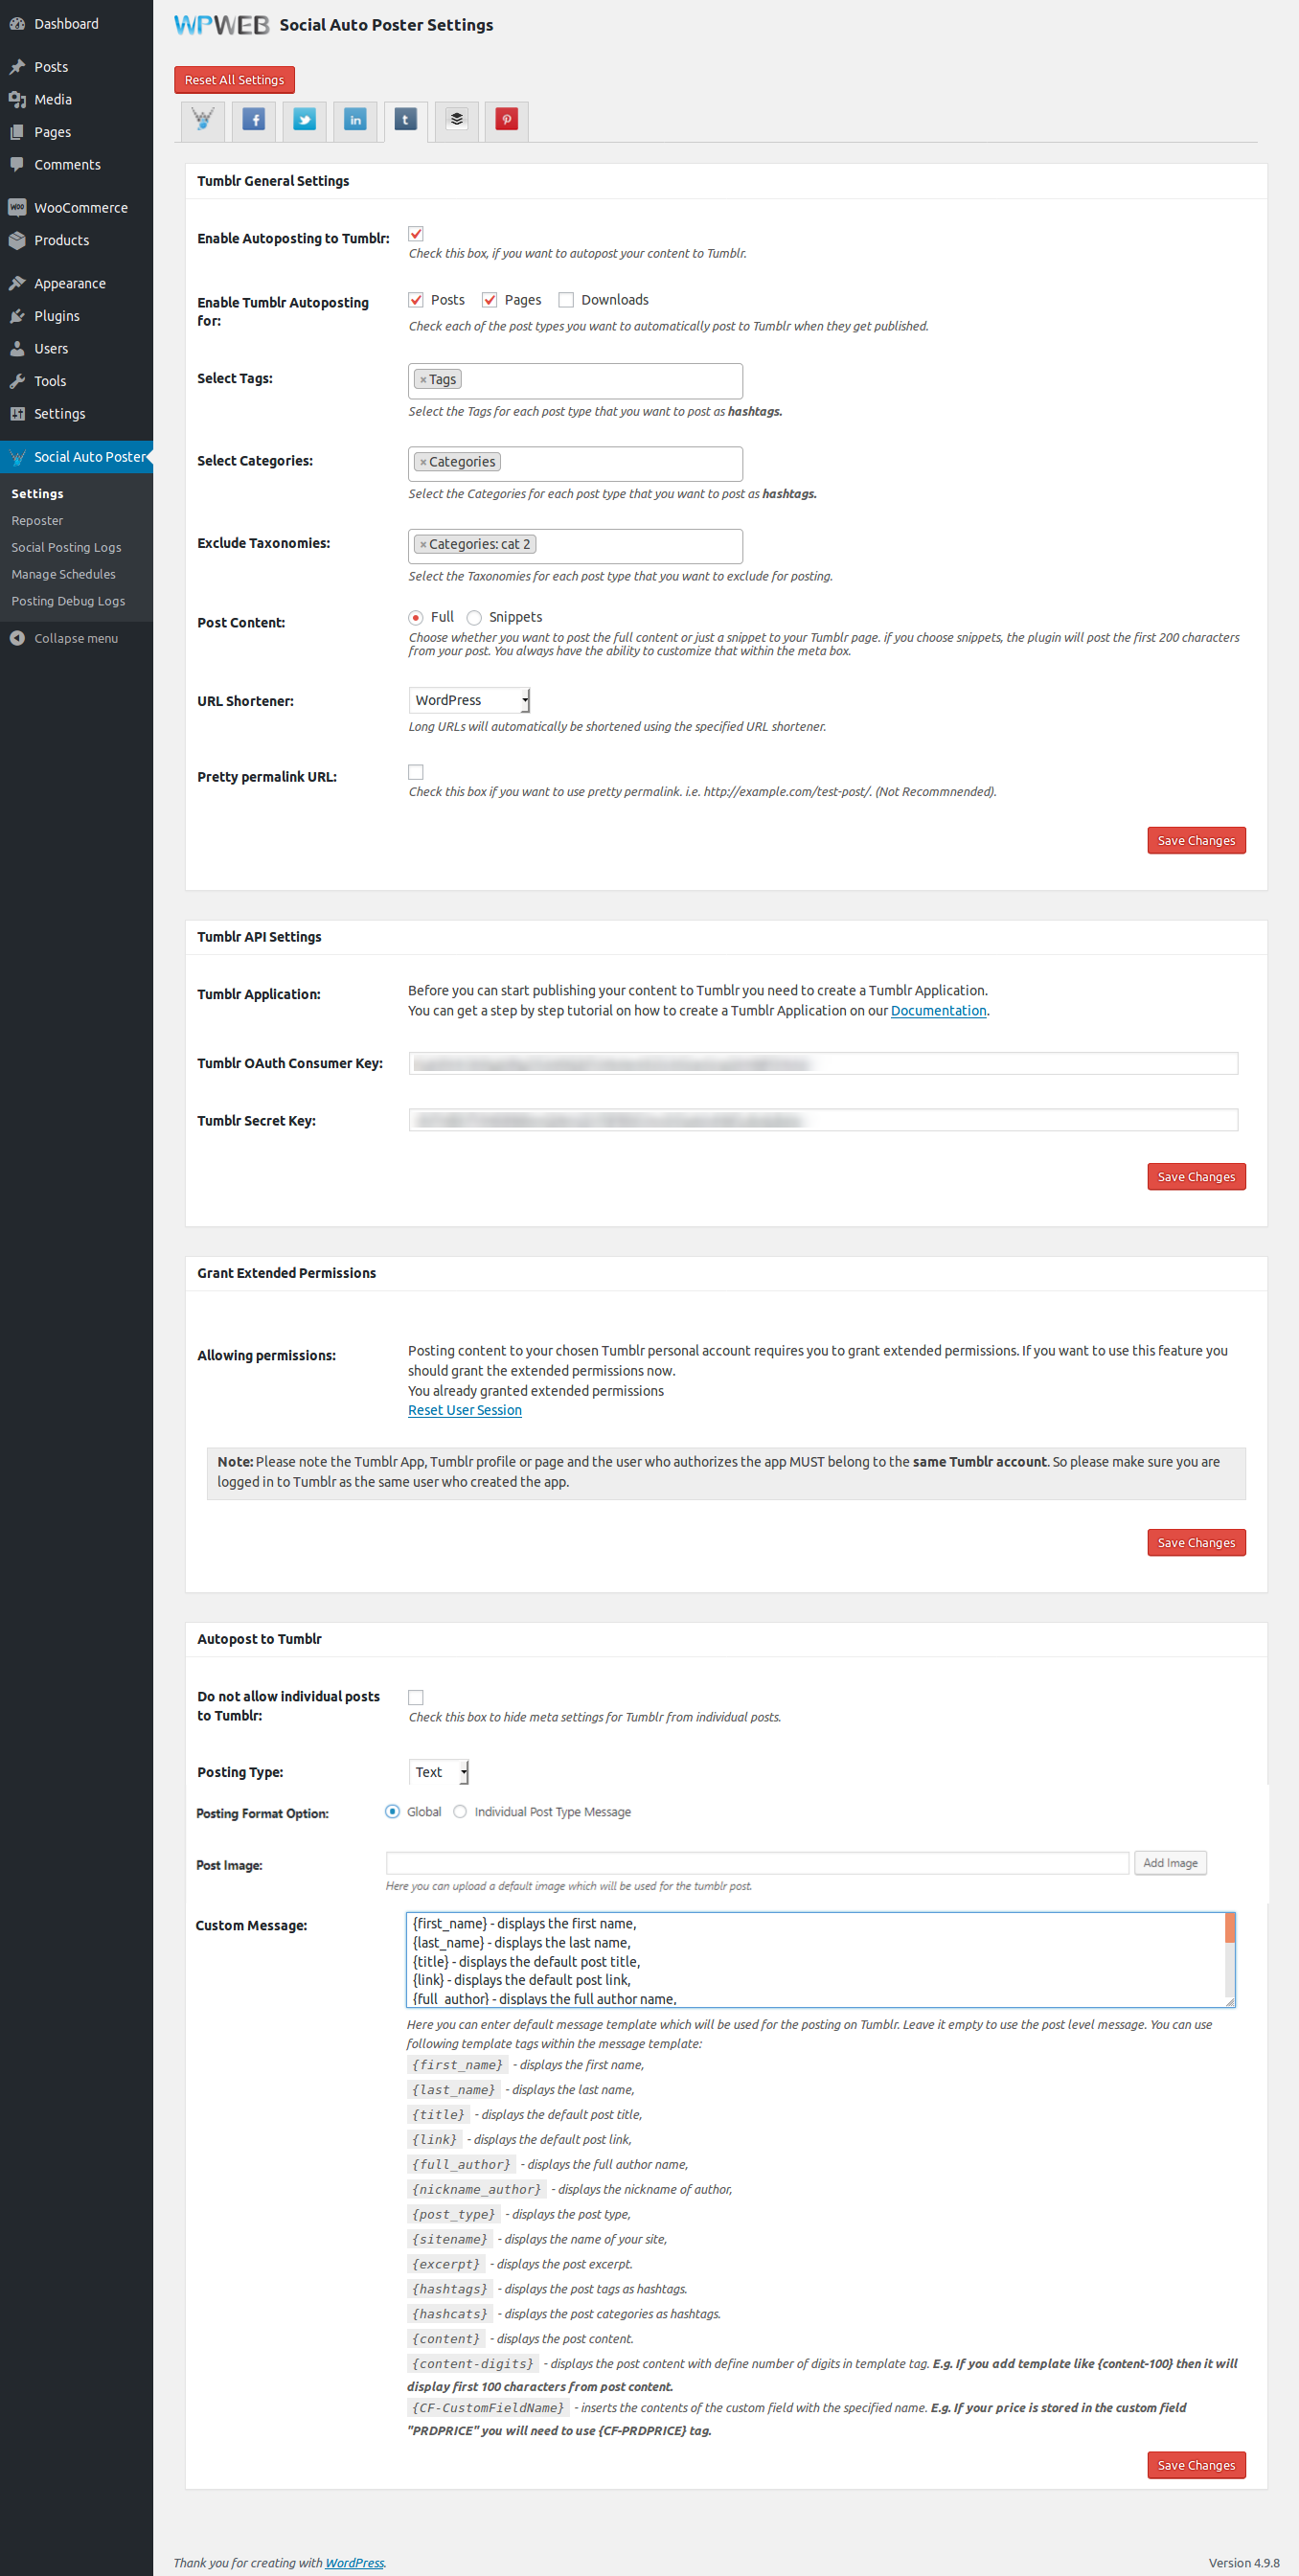
Tumblr General Settings
Enable Autoposting to Tumblr
Check this box, if you want to automatically post your new content to Tumblr.
Enable Tumblr Autoposting for
Check each of the post types that you want to post automatically to Tumblr when they get published.
Select Tag
Select the Tags for each post type that you want to post as hashtags.
Select Categories
Select the Categories for each post type that you want to post as hashtags.
Exclude Taxonomies
Select the Taxonomies for each post type that you want to exclude for posting.
Post Content
Choose option whatever you want to post the full content or just a snippet to your Tumblr page. If you choose snippets, the plugin will post the first 200 characters from your post. You always have the ability to customize that within the meta box.
URL Shortener
Long URLs will automatically be shortened using the specified URL shortener like WordPress, tinyurl.com, bit.ly or shorte.st.
Pretty permalink URL
This setting will only appear once the URL Shortener "WordPress" is enabled. Check this option if you want to use pretty URL instead of WordPress plain URL in Social Media.
Tumblr API Settings
Here, You have to enter Tumblr OAuth Consumer Key, Tumblr Secret Key.
Grant Extended Permissions
Allowing permissions
Once you perform the “Grant extended permissions” the plugin will connect with your previously created Tumblr App. When you go through the steps while connecting the plugin to your Tumblr App you need to give all the asked permissions. Remember: You give the permissions to your own App, so you won't get spammed from someone else then your self :-)
Autopost to Tumblr
Do not allow individual posts to Tumblr
Check this box to hide meta settings for Tumblr from individual posts.
Posting Type
Choose posting type which you want to use, Default is Text posting.
Posting Format Option
Here you will have two options as below.Global: Select global to apply custom message template to all post types.
Individual Post Type Message: Select this option if you want to to apply custom message template individual post types as shown in the screenshot i.e. page, product, post etc.
Post Image
Here you can upload a default image which will be used for the tumblr post.
Custom Message
Here you can enter default message template which will be used for the posting on Tumblr. Leave it empty to use the post level message. You can use following template tags within the message template:
{first_name}- displays the first name{last_name}- displays the last name{title}- displays the default post title{link}- displays the default post link{full_author}- displays the full author name{nickname_author}- displays the nickname of author{post_type}- displays the post type{sitename}- displays the name of your site{excerpt}- displays the post excerpt{hashtags}- displays the post tags as hashtags{hashcats}- displays the post categories as hashtags{content}- displays the post content{content-digits}- displays the post content with define number of digits in template tag. E.g. If you add template like {content-100} then it will display first 100 characters from post content{CF-CustomFieldName}- inserts the contents of the custom field with the specified name. E.g. If your price is stored in the custom field "PRDPRICE" you will need to use {CF-PRDPRICE} tag.
Post Image
Here you can upload a default image which will be used for the Tumblr wall post.
BufferApp Settings
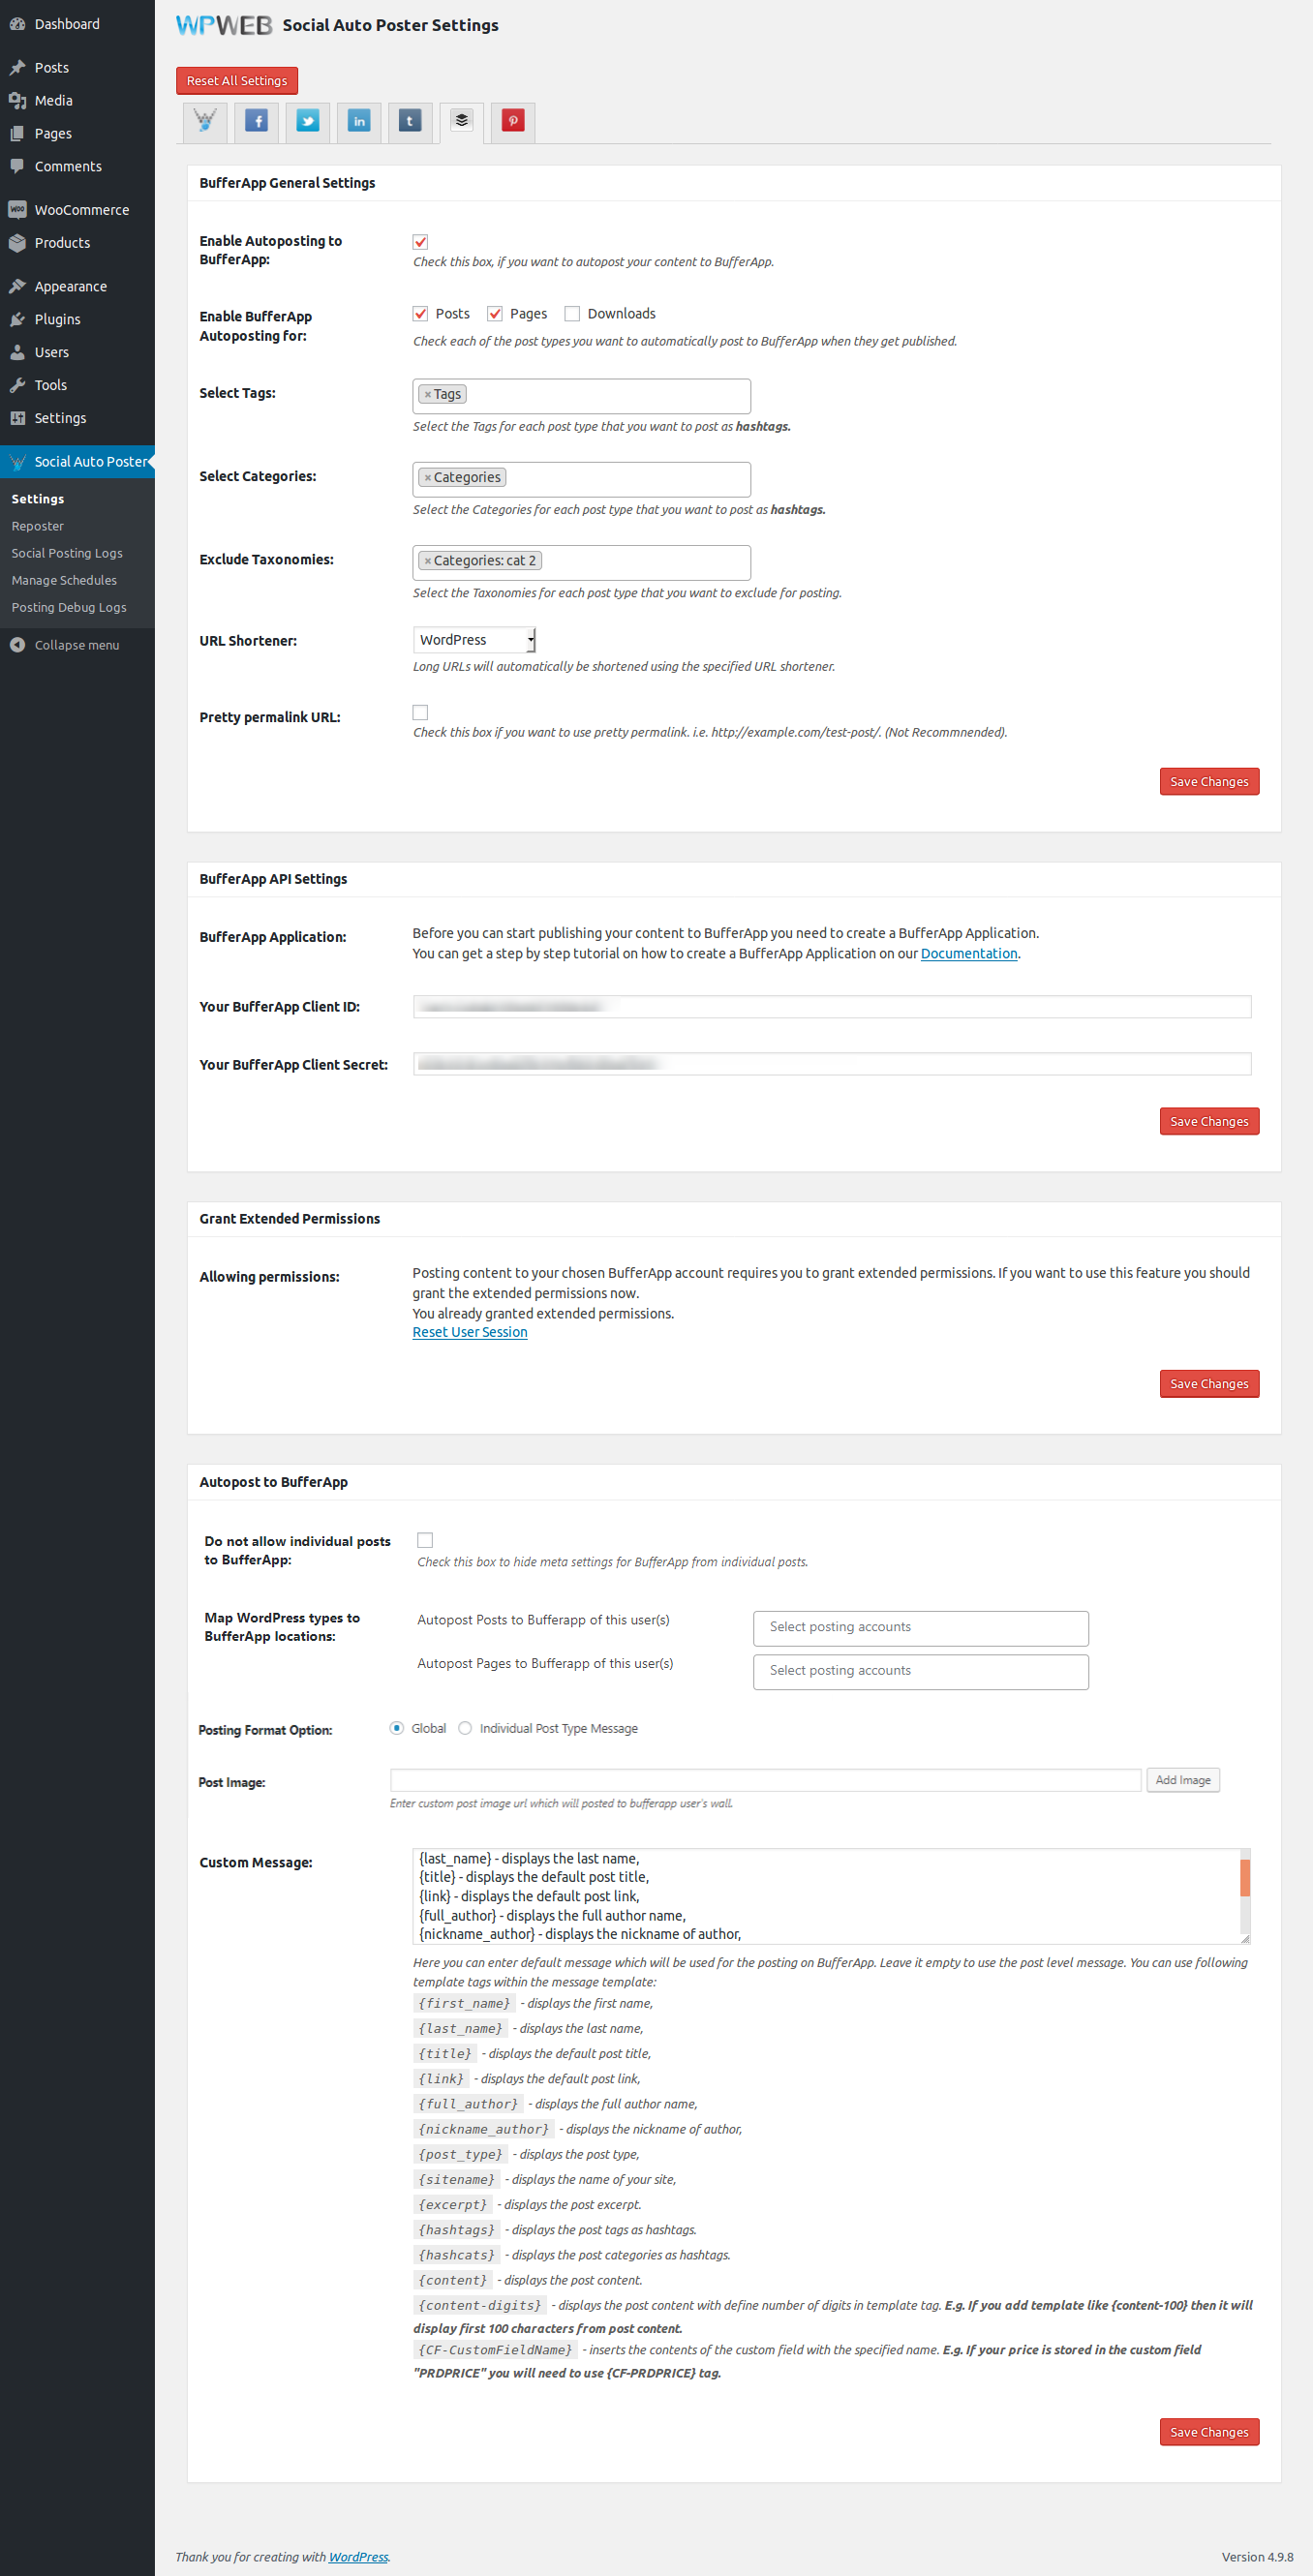
BufferApp General Settings
Enable Autoposting to BufferApp
Check this box, if you want to automatically post your new content to BufferApp.
Enable BufferApp Autoposting for
Check each of the post types that you want to post automatically to BufferApp when they get published.
Select Tag
Select the Tags for each post type that you want to post as hashtags.
Select Categories
Select the Categories for each post type that you want to post as hashtags.
Exclude Taxonomies
Select the Taxonomies for each post type that you want to exclude for posting.
URL Shortener
Long URLs will automatically be shortened using the specified URL shortener like WordPress, tinyurl.com, bit.ly or shorte.st.
Pretty permalink URL
This setting will only appear once the URL Shortener "WordPress" is enabled. Check this option if you want to use pretty URL instead of WordPress plain URL in Social Media.
BufferApp API Settings
Here, You have to enter BufferApp Client ID, BufferApp Client Secret.
Grant Extended Permissions
Allowing permissions
To be able to autopost to your BufferApp Accounts, you need to grant extended permissions. Click on the 'Grant extended permissions' link. This will connect the plugin with your previously created BufferApp App. When you go through the steps while connecting the plugin to your BufferApp App you need to give all the asked permissions. Remember: You give the permissions to your own App, so you won't get spammed from someone else then your self :-)
Autopost to BufferApp
Do not allow individual posts to BufferApp
Check this box to hide meta settings for BufferApp from individual posts.
Map WordPress types to BufferApp locations
Once you perform “Grant the extended permissions” you'll be able to choose which post type you want to autopost to a specific BufferApp Account. You'll see a list of all registered post types and a drop-down from where you can choose on which BufferApp Account you want to post each of these content types.
Posting Format Option
Here you will have two options as below.Global: Select global to apply custom message template to all post types.
Individual Post Type Message: Select this option if you want to to apply custom message template individual post types as shown in the screenshot i.e. page, product, post etc.
Post Image
Enter custom post image url which will posted to bufferapp user's wall.
Custom Message
Here you can enter default message which will be used for the posting on BufferApp. Leave it empty to use the post level message. You can use following template tags within the message template:
{first_name}- displays the first name{last_name}- displays the last name{title}- displays the default post title{link}- displays the default post link{full_author}- displays the full author name{nickname_author}- displays the nickname of author{post_type}- displays the post type{sitename}- displays the name of your site{excerpt}- displays the post excerpt{hashtags}- displays the post tags as hashtags{hashcats}- displays the post categories as hashtags{content}- displays the post content{content-digits}- displays the post content with define number of digits in template tag. E.g. If you add template like {content-100} then it will display first 100 characters from post content{CF-CustomFieldName}- inserts the contents of the custom field with the specified name. E.g. If your price is stored in the custom field "PRDPRICE" you will need to use {CF-PRDPRICE} tag.
Post Image
Enter custom post image URL which will posted to BufferApp user's wall.
Pinterest Settings
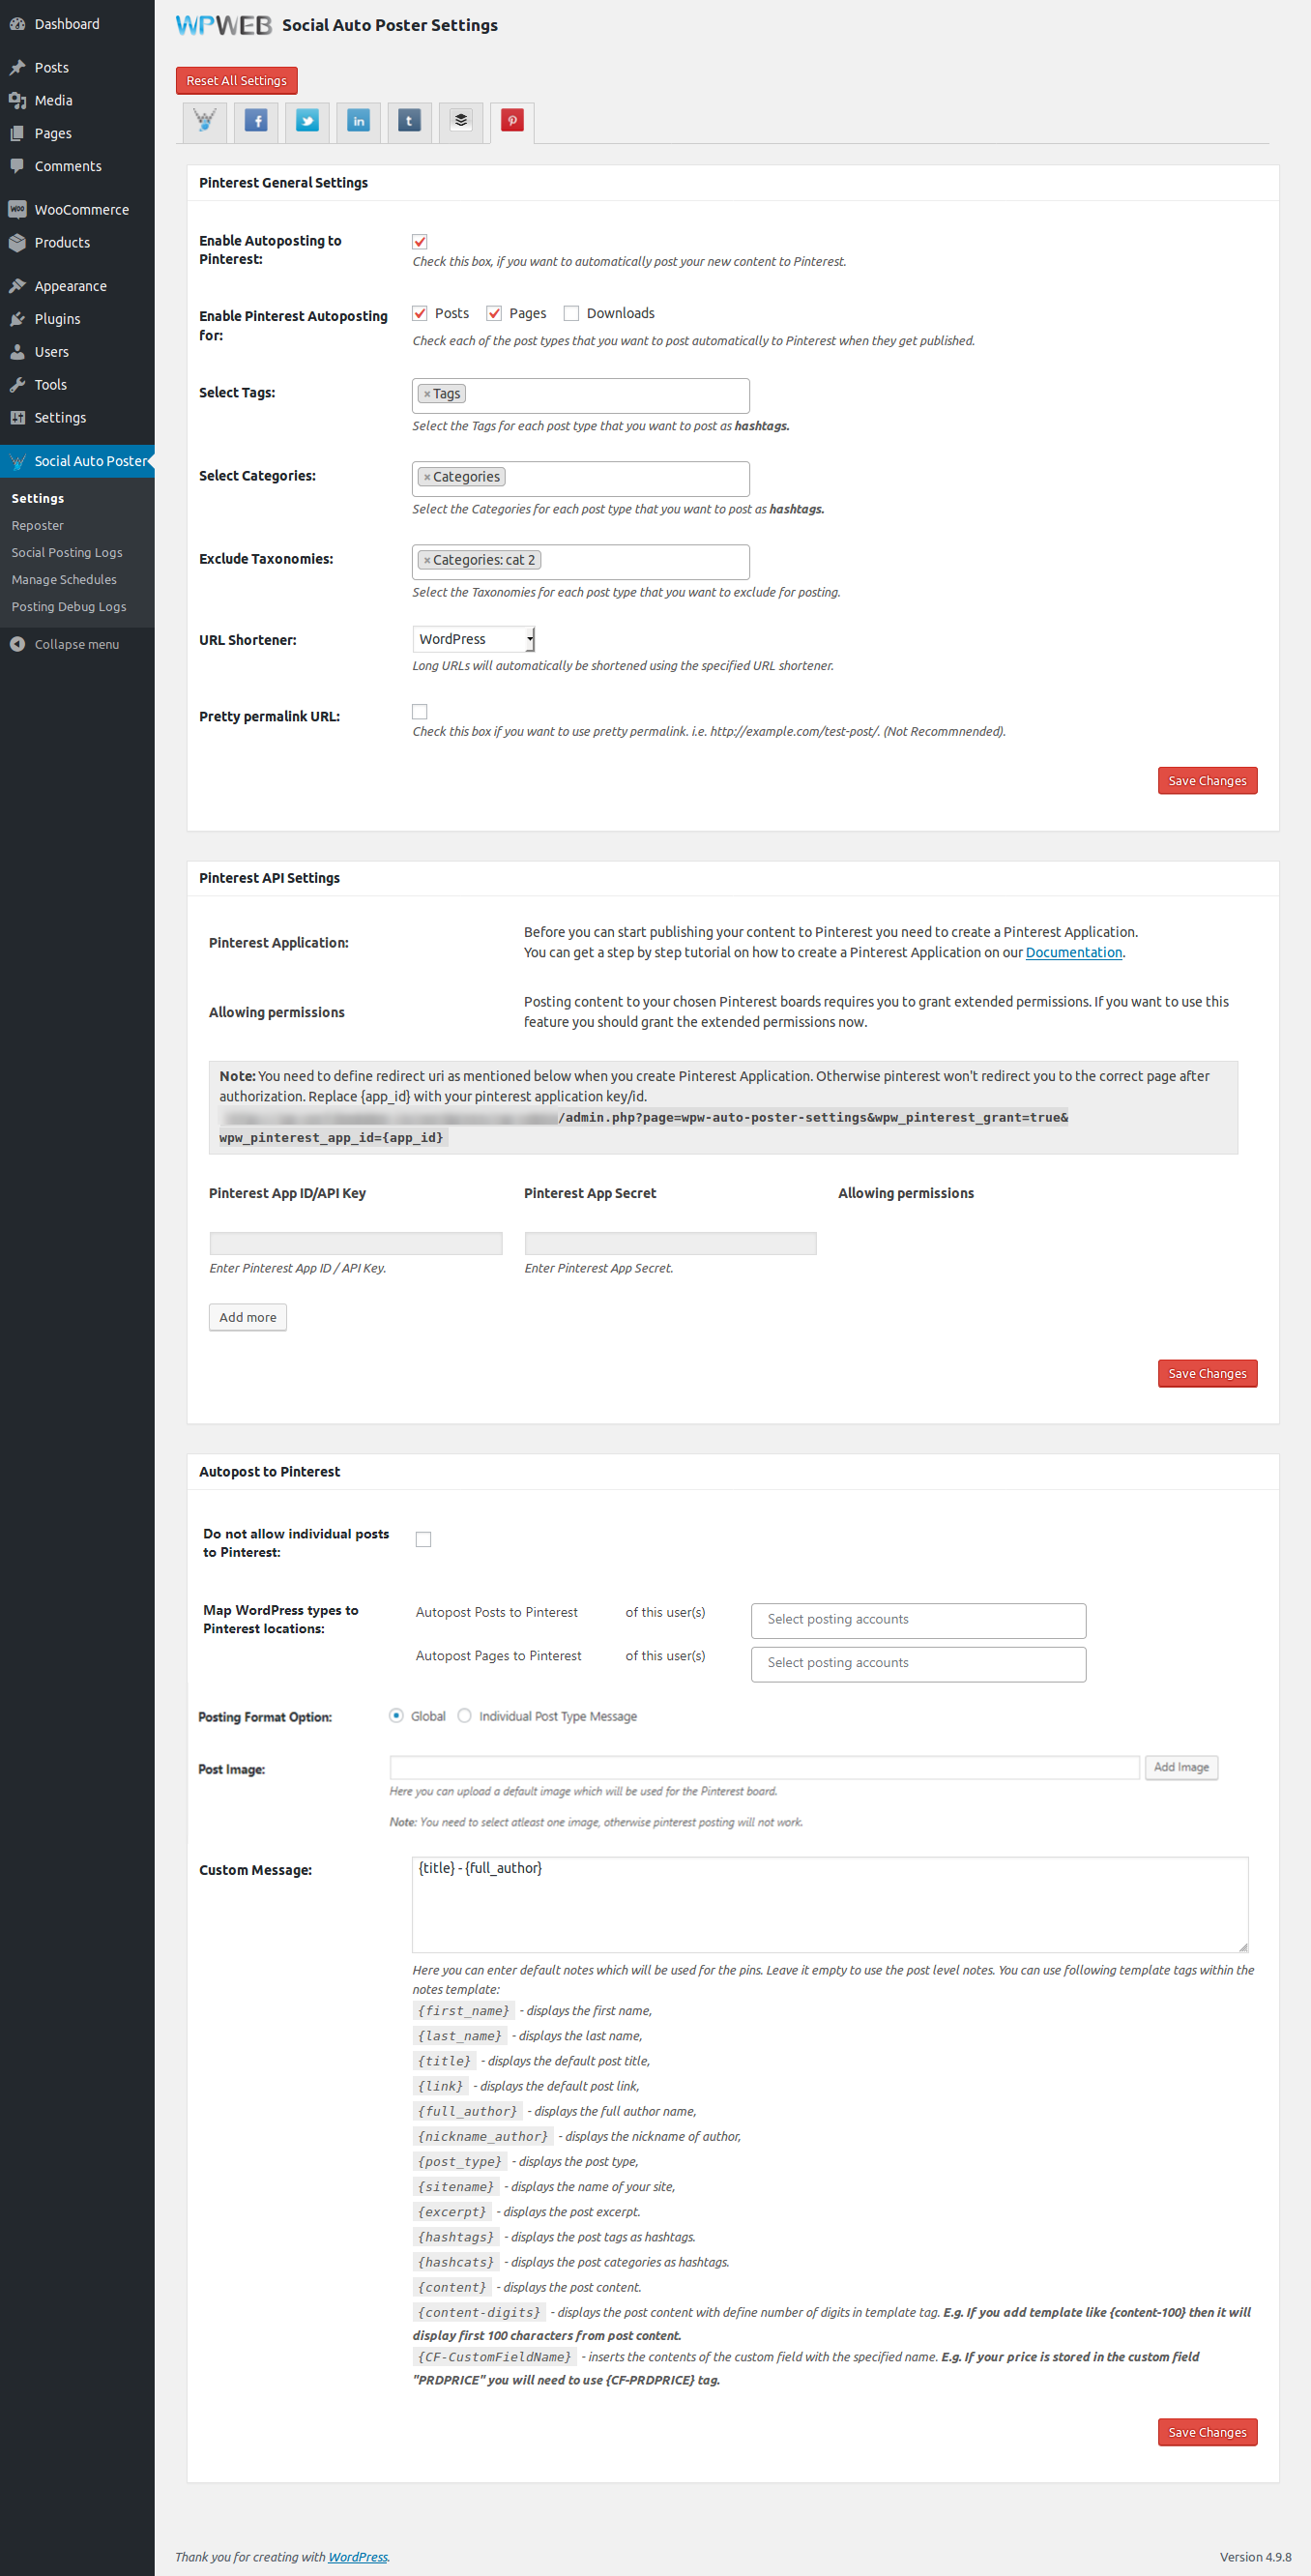
Pinterest General Settings
Enable Autoposting to Pinterest
Check this box, if you want to automatically post your new content to Pinterest.
Enable Pinterest Autoposting for
Check each of the post types that you want to post automatically to Pinterest when they get published.
Select Tag
Select the Tags for each post type that you want to post as hashtags.
Select Categories
Select the Categories for each post type that you want to post as hashtags.
Exclude Taxonomies
Select the Taxonomies for each post type that you want to exclude for posting.
URL Shortener
Long URLs will automatically be shortened using the specified URL shortener.
Pretty permalink URL
Check this box if you want to use pretty permalink. i.e. http://example.com/test-post/. (Not Recommnended).
Pinterest API Settings
Here, You have to enter Pinterest App ID, App Secret.
Note: Now you can set as many Pinterest accounts as you want to autopost the content.
Autopost to Pinterest
Do not allow individual posts to Pinterest
By checking this box you can prevent your authors to post to individual Pinterest Accounts If you run a multi author blog. If checked, then all posts created by any author will get posted to your chosen Pinterest Account.
Map WordPress types to Pinterest locations
After you save the API Key and APP Secret, you'll be able to choose which post type you want to autopost to a specific Pinterest Account. You'll see a list of all registered post types and drop down from where you can choose on which Pinterest Account you want to post each of these content types.
Note: Now you can set as many Pinterest boards as you want to autopost the content.
Posting Format Option
Here you will have two options as below.Global: Select global to apply custom message template to all post types.
Individual Post Type Message: Select this option if you want to to apply custom message template individual post types as shown in the screenshot i.e. page, product, post etc.
Post Image
Here you can upload a default image which will be used for the Pinterest board.
Note: You need to select atleast one image, otherwise Pinterest posting will not work.
Custom Message
You can enter a custom Pinterest template to be used here. The available tags are:
{first_name}- displays the first name{last_name}- displays the last name{title}- displays the post title{link}- displays the post title with link{full_author}- displays the full author name{nickname_author}- displays the nickname of author{post_type}- displays the post type{sitename}- displays the name of your site{excerpt}- displays the post excerpt{hashtags}- displays the post tags as hashtags{hashcats}- displays the post categories as hashtags{content}- displays the post content{content-digits}- displays the post content with define number of digits in template tag. E.g. If you add template like {content-100} then it will display first 100 characters from post content{CF-CustomFieldName}- inserts the contents of the custom field with the specified name. E.g. If your price is stored in the custom field "PRDPRICE" you will need to use {CF-PRDPRICE} tag.
Reposter Settings
Don't let your posts die after just a single social media share. Social Auto Poster allows you to share individual posts multiple times, over and over again. It can automatically re-post the already existing posts and can also select specific posts for re-posting using filters like custom post type, include/exclude categories.
Schedule Settings
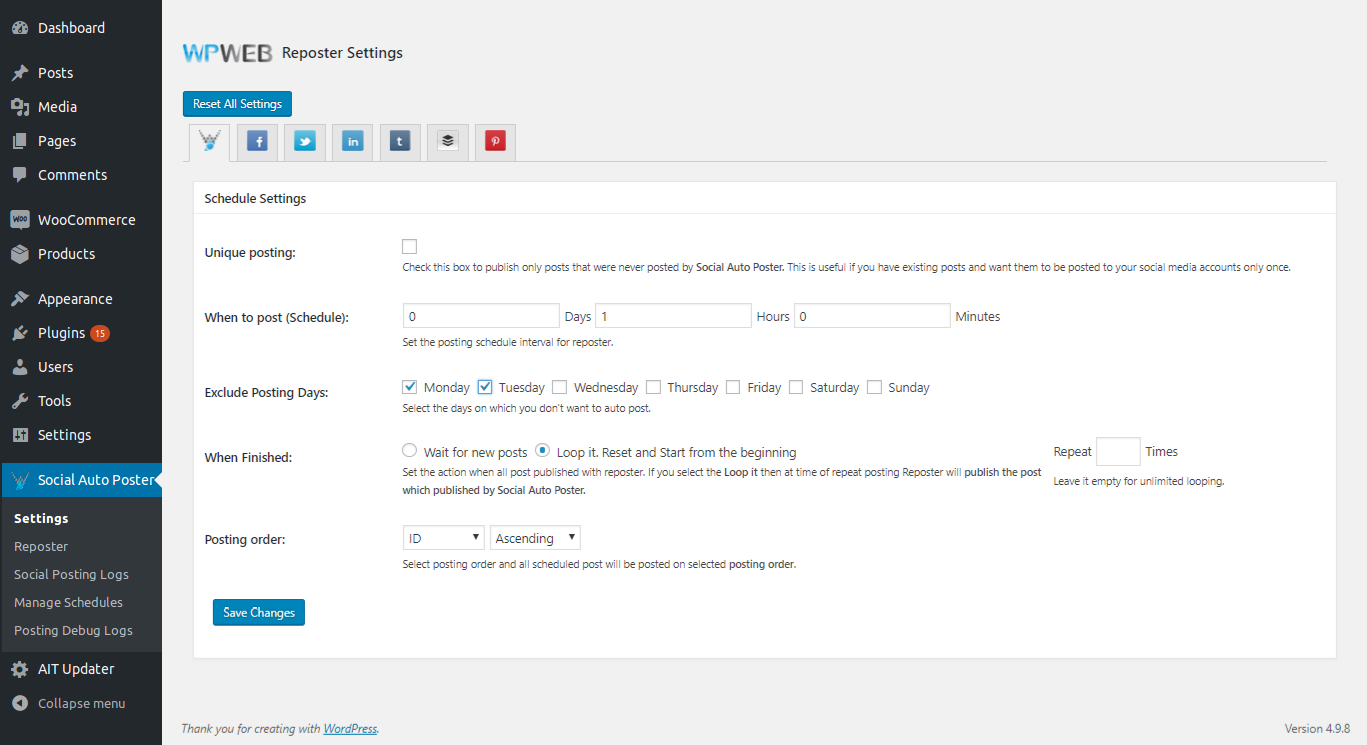
Unique posting
Check this box to publish only posts that were never posted by Social Auto Poster. This is useful if you have existing posts and want them to be posted to your social media accounts only once.
When to post (Schedule)
Set the posting schedule interval for reposter.
Exclude Posting Days
Select the days on which you don't want to auto post.
When Finished
Set the option for what should happen when there is no post pending.
- Wait for new posts: When there is no post pending to be posted then it will wait for new posts.
- Loop It. Reset and Start from beginning: When there is no post pending to be posted then it will repeat to post all posts again in a loop for defined number of times.
Posting order
Select posting order and all scheduled post will be posted on selected posting order.
Facebook Settings
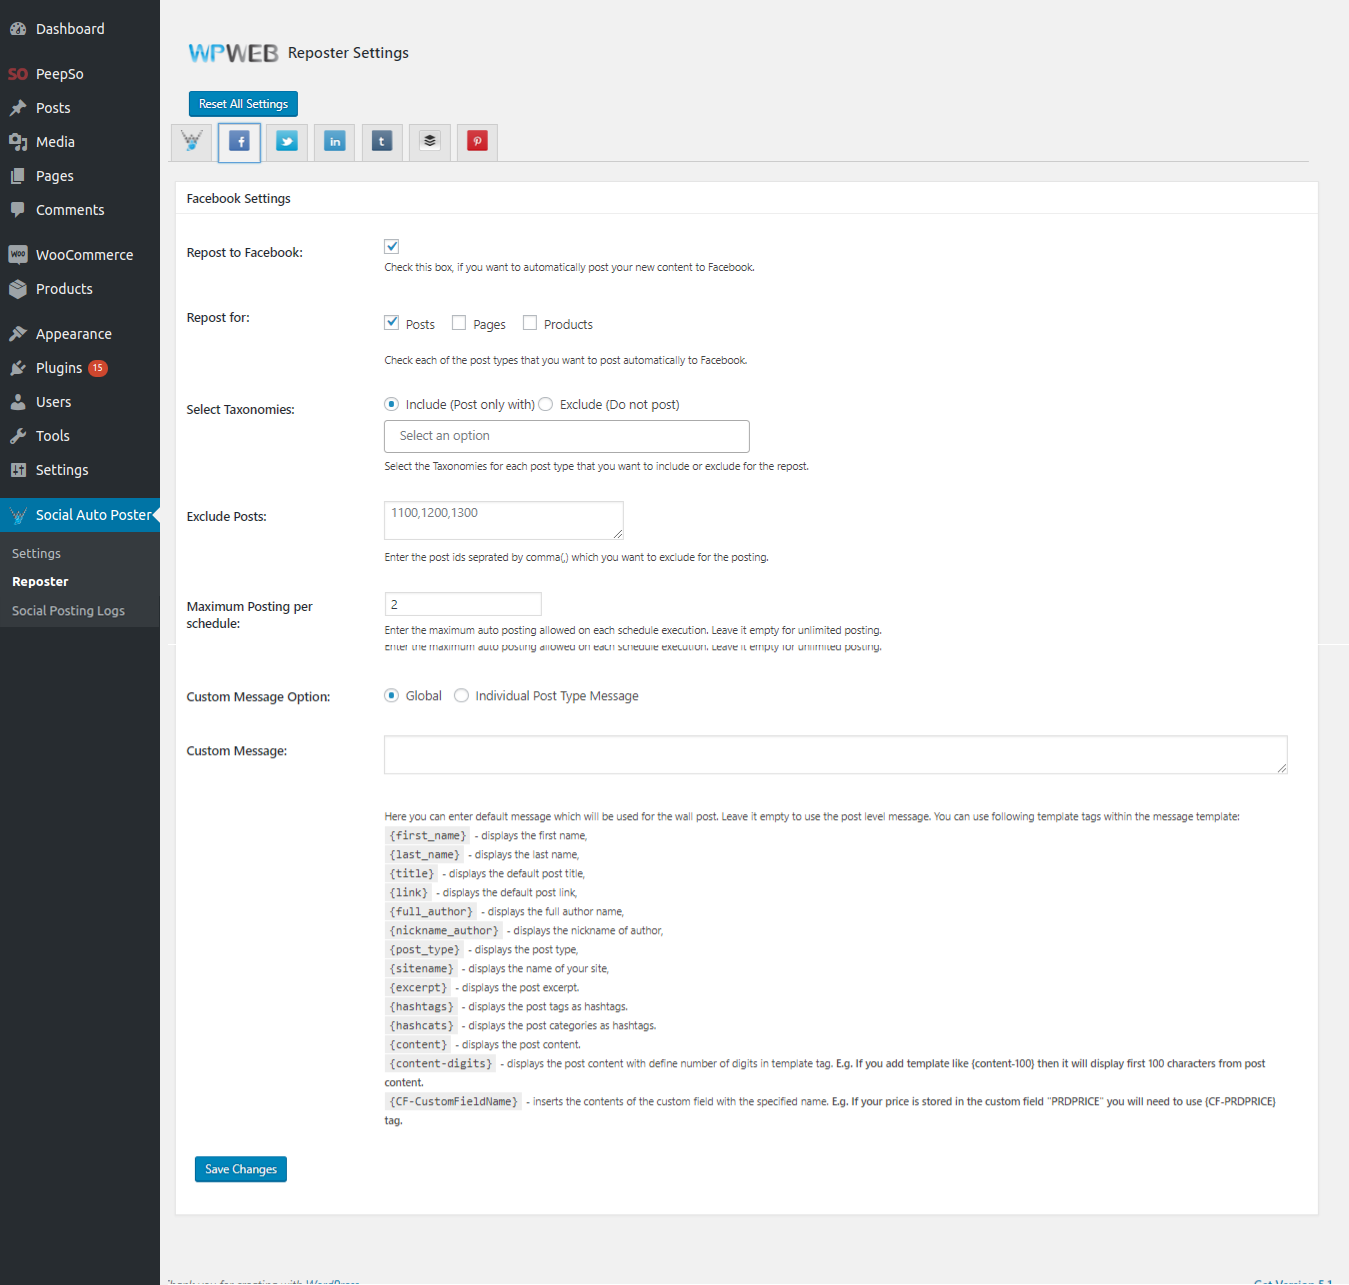
Facebook Settings
Repost to Facebook
Check this box, if you want to automatically post your new content to Facebook.
Repost for
Check each of the post types that you want to post automatically to Facebook.
Select Taxonomies
Select the Taxonomies for each post type that you want to include or exclude for the repost.
Exclude Posts
Enter the post ids seprated by comma(,) which you want to exclude for the posting.
Maximum Posting per schedule
Enter the maximum auto posting allowed on each schedule execution. Leave it empty for unlimited posting.
Custom message option
Here you will have two options as below.Global: Select global to apply custom message template to all post types.
Individual Post Type Message:
Select this option if you want to to apply custom message template individual post types as shown in the screenshot i.e. page, product, post etc. Check the screenshot below.Twitter Settings
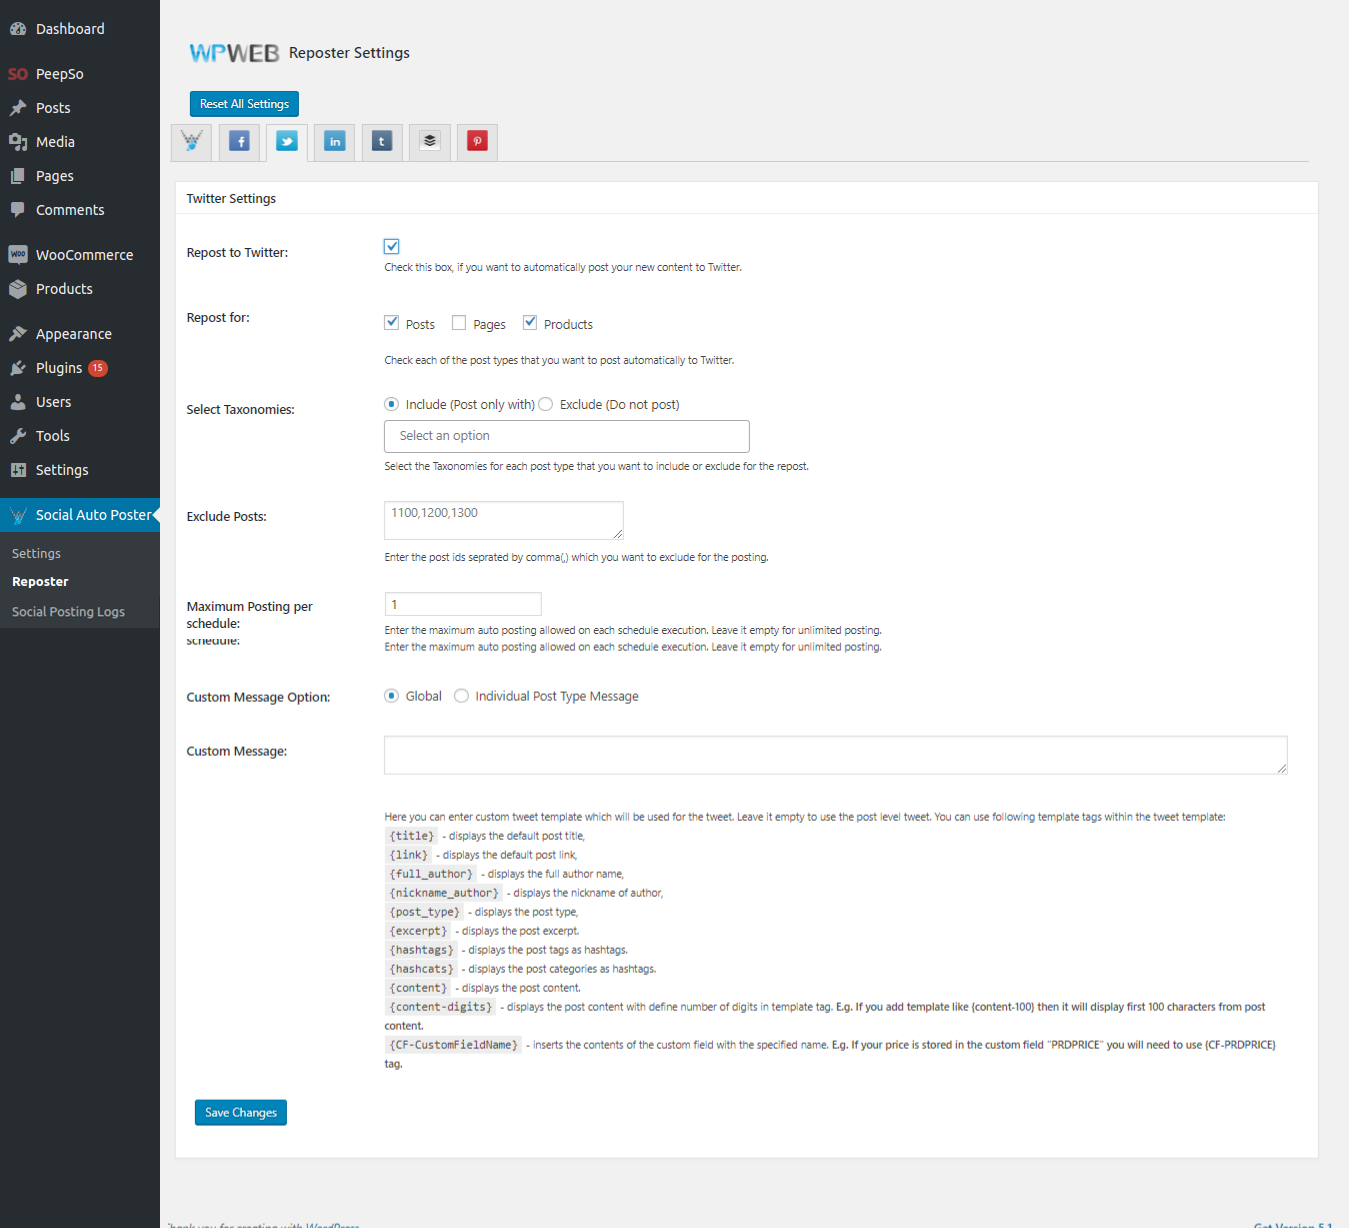
Twitter Settings
Repost to Twitter
Check this box, if you want to automatically post your new content to Twitter.
Repost for
Check each of the post types that you want to post automatically to Twitter.
Select Taxonomies
Select the Taxonomies for each post type that you want to include or exclude for the repost.
Exclude Posts
Enter the post ids seprated by comma(,) which you want to exclude for the posting.
Maximum Posting per schedule
Enter the maximum auto posting allowed on each schedule execution. Leave it empty for unlimited posting.
Custom message option
Here you will have two options as below.Global: Select global to apply custom message template to all post types.
Individual Post Type Message: Select this option if you want to to apply custom message template individual post types as shown in the screenshot i.e. page, product, post etc. Check the screenshot below.
LinkedIn Settings
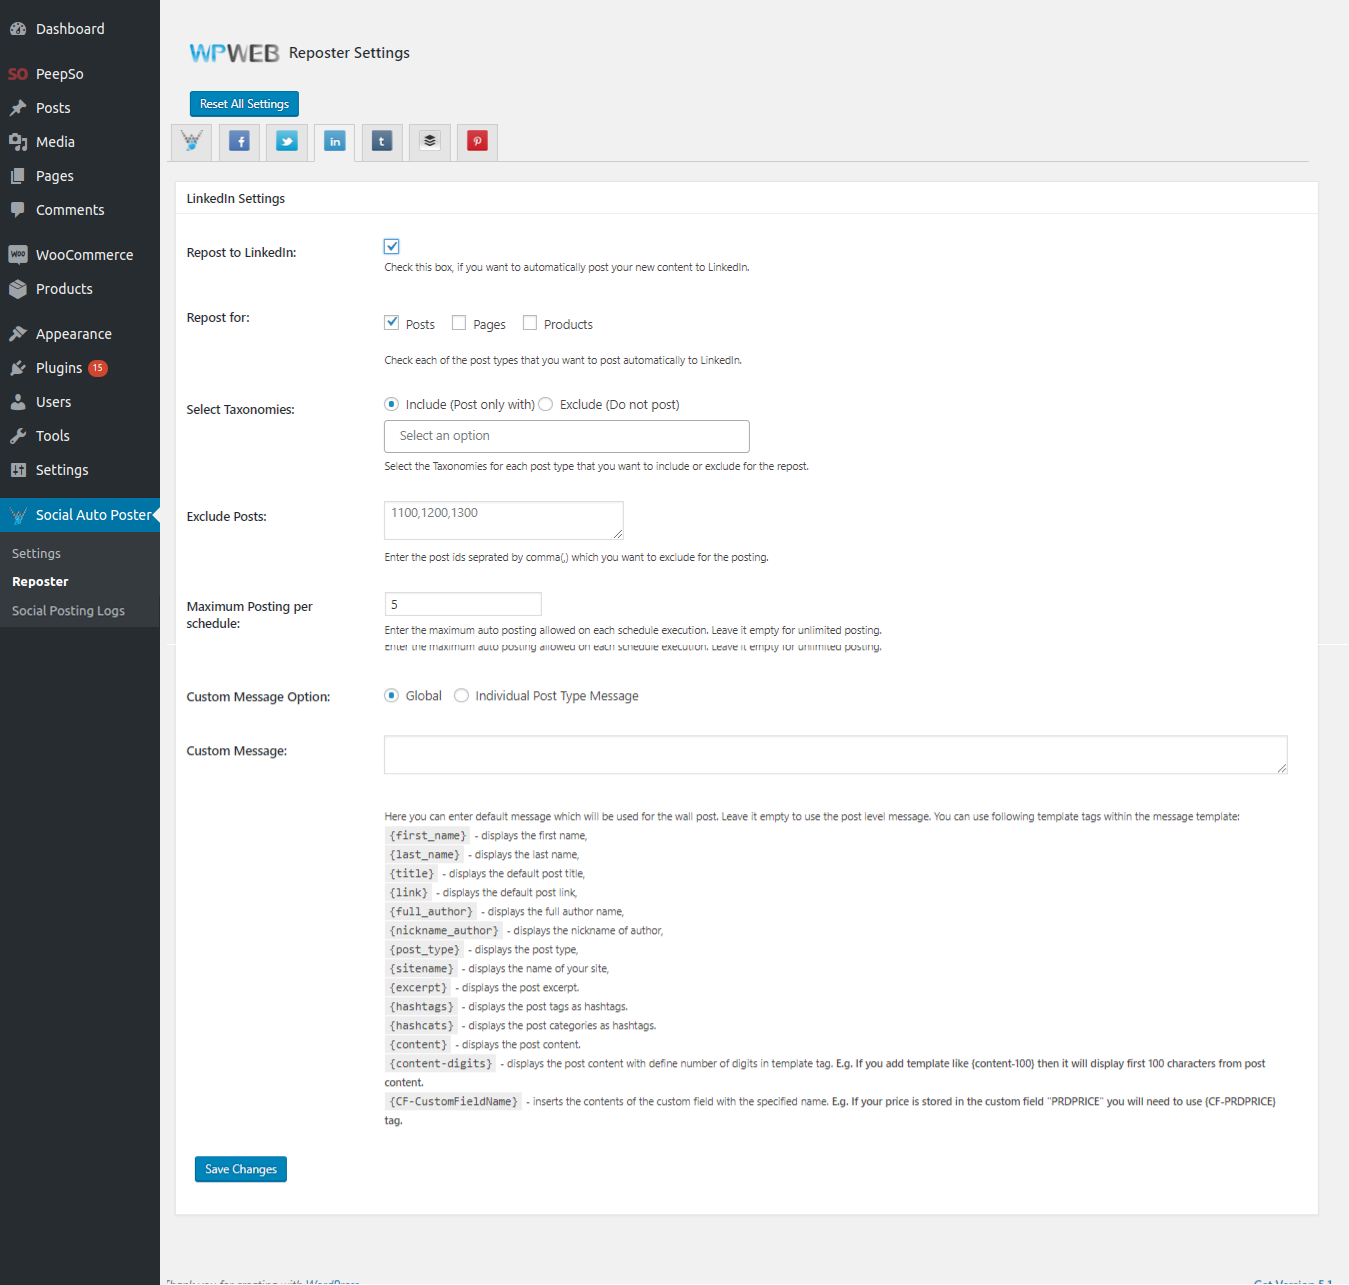
LinkedIn Settings
Repost to LinkedIn
Check this box, if you want to automatically post your new content to LinkedIn.
Repost for
Check each of the post types that you want to post automatically to LinkedIn.
Select Taxonomies
Select the Taxonomies for each post type that you want to include or exclude for the repost.
Exclude Posts
Enter the post ids seprated by comma(,) which you want to exclude for the posting.
Maximum Posting per schedule
Enter the maximum auto posting allowed on each schedule execution. Leave it empty for unlimited posting.
Custom message option
Here you will have two options as below.Global: Select global to apply custom message template to all post types.
Individual Post Type Message: Select this option if you want to to apply custom message template individual post types as shown in the screenshot i.e. page, product, post etc. Check the screenshot below.
Tumblr Settings
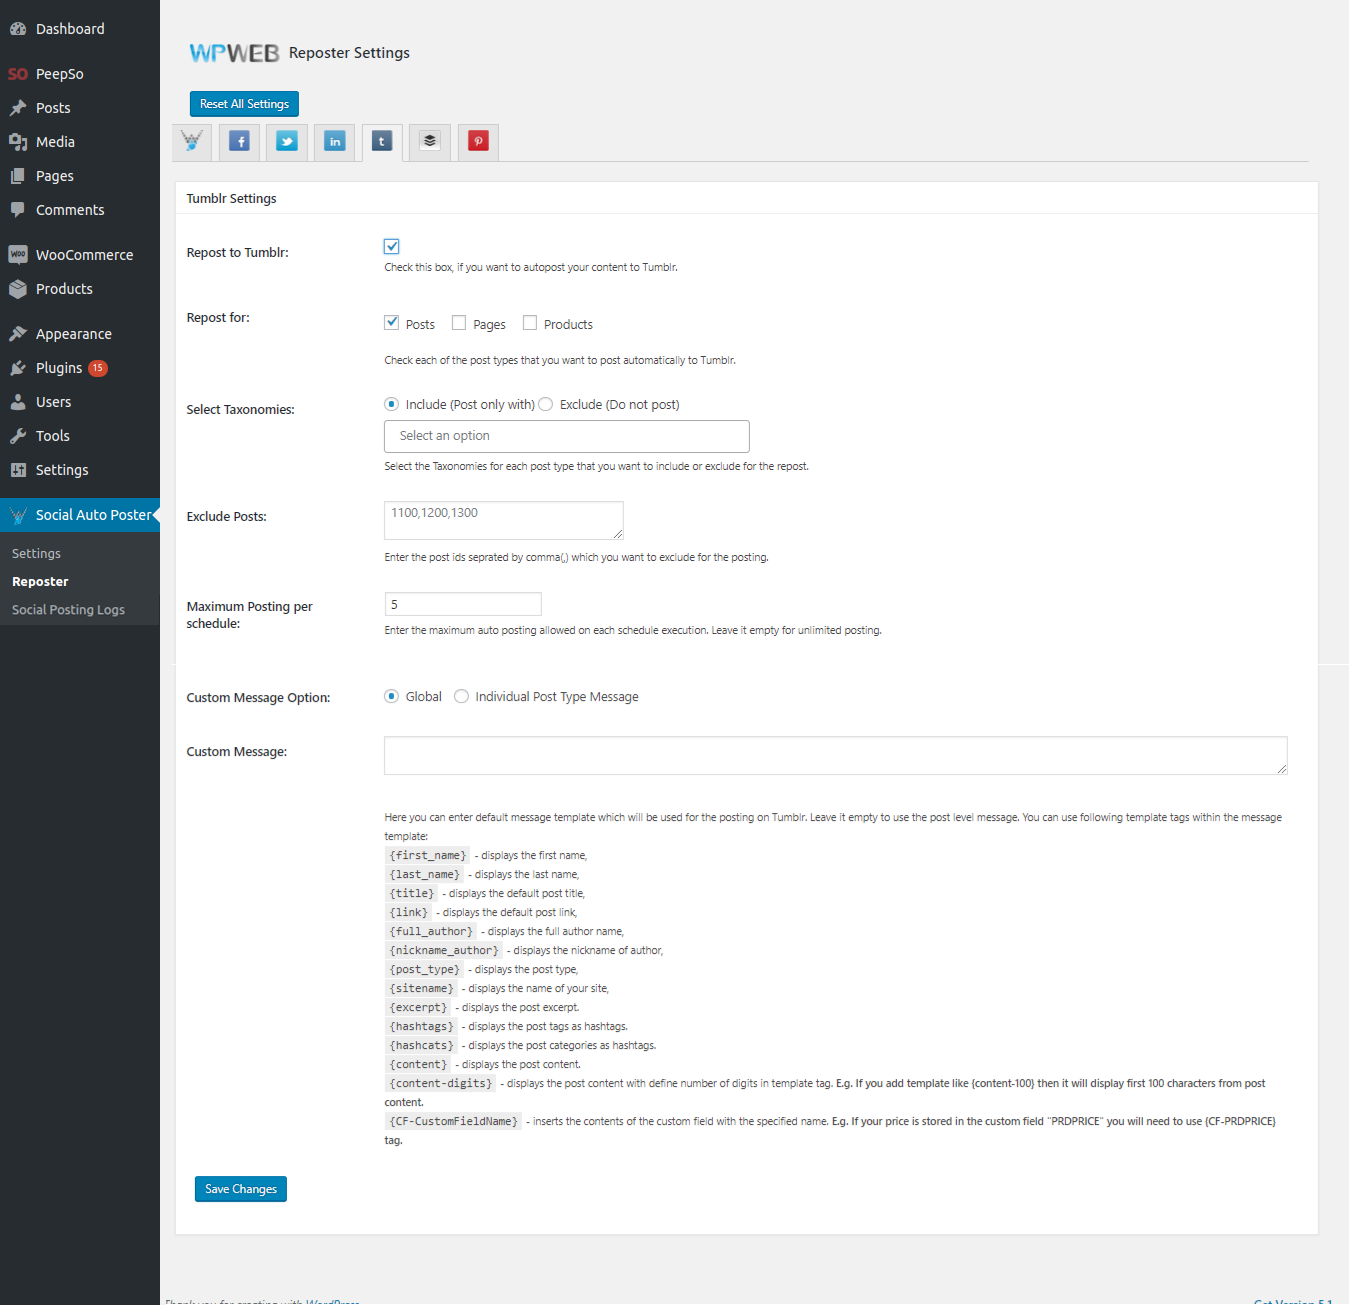
Tumblr Settings
Repost to Tumblr
Check this box, if you want to autopost your content to Tumblr.
Repost for
Check each of the post types that you want to post automatically to Tumblr.
Select Taxonomies
Select the Taxonomies for each post type that you want to include or exclude for the repost.
Exclude Posts
Enter the post ids seprated by comma(,) which you want to exclude for the posting.
Maximum Posting per schedule
Enter the maximum auto posting allowed on each schedule execution. Leave it empty for unlimited posting.
Custom message option
Here you will have two options as below.Global: Select global to apply custom message template to all post types.
Individual Post Type Message: Select this option if you want to to apply custom message template individual post types as shown in the screenshot i.e. page, product, post etc. Check the screenshot below.
BufferApp Settings
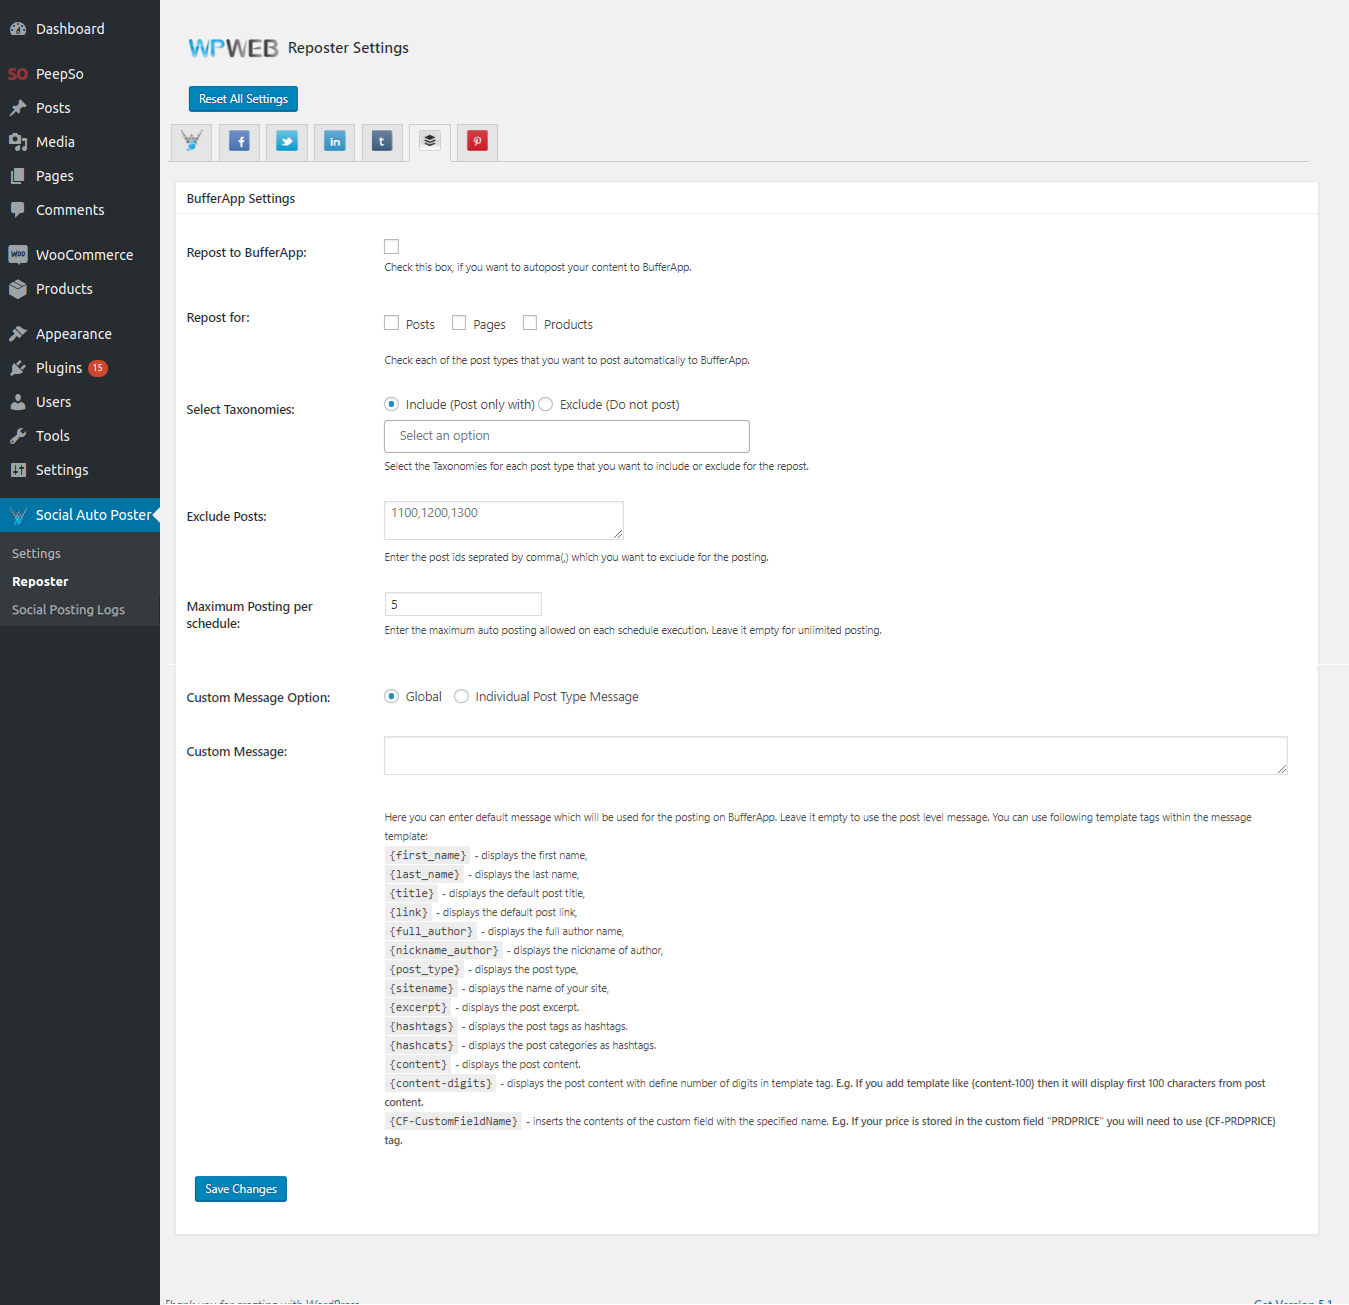
BufferApp Settings
Repost to BufferApp
Check this box, if you want to autopost your content to BufferApp.
Repost for
Check each of the post types that you want to post automatically to BufferApp.
Select Taxonomies
Select the Taxonomies for each post type that you want to include or exclude for the repost.
Exclude Posts
Enter the post ids seprated by comma(,) which you want to exclude for the posting.
Maximum Posting per schedule
Enter the maximum auto posting allowed on each schedule execution. Leave it empty for unlimited posting.
Custom message option
Here you will have two options as below.Global: Select global to apply custom message template to all post types.
Individual Post Type Message: Select this option if you want to to apply custom message template individual post types as shown in the screenshot i.e. page, product, post etc. Check the screenshot below.
Pinterest Settings
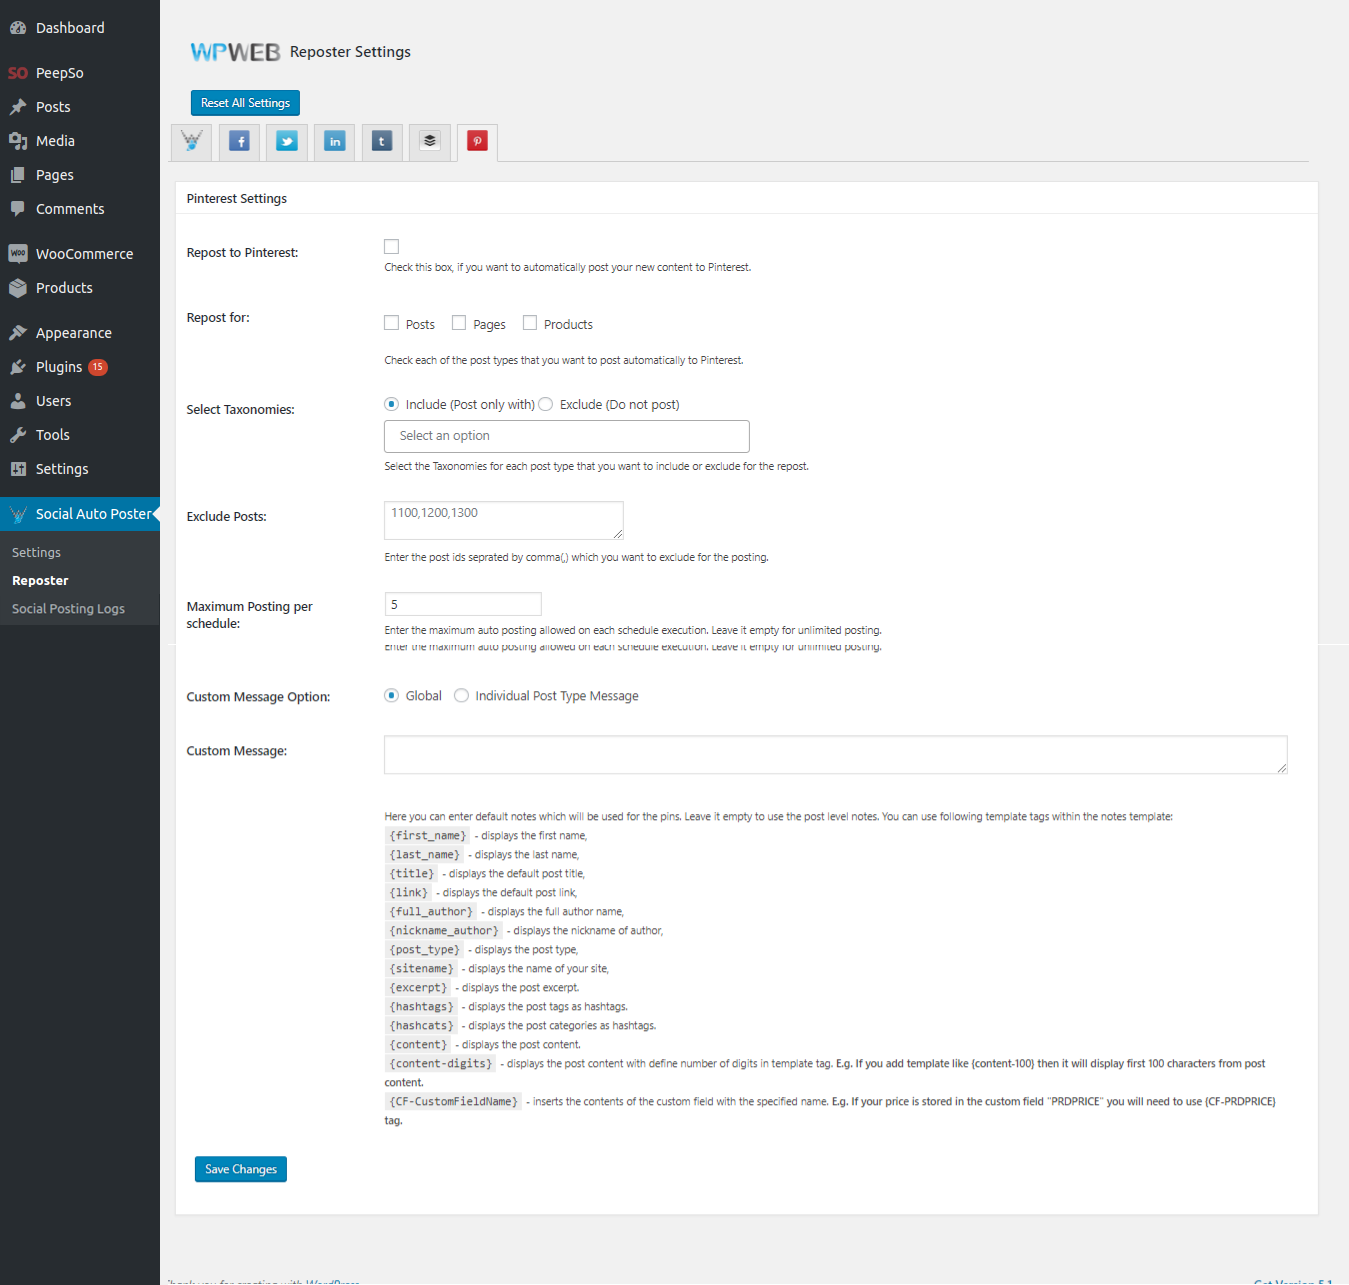
Pinterest Settings
Repost to Pinterest
Check this box, if you want to automatically post your new content to Pinterest.
Repost for
Check each of the post types that you want to post automatically to Pinterest.
Select Taxonomies
Select the Taxonomies for each post type that you want to include or exclude for the repost.
Exclude Posts
Enter the post ids seprated by comma(,) which you want to exclude for the posting.
Maximum Posting per schedule
Enter the maximum auto posting allowed on each schedule execution. Leave it empty for unlimited posting.
Custom message option
Here you will have two options as below.Global: Select global to apply custom message template to all post types.
Individual Post Type Message: Select this option if you want to to apply custom message template individual post types as shown in the screenshot i.e. page, product, post etc. Check the screenshot below.
Posts Category Setup
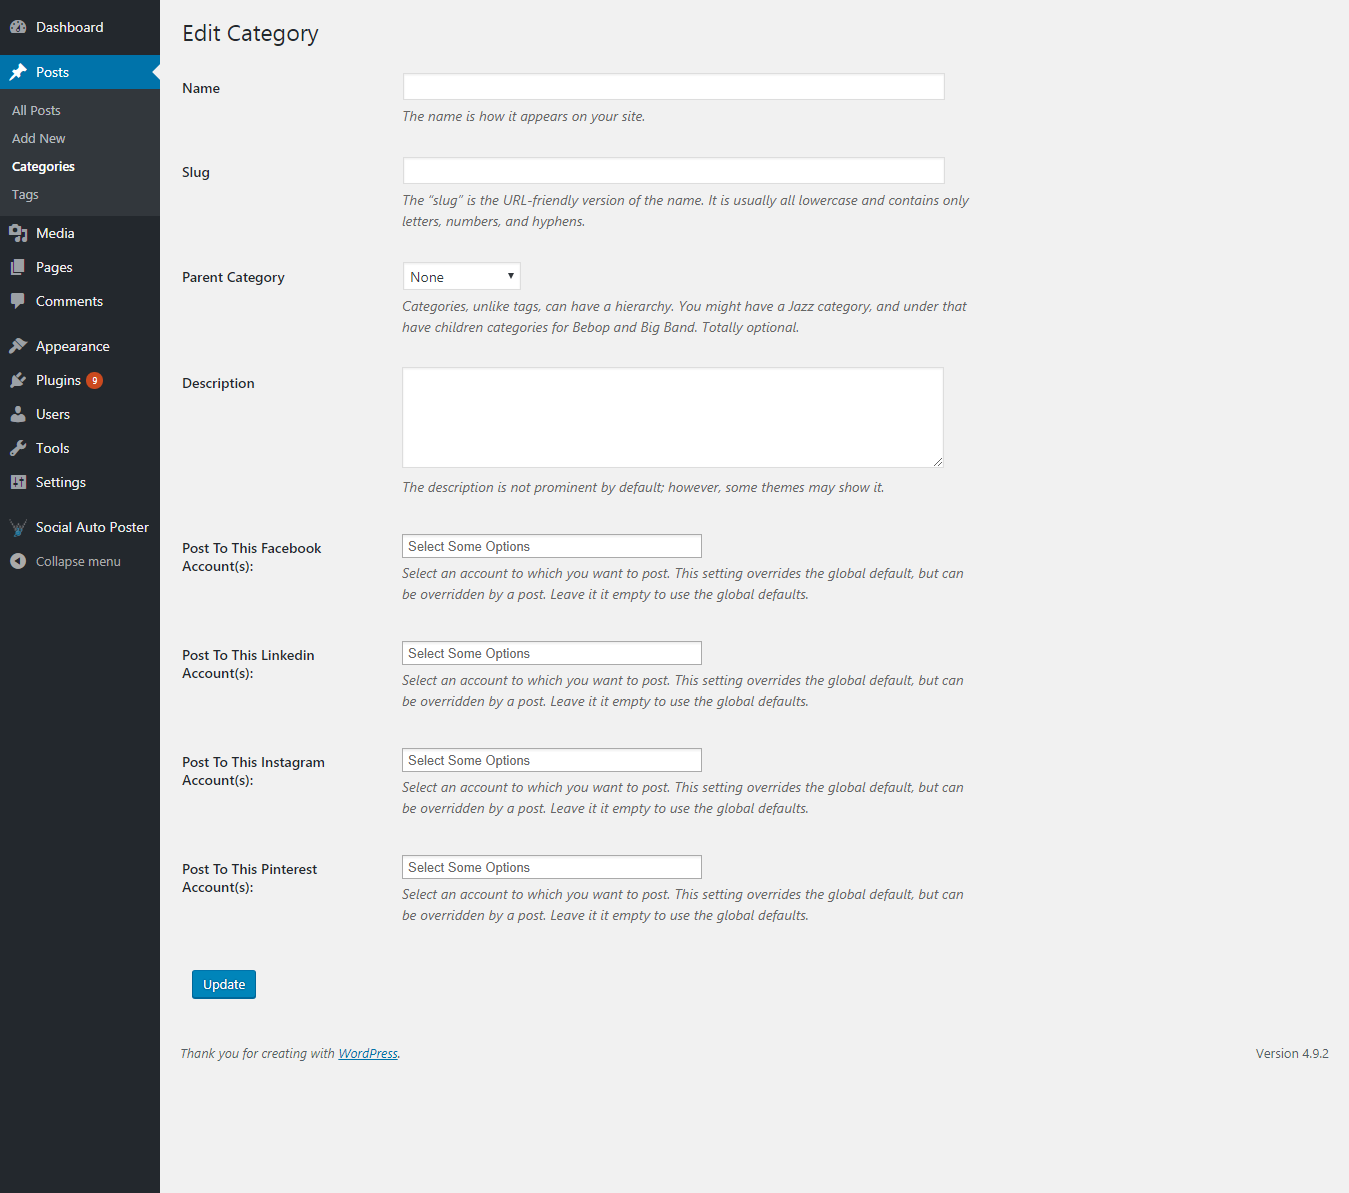
Post To This Facebook Account(s)
Select an account to which you want to post. This setting overrides the global default, but can be overridden by a post/pages. Leave it empty to use the global defaults.
Post To This Twitter Account(s)
Select an account to which you want to post. This setting overrides the global default, but can be overridden by a post/pages. Leave it empty to use the global defaults.
Post To This Linkedin Account(s)
Select an account to which you want to post. This setting overrides the global default, but can be overridden by a post/pages. Leave it it empty to use the global defaults.
Post To This Pinterest Account(s)
Select an account to which you want to post. This setting overrides the global default, but can be overridden by a post/pages. Leave it it empty to use the global defaults.
Post Meta Box Settings
Facebook Metabox
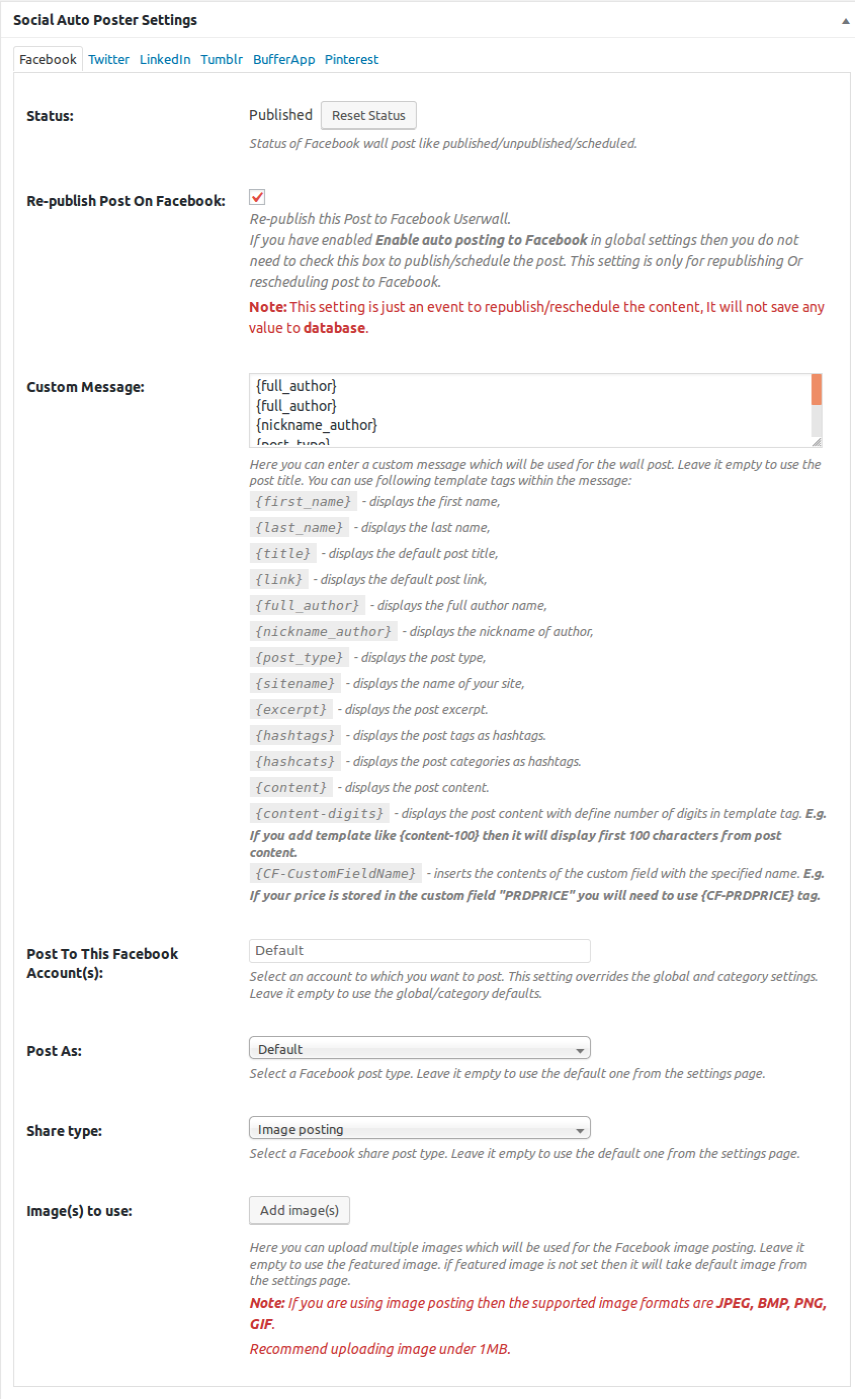
Status
Status of Facebook wall post like published/unpublished/scheduled.
Publish Post On Facebook
If you checked the box 'Enable Facebook Autoposting for' within the plugin settings, then you don't need to do anything here and the post will automatically get published to your chosen Facebook Account. If you want to publish same post again on Facebook, you need to check this box when you update the post and post will get published.
Note: If you are using scheduling method, you will be able to see below options as shown in the screenshot.

Schedule Post On Facebook
Schedule this Post to Facebook Userwall.
Immediate Posting On Facebook
Check this box if you want to publish particular post/page instantly on social networks while global setting is set to Scheduling.
Message
Here you can enter a custom message which will be used for the wall post. Leave it empty to use the post title. You can use following template tags within the message:
{first_name}- displays the first name{last_name}- displays the last name{title}- displays the post title{link}- displays the post title with link{full_author}- displays the full author name{nickname_author}- displays the nickname of author{post_type}- displays the post type{sitename}- displays the name of your site{excerpt}- displays the post excerpt{hashtags}- displays the post tags as hashtags{hashcats}- displays the post categories as hashtags{content}- displays the post content{content-digits}- displays the post content with define number of digits in template tag. E.g. If you add template like {content-100} then it will display first 100 characters from post content{CF-CustomFieldName}- inserts the contents of the custom field with the specified name. E.g. If your price is stored in the custom field "PRDPRICE" you will need to use {CF-PRDPRICE} tag.
Post To This Facebook Account(s)
Select an account to which you want to post. This setting overrides the global and category settings. Leave it empty to use the global/category defaults.
Note : Now you can set as many Facebook pages / groups as you want to post the content.
Post As
Select a Facebook post type. Leave it empty to use the default one from the settings page.
Post Image
Here you can upload a default image which will be used for the Facebook wall post. Leave it empty to use the featured image. If featured image is also blank, then it will take default image from the settings page.
Share type
Here you can Select a Facebook share post type. Leave it empty to use the default one from the settings page.
Image to use
Here you can upload multiple images which will be used for the Facebook image posting. Leave it empty to use the featured image. if featured image is not set then it will take default image from the settings page.
Note: If you are using image posting then the supported image formats are JPEG, BMP, PNG, GIF.
Facebook Status Update Text
Within this option, you can customize the message which will get posted to your chosen Facebook Account. If you want to use the one from the Settings Page, then you don't need to change anything here. You can customize this content as per your needs. There are also several template tags you can use to customize the content. The template tags will then be replaced with the related information. The available tags are:
{first_name}- displays the first name{last_name}- displays the last name{title}- displays the post title{link}- displays the post title with link{full_author}- displays the full author name{nickname_author}- displays the nickname of author{post_type}- displays the post type{sitename}- displays the name of your site{excerpt}- displays the post excerpt{hashtags}- displays the post tags as hashtags{hashcats}- displays the post categories as hashtags{content}- displays the post content{content-digits}- displays the post content with define number of digits in template tag. E.g. If you add template like {content-100} then it will display first 100 characters from post content{CF-CustomFieldName}- inserts the contents of the custom field with the specified name. E.g. If your price is stored in the custom field "PRDPRICE" you will need to use {CF-PRDPRICE} tag.
Twitter Metabox
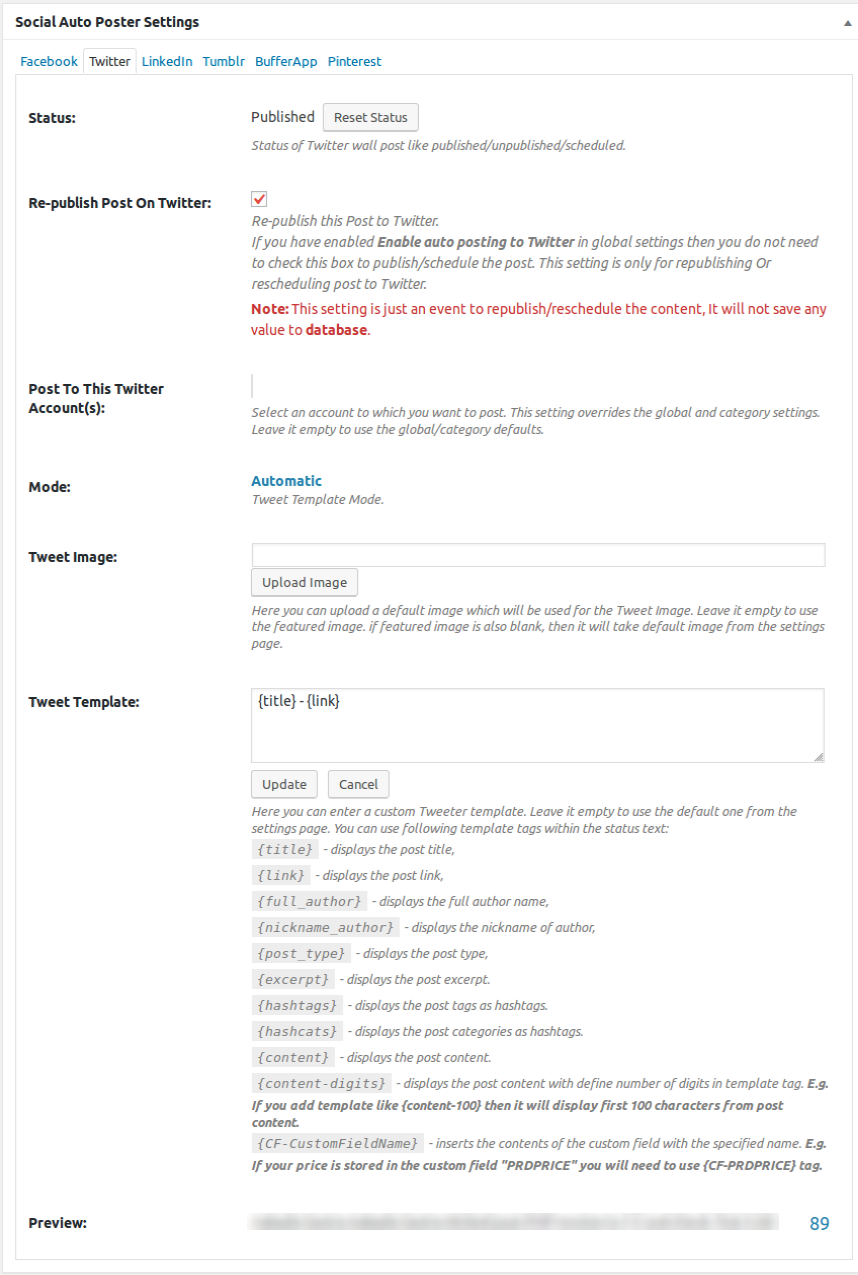
Status
Status of Twitter wall post like published/unpublished.
Publish Post On Twitter
If you checked the box “Enable Twitter Autoposting for” within the plugin settings, then you don't need to do anything here and the post will automatically get published to your Twitter Account.
Post To This Twitter Account(s)
Select an account to which you want to post. This setting overrides the global and category settings. Leave it empty to use the global/category defaults.
Note: Now you can set as many Twitter accounts as you want to autopost the content.
Mode
Display Twitter Template Mode.
Tweet Image
Here you can upload a default image which will be used for the Tweet Image. Leave it empty to use the featured image. If featured image is also blank, then it will take default image from the settings page.
Tweet Template
Within this option, you can customize the template which will get posted to your Twitter Account. If you want to use the one from the Settings Page, then you don't need to change anything here. There are also several template tags you can use to customize the content. The template tags will then be replaced with the related information. The available tags are:
{title}- displays the post title{link}- displays the post link{full_author}- displays the full author name{nickname_author}- displays the nickname of author{post_type}- displays the post type{excerpt}- displays the post excerpt{hashtags}- displays the post tags as hashtags{hashcats}- displays the post categories as hashtags{content}- displays the post content{content-digits}- displays the post content with define number of digits in template tag. E.g. If you add template like {content-100} then it will display first 100 characters from post content{CF-CustomFieldName}- inserts the contents of the custom field with the specified name. E.g. If your price is stored in the custom field "PRDPRICE" you will need to use {CF-PRDPRICE} tag.
Preview
Display Preview of selected Template.
LinkedIn Metabox
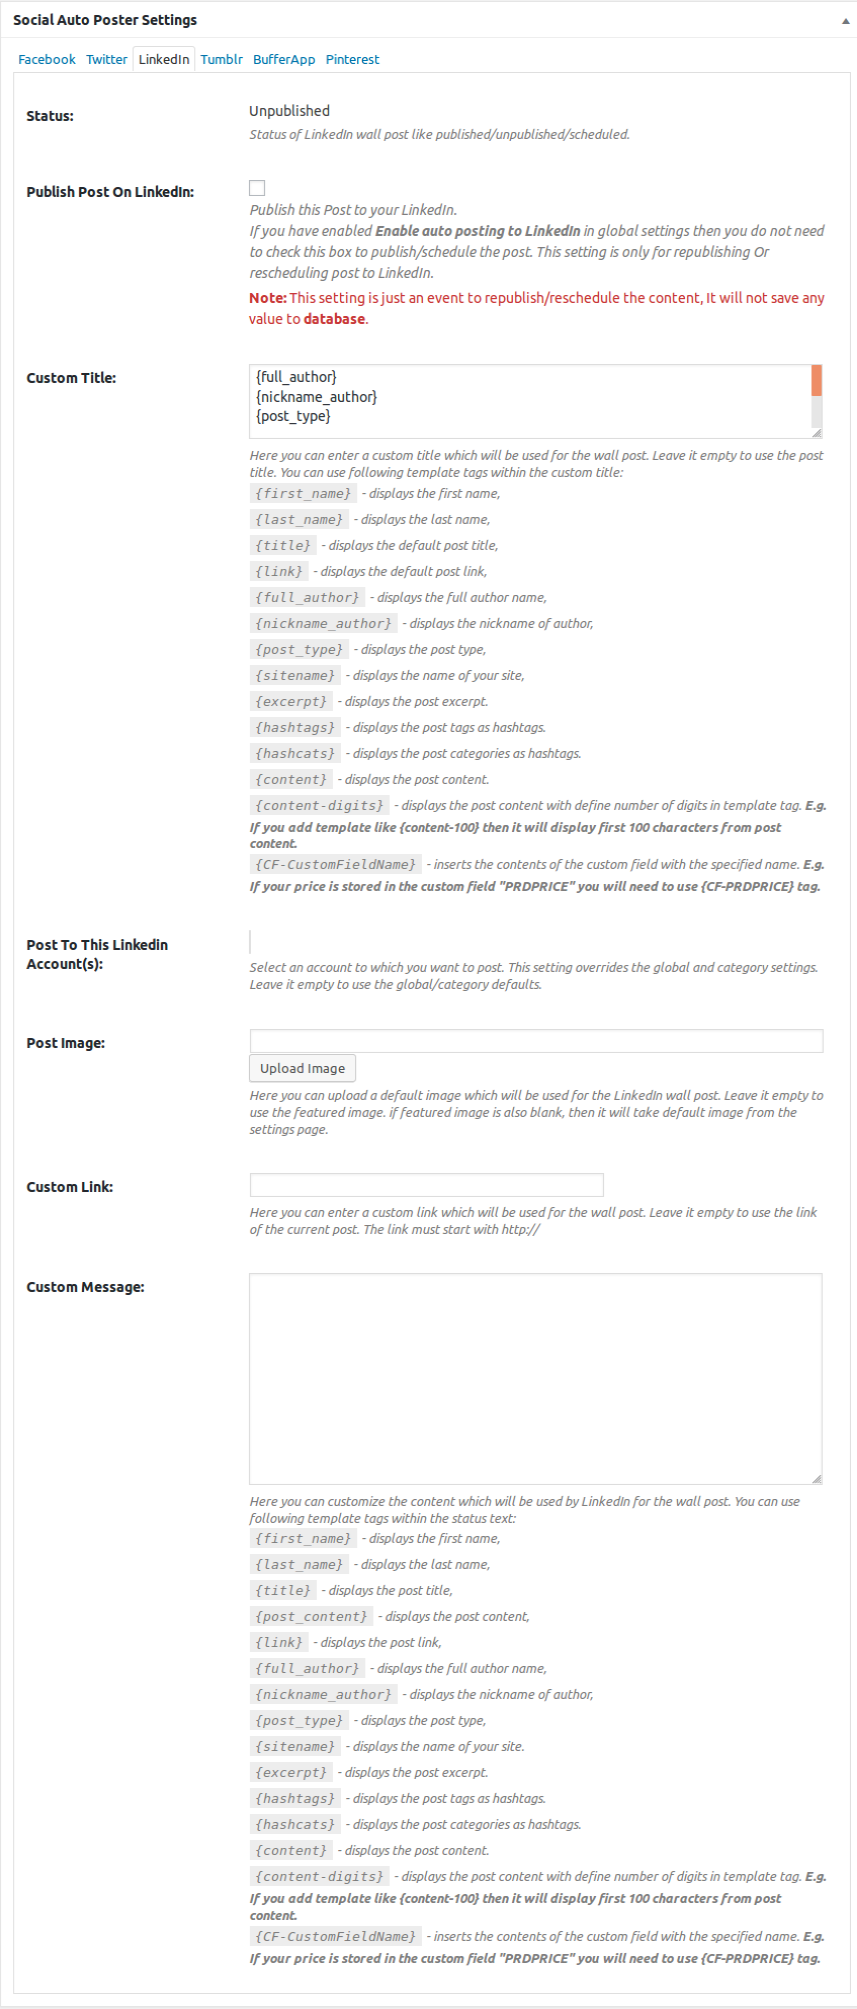
Note: LinkedIn posting character limitation is 400 character.
Status
Status of LinkedIn wall post like published/unpublished.
Publish Post On LinkedIn
If you checked the box 'Enable LinkedIn Autoposting for' within the plugin settings, then you don't need to do anything here and the post will automatically get published to your LinkedIn Account.
Custom Title
Here you can enter a custom title which will be used for the wall post. Leave it empty to use the post title. You can use following template tags within the custom title:
{first_name}- displays the first name{last_name}- displays the last name{title}- displays the post title{link}- displays the post title with link{full_author}- displays the full author name{nickname_author}- displays the nickname of author{post_type}- displays the post type{sitename}- displays the name of your site{excerpt}- displays the post excerpt{hashtags}- displays the post tags as hashtags{hashcats}- displays the post categories as hashtags{content}- displays the post content{content-digits}- displays the post content with define number of digits in template tag. E.g. If you add template like {content-100} then it will display first 100 characters from post content{CF-CustomFieldName}- inserts the contents of the custom field with the specified name. E.g. If your price is stored in the custom field "PRDPRICE" you will need to use {CF-PRDPRICE} tag.
Post To This LinkedIn Account(s)
Select an account to which you want to post. This setting overrides the global and category settings. Leave it empty to use the global/category defaults.
Note: Now you can set as many LinkedIn company pages/groups as you want to post the content.
Post Image
Here you can upload a default image which will be used for the LinkedIn wall post. Leave it empty to use the featured image. If featured image is also blank, then it will take default image from the settings page.
Custom Link
Here you can enter a custom link which will be used for the wall post. Leave it empty to use the link of the current post. The link must start with http://
Custom Message
Here you can customize the comments which will be used by LinkedIn for the wall post. There are also several template tags you can use to customize the content. The template tags will then be replaced with the related information. The available tags are:
{first_name}- displays the first name{last_name}- displays the last name{title}- displays the post title{post_content}- displays the post content{link}- displays the post link{full_author}- displays the full author name{nickname_author}- displays the nickname of author{post_type}- displays the post type{sitename}- displays the name of your site{excerpt}- displays the post excerpt{hashtags}- displays the post tags as hashtags{hashcats}- displays the post categories as hashtags{content}- displays the post content{content-digits}- displays the post content with define number of digits in template tag. E.g. If you add template like {content-100} then it will display first 100 characters from post content{CF-CustomFieldName}- inserts the contents of the custom field with the specified name. E.g. If your price is stored in the custom field "PRDPRICE" you will need to use {CF-PRDPRICE} tag.
Tumblr Metabox
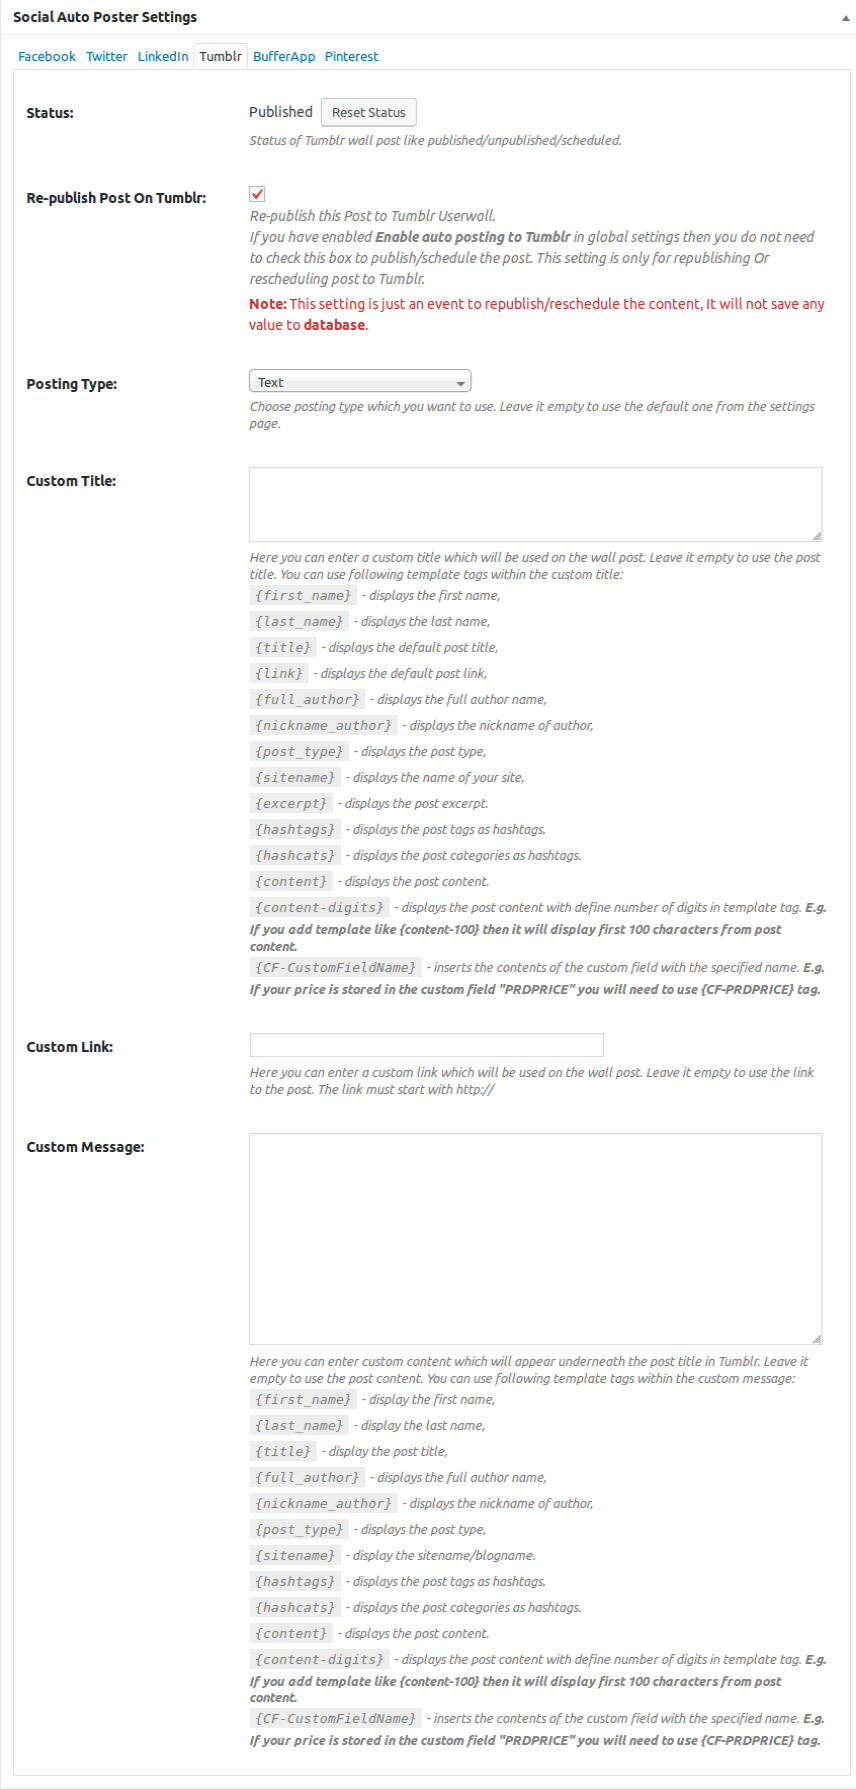
Status
Status of Tumblr wall post like published/unpublished.
Publish Post On Tumblr
If you checked the box 'Enable Tumblr Autoposting for' within the plugin settings, then you don't need to do anything here and the post will automatically get published to your Tumblr Account.
Posting Type
Choose posting type which you want to use. Leave it empty to use the default one from the settings page.
Custom Title
Here you can enter a custom title which will be used for the wall post. Leave it empty to use the post title. You can use following template tags within the custom title:
{first_name}- displays the first name{last_name}- displays the last name{title}- displays the post title{link}- displays the post title with link{full_author}- displays the full author name{nickname_author}- displays the nickname of author{post_type}- displays the post type{sitename}- displays the name of your site{excerpt}- displays the post excerpt{hashtags}- displays the post tags as hashtags{hashcats}- displays the post categories as hashtags{content}- displays the post content{content-digits}- displays the post content with define number of digits in template tag. E.g. If you add template like {content-100} then it will display first 100 characters from post content{CF-CustomFieldName}- inserts the contents of the custom field with the specified name. E.g. If your price is stored in the custom field "PRDPRICE" you will need to use {CF-PRDPRICE} tag.
Custom Link
Here you can enter a custom link which will be used for the wall post. Leave it empty to use the link of the current post. The link must start with http://
Custom Message
Here you can enter custom content which will appear underneath the post title in Tumblr. There are also several template tags you can use to customize the content. Leave it empty to use the post content. The template tags will then be replaced with the related information. The available tags are:
{first_name}- displays the first name{last_name}- displays the last name{title}- displays the post title{full_author}- displays the full author name{nickname_author}- displays the nickname of author{post_type}- displays the post type{sitename}- displays the name of your sitename/blogname{hashtags}- displays the post tags as hashtags{hashcats}- displays the post categories as hashtags{content}- displays the post content{content-digits}- displays the post content with define number of digits in template tag. E.g. If you add template like {content-100} then it will display first 100 characters from post content{CF-CustomFieldName}- inserts the contents of the custom field with the specified name. E.g. If your price is stored in the custom field "PRDPRICE" you will need to use {CF-PRDPRICE} tag.
BufferApp Metabox
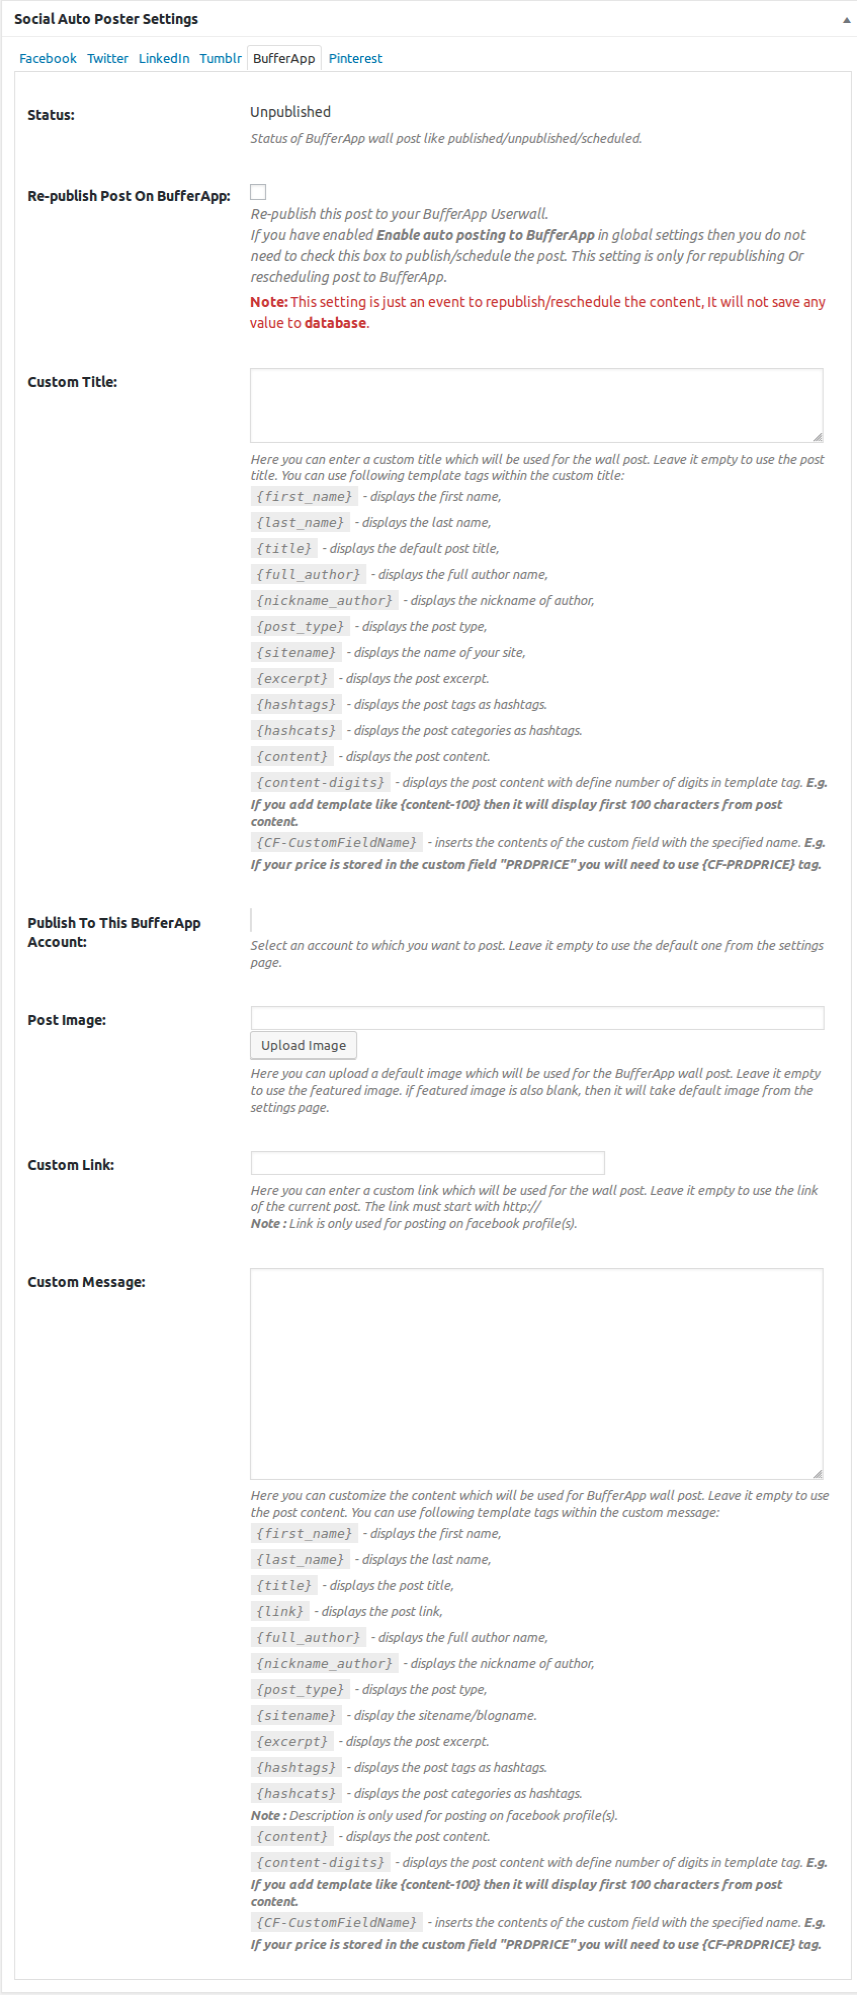
Status
Status of BufferApp wall post like published/unpublished.
Publish Post On BufferApp
If you checked the box 'Enable BufferApp Autoposting for' within the plugin settings, then you don't need to do anything here and the post will automatically get published to your chosen BufferApp Account.
Custom Title
Here you can enter a custom title which will be used for the wall post. Leave it empty to use the post title. You can use following template tags within the custom title:
{first_name}- displays the first name{last_name}- displays the last name{title}- displays the post title{link}- displays the post title with link{full_author}- displays the full author name{nickname_author}- displays the nickname of author{post_type}- displays the post type{sitename}- displays the name of your site{excerpt}- displays the post excerpt{hashtags}- displays the post tags as hashtags{hashcats}- displays the post categories as hashtags{content}- displays the post content{content-digits}- displays the post content with define number of digits in template tag. E.g. If you add template like {content-100} then it will display first 100 characters from post content{CF-CustomFieldName}- inserts the contents of the custom field with the specified name. E.g. If your price is stored in the custom field "PRDPRICE" you will need to use {CF-PRDPRICE} tag.
Post To This BufferApp Account
Select an account to which you want to post. Leave it empty to use the default one from the settings page.
Post Image
Here you can upload a default image which will be used for the BufferApp wall post. Leave it empty to use the featured image. If featured image is also blank, then it will take default image from the settings page.
Custom Link
Here you can enter a custom link which will be used for the wall post. Leave it empty to use the link of the current post. The link must start with http://
Custom Message
Here you can customize the content which will be used for BufferApp wall post. Leave it empty to use description of the current post. There are also several template tags you can use to customize the content. The template tags will then be replaced with the related information. The available tags are:
{first_name}- displays the first name{last_name}- displays the last name{title}- displays the post title{link}- displays the post link{full_author}- displays the full author name{nickname_author}- displays the nickname of author{post_type}- displays the post type{sitename}- displays the name of your site{excerpt}- displays the post excerpt{hashtags}- displays the post tags as hashtags{hashcats}- displays the post categories as hashtags{content}- displays the post content{content-digits}- displays the post content with define number of digits in template tag. E.g. If you add template like {content-100} then it will display first 100 characters from post content{CF-CustomFieldName}- inserts the contents of the custom field with the specified name. E.g. If your price is stored in the custom field "PRDPRICE" you will need to use {CF-PRDPRICE} tag.
Pinterest Metabox
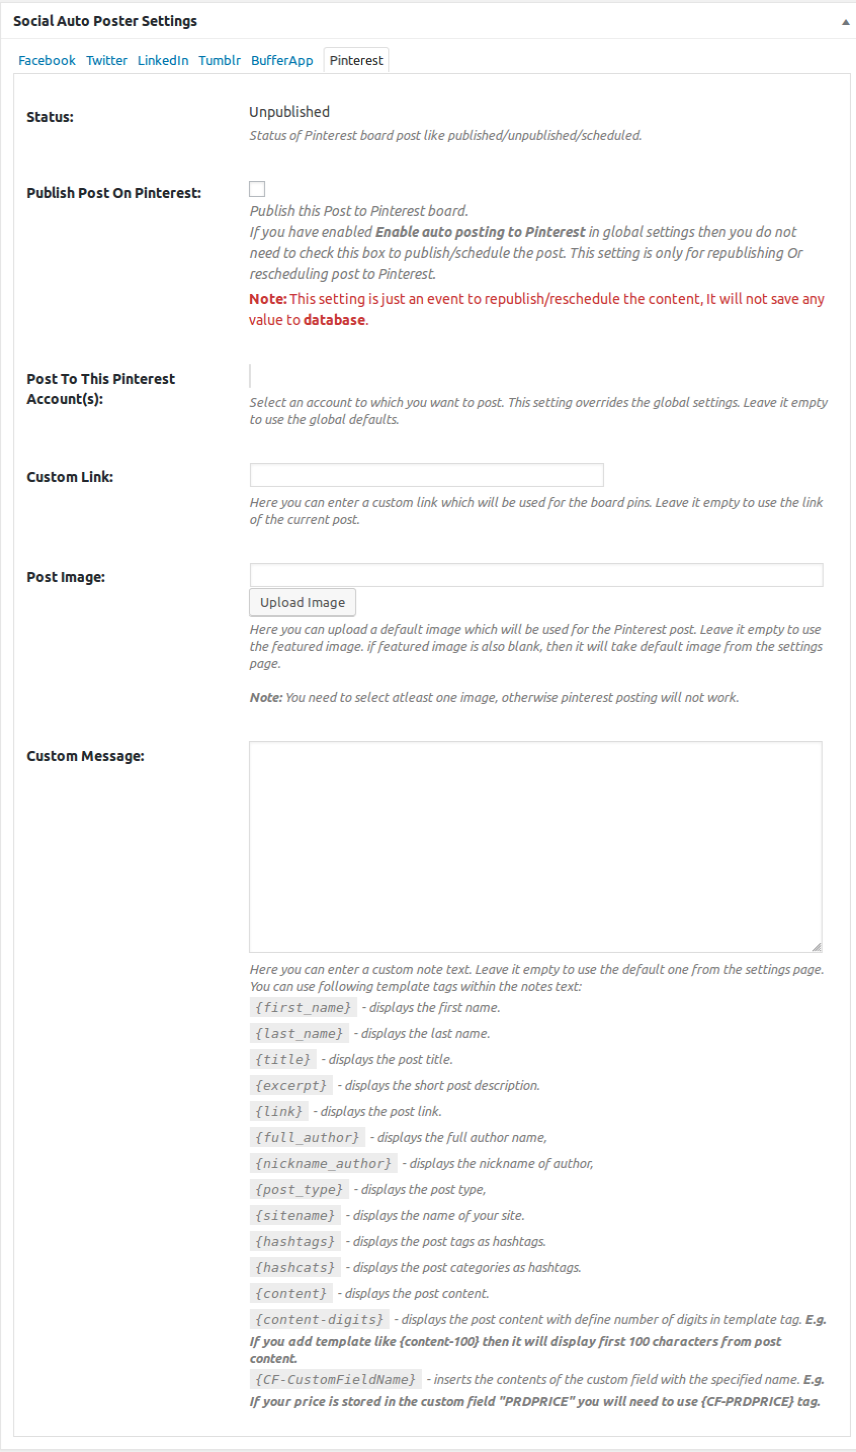
Status
Status of Pinterest board post like published/unpublished/scheduled.
Publish Post On Pinterest
Check this box to publish this Post to Pinterest board.
Post To This Pinterest Account(s)
Here you can enter a custom link which will be used for the board pins. Leave it empty to use the link of the current post.
Post Image
Here you can upload a default image which will be used for the Pinterest post. Leave it empty to use the featured image. If featured image is also blank, then it will take default image from the settings page.
Note: You need to select atleast one image, otherwise Pinterest posting will not work.
Custom Message
Here you can enter a custom note text. Leave it empty to use the default one from the settings page. You can use following template tags within the notes text:
{first_name}- displays the first name{last_name}- displays the last name{title}- displays the post title{excerpt}- displays the short post description{link}- displays the post link{full_author}- displays the full author name{nickname_author}- displays the nickname of author{post_type}- displays the post type{sitename}- displays the name of your site{hashtags}- displays the post tags as hashtags{hashcats}- displays the post categories as hashtags{content}- displays the post content{content-digits}- displays the post content with define number of digits in template tag. E.g. If you add template like {content-100} then it will display first 100 characters from post content{CF-CustomFieldName}- inserts the contents of the custom field with the specified name. E.g. If your price is stored in the custom field "PRDPRICE" you will need to use {CF-PRDPRICE} tag.
Schedule Date And Time Metabox
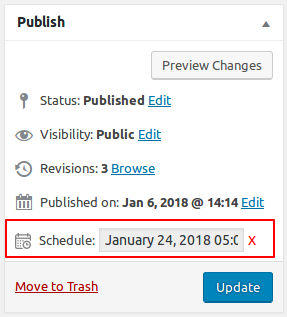
Schedule Date & Time
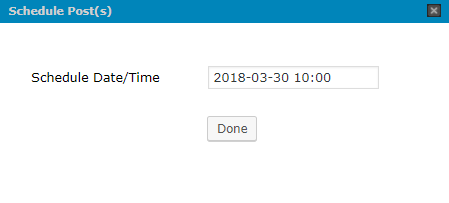
When you set Schedule Wall Posts option as hourly, you will get option to set Schedule Date & Time at page/post level.
Manage Schedules
A list of all unpublished, published and scheduled posts is kept and can be viewed from Social Auto Poster > Manage Schedules.
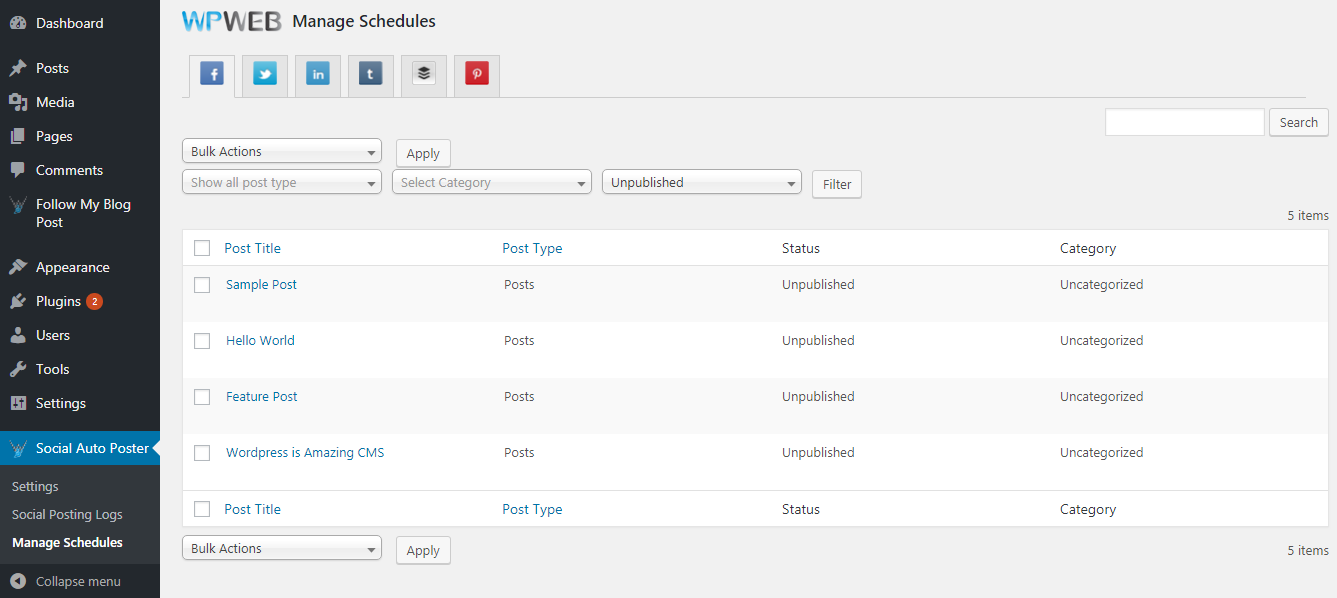
As shown above, for Manage Schedules: Post Title, Post Type, Status (published, unpublished or scheduled), and a date is displayed. The data can be filtered by post type or status.
You can schedule any post/page individually or via bulk action. you also have an option to unschedule any post/page which you have already scheduled but not published yet.
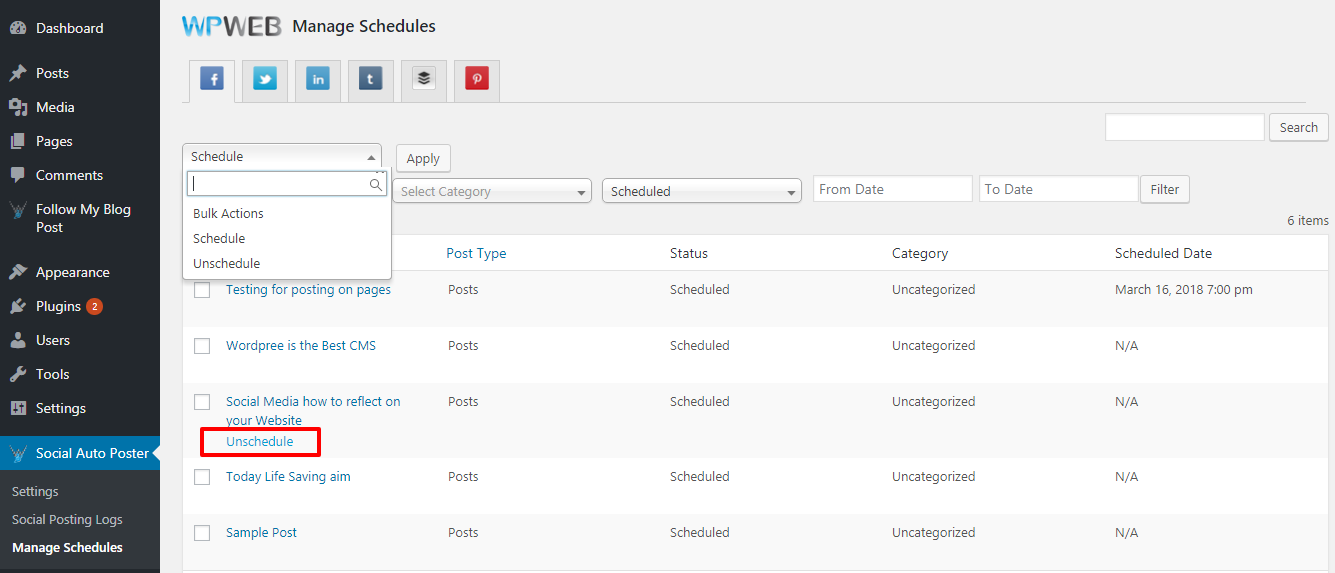
When you set Schedule Wall Posts option as hourly, you will get option to set Schedule Date & Time as shown in bellow screenshot
By: WPWeb
Email: support@wpweb.co.in
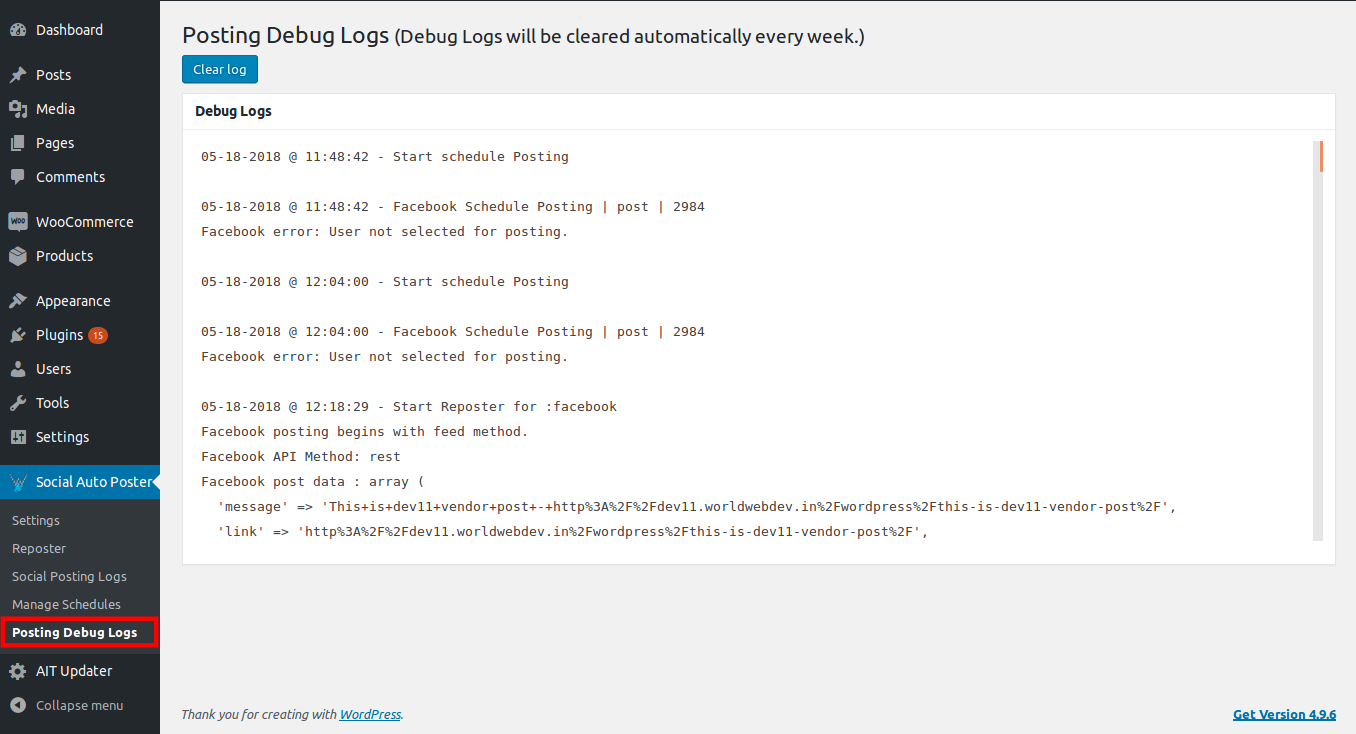
Social Posting Logs
Social Posting Logs
A record of every Social Posting Activity is kept and can be viewed from Social Auto Poster > Social Posting Logs.
As shown above, for every Social Posting Activity: Post Title, Post Type, Social Type and a Date for the posting displayed. This log data can be filtered by post title, social type and posting date. You can see more details like posted content with account details by click on view details link. The popup with all details look like as mentioned in the image below:
Social Posting Reports
A record of every Social Posting Activity is kept and available for graphic representation from Social Auto Poster > Social Posting Logs.